sandboxd-o


sandboxd-o: Containerd CRI and gVisor shim based sandbox-like runtime, orchestrator
[!WARNING]
This project provides a sandbox-like environment, but fundamentally operates on top of container technology. (Containers are not a sandbox!)
Even though gVisor offers stronger isolation, there are still limitations compared to more robust isolation mechanisms such as Firecracker Micro-VMs or KVM-based virtualization.
Therefore, this project should be used with those limitations in mind. It is recommended to deploy it in a dedicated computing environment (worker nodes) rather than running it alongside environments containing critical production data.
While the likelihood of container escape may be low, it is important to remember that container technology does not fundamentally provide a perfectly isolated sandbox environment.
- Overview
- About: Technical Architecture
- Resource Model/Objects
- Sandbox/Container State
- Installation, Build and Usage
- Configuration
- Testing
- Appendix A. Performance and Benchmarking
- Appendix B. Infrastructure Cost Comparison (vs K8s)
- Appendix C. Reference
- Appendix D. API Documentation
- Appendix E. FAQ, Troubleshooting and Best Practices
- Appendix F. Contribution and Contributors
- Appendix G. MIT License
Overview
sandboxd-o, officially named Sandboxd-OCI(Open Container Initiative) or Sandboxd-Orchestrator, is a sandbox runtime and orchestrator built on top of Containerd CRI and the gVisor shim.
This project was developed to provide an isolated environment using container technology and serves as a replacement for the previous Container Provisioner with Kubernetes.
The previous project required deploying a Kubernetes cluster, introducing unnecessary overhead simply to leverage Kubernetes orchestration capabilities. In contrast, sandboxd-o includes orchestration functionality natively and is designed as a lightweight container-based runtime focused solely on sandbox environments.
This project is actively used as a core component of the sandbox environment(VM) in N4U Wargame and is being developed with the goal of enabling stable operation in real production environments.
About: Technical Architecture
This project is broadly divided into three main components. Each component is described below, and the overall architecture was designed by referencing and simplifying the structure of Kubernetes.
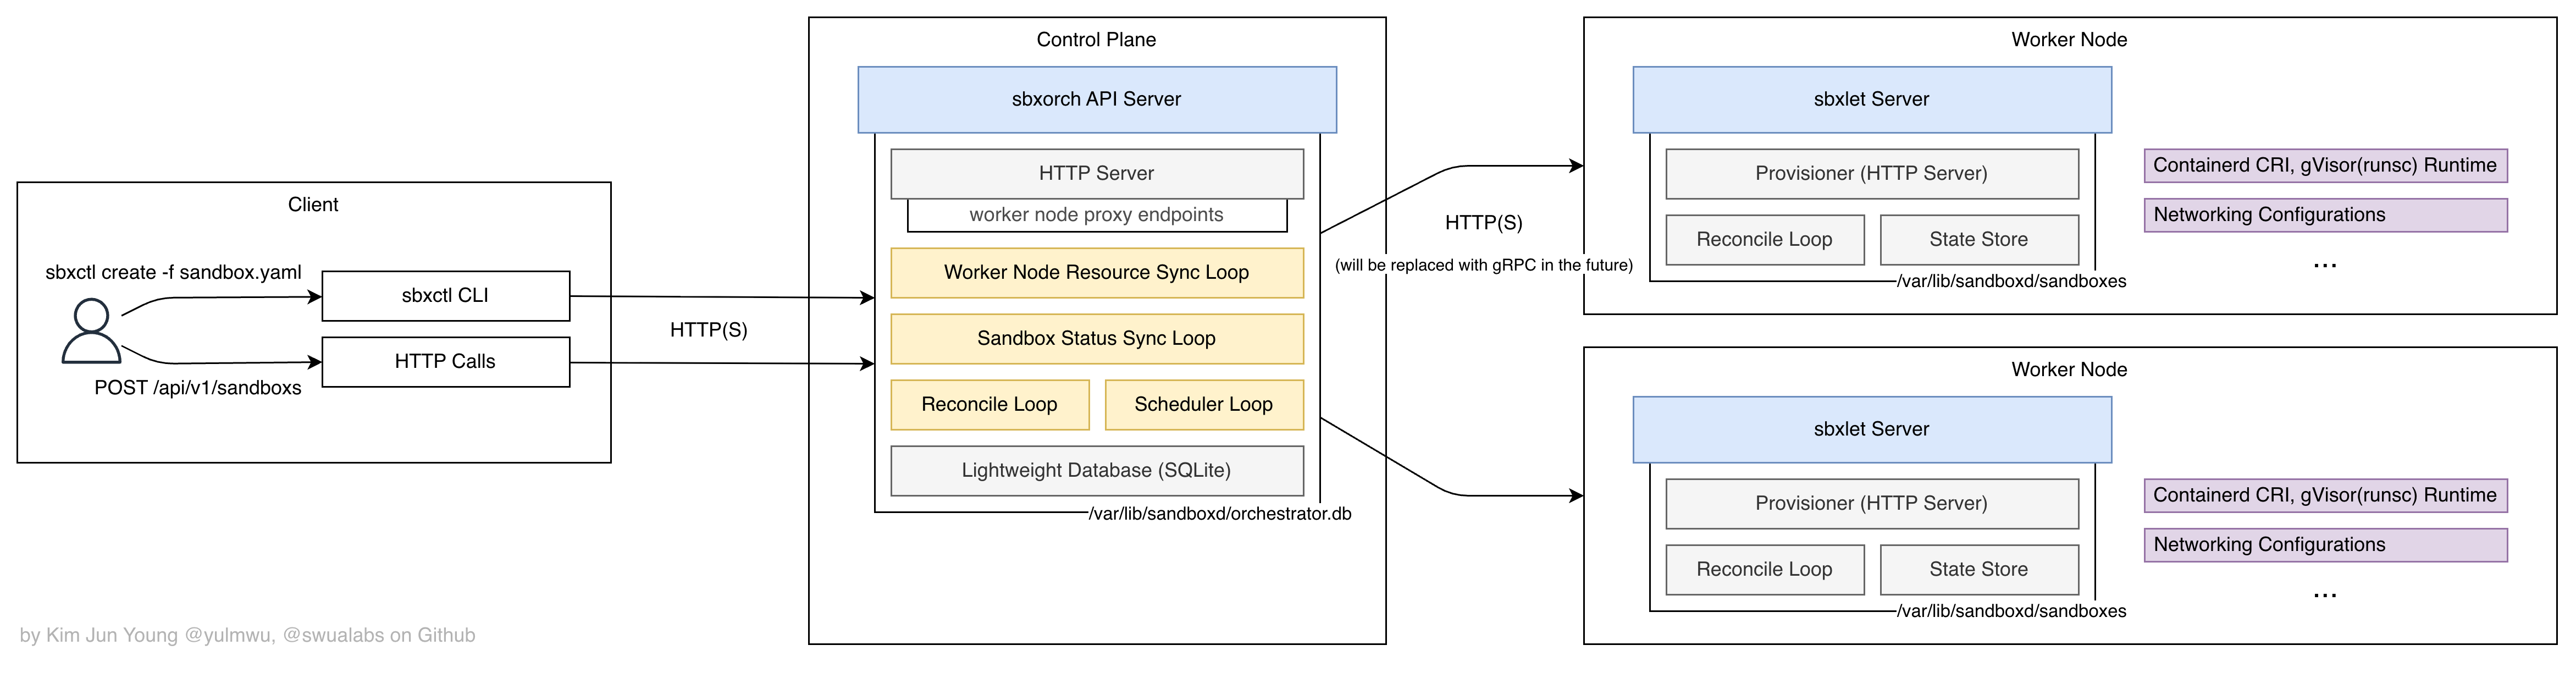
Sandboxd Let(sbxlet) Runtime
This component corresponds to Kubernetes’ kubelet and is deployed to each worker node as a daemon/agent responsible for provisioning and managing sandboxes and containers.
It uses gVisor as the container runtime to provide an isolated sandbox environment and manages sandboxes and networking based on PodSandbox from Containerd CRI.
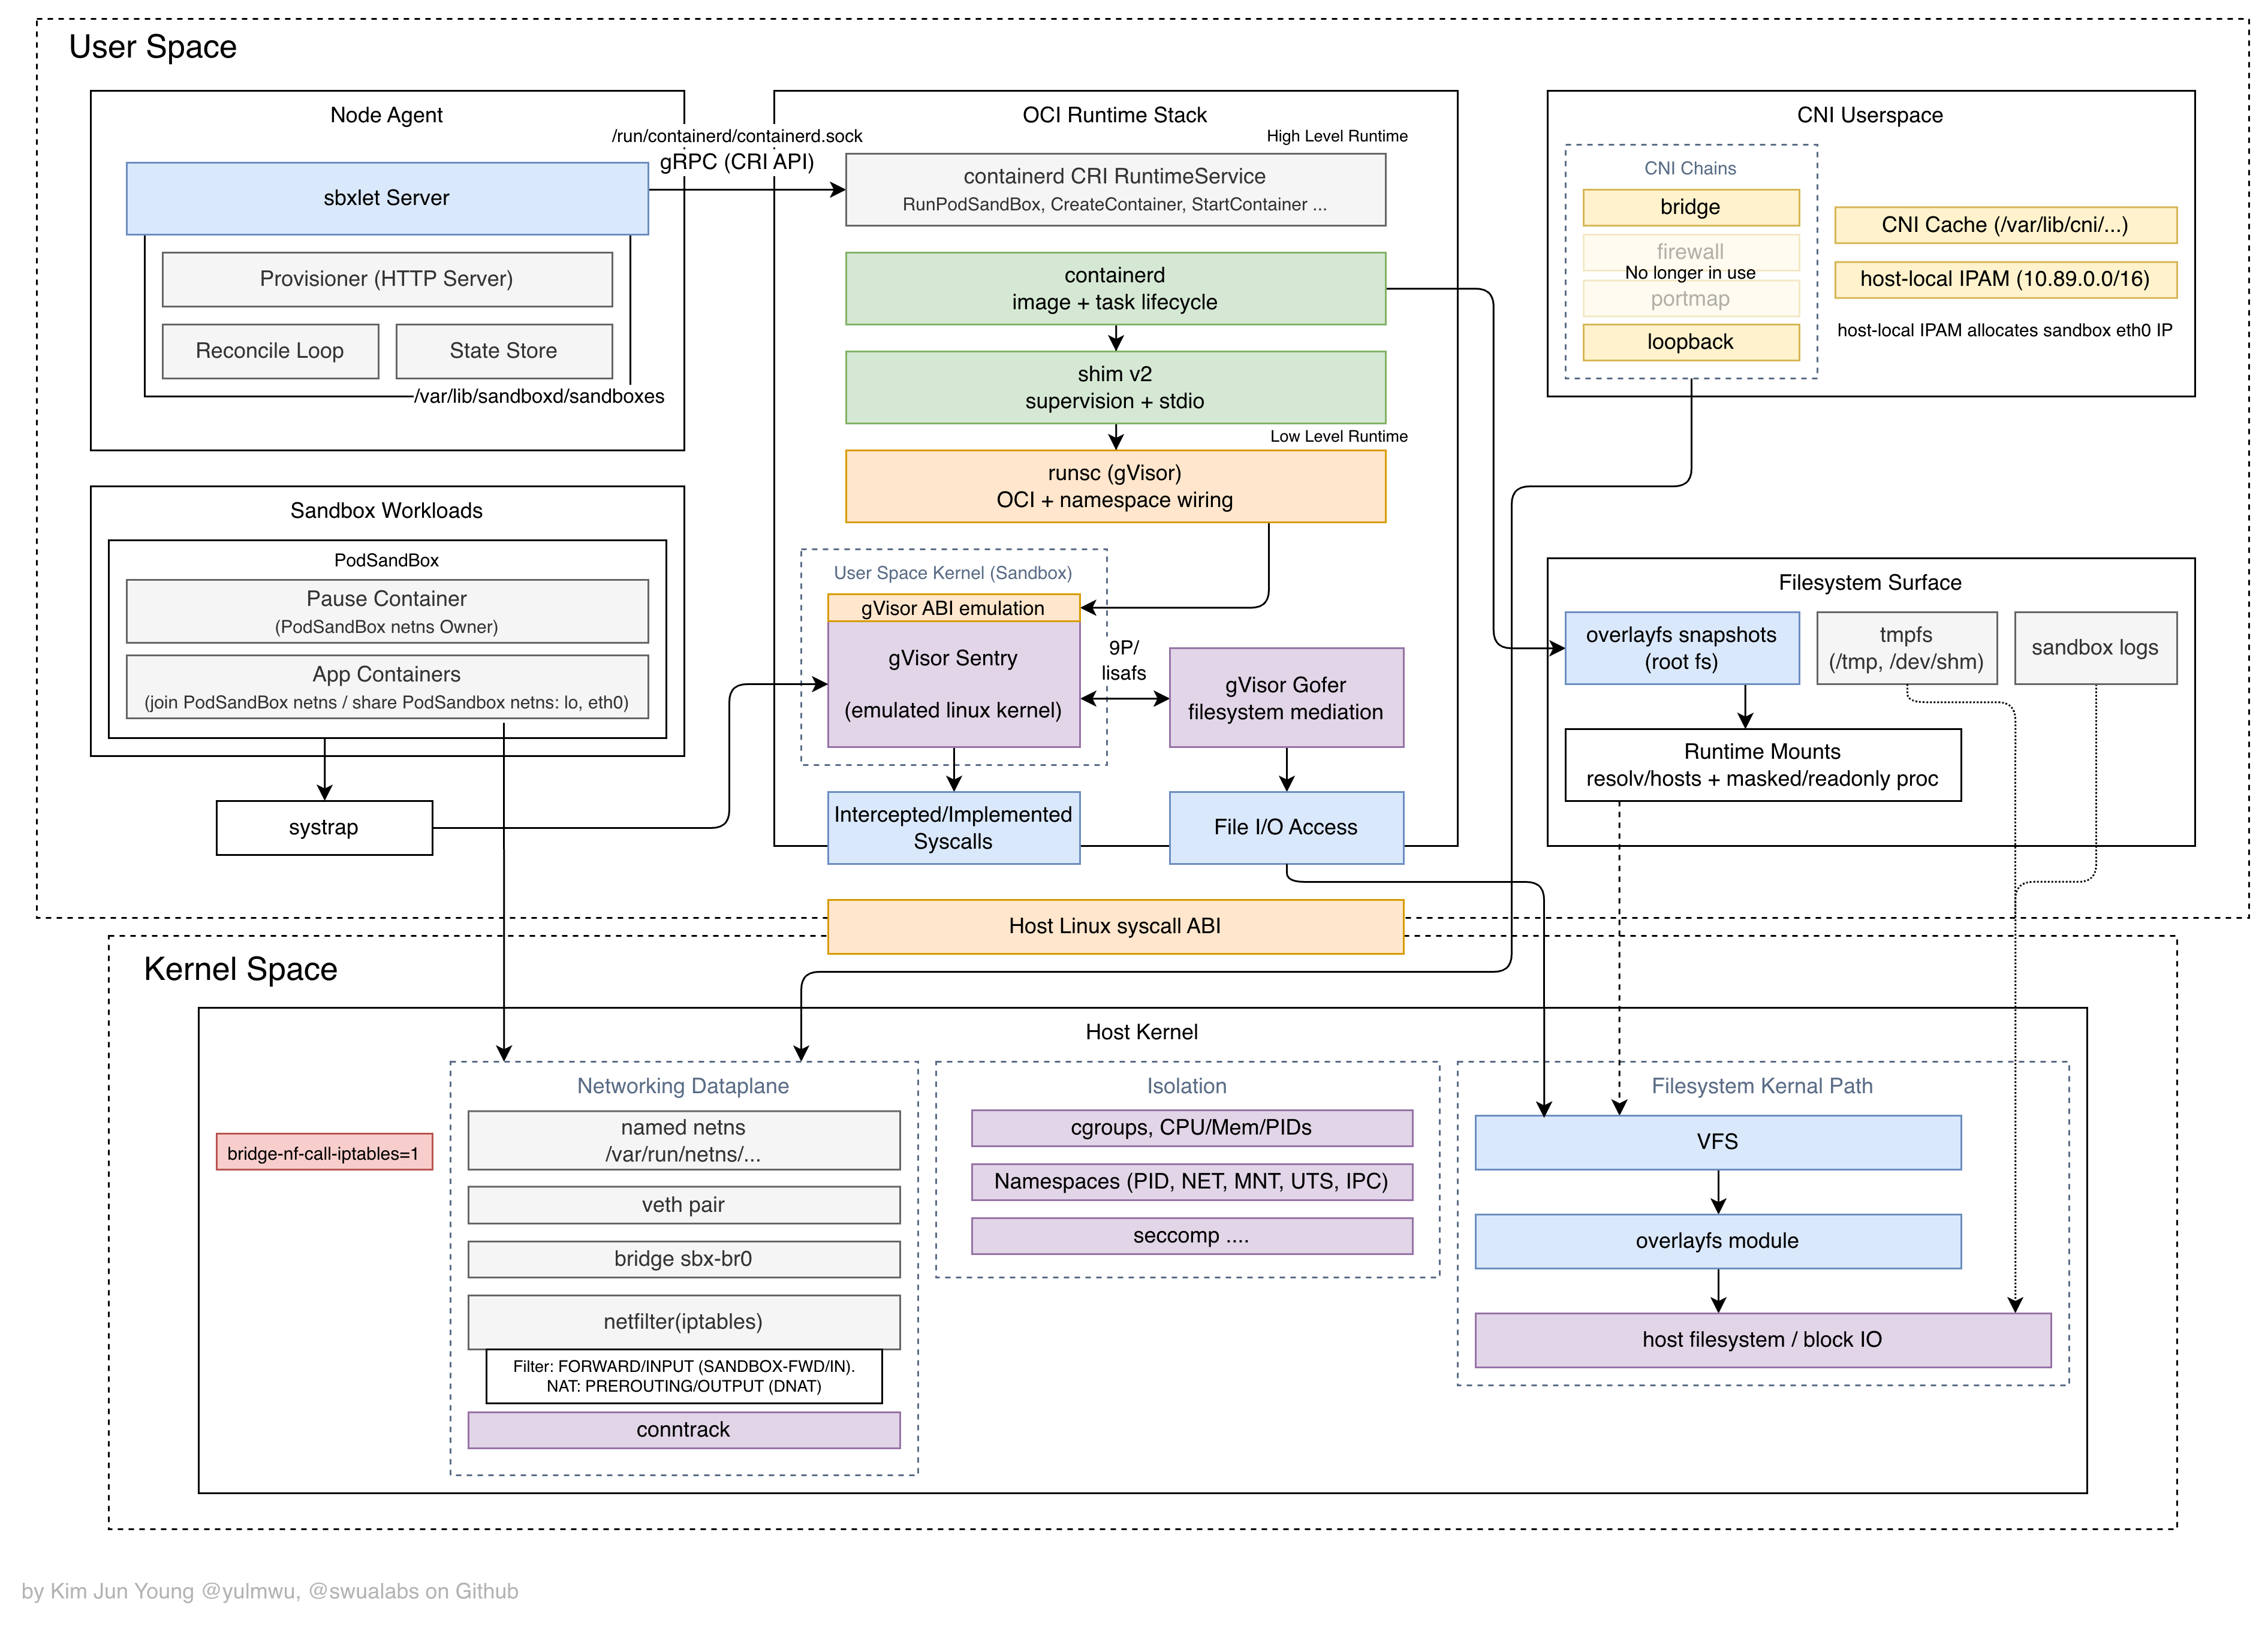
To achieve the project’s core goal of providing “the strongest possible isolation within practical limits,” sandbox environments are built using runsc, the runtime of gVisor.
[!NOTE]
gVisor is a technology that strengthens isolation between containers and the host system by emulating the Linux kernel. It intercepts and handles system calls through a user-space kernel called Sentry. This prevents containers from directly interacting with the host system and improves security.
In addition, gVisor uses a user-space filesystem component called Gofer to mediate container filesystem access, preventing containers from directly accessing the host filesystem.
The filesystem surface can leverage overlayfs to provide a sandbox filesystem isolated from the host filesystem.
This project follows the principle that once a sandbox is created, it must be treated as disposable and single-use. As a result, filesystems are never shared across sandboxes or persisted beyond sandbox lifetime.
Within a single sandbox, however, the specification may define shared ephemeral volumes that can be mounted by multiple containers in that sandbox.
Networking Model
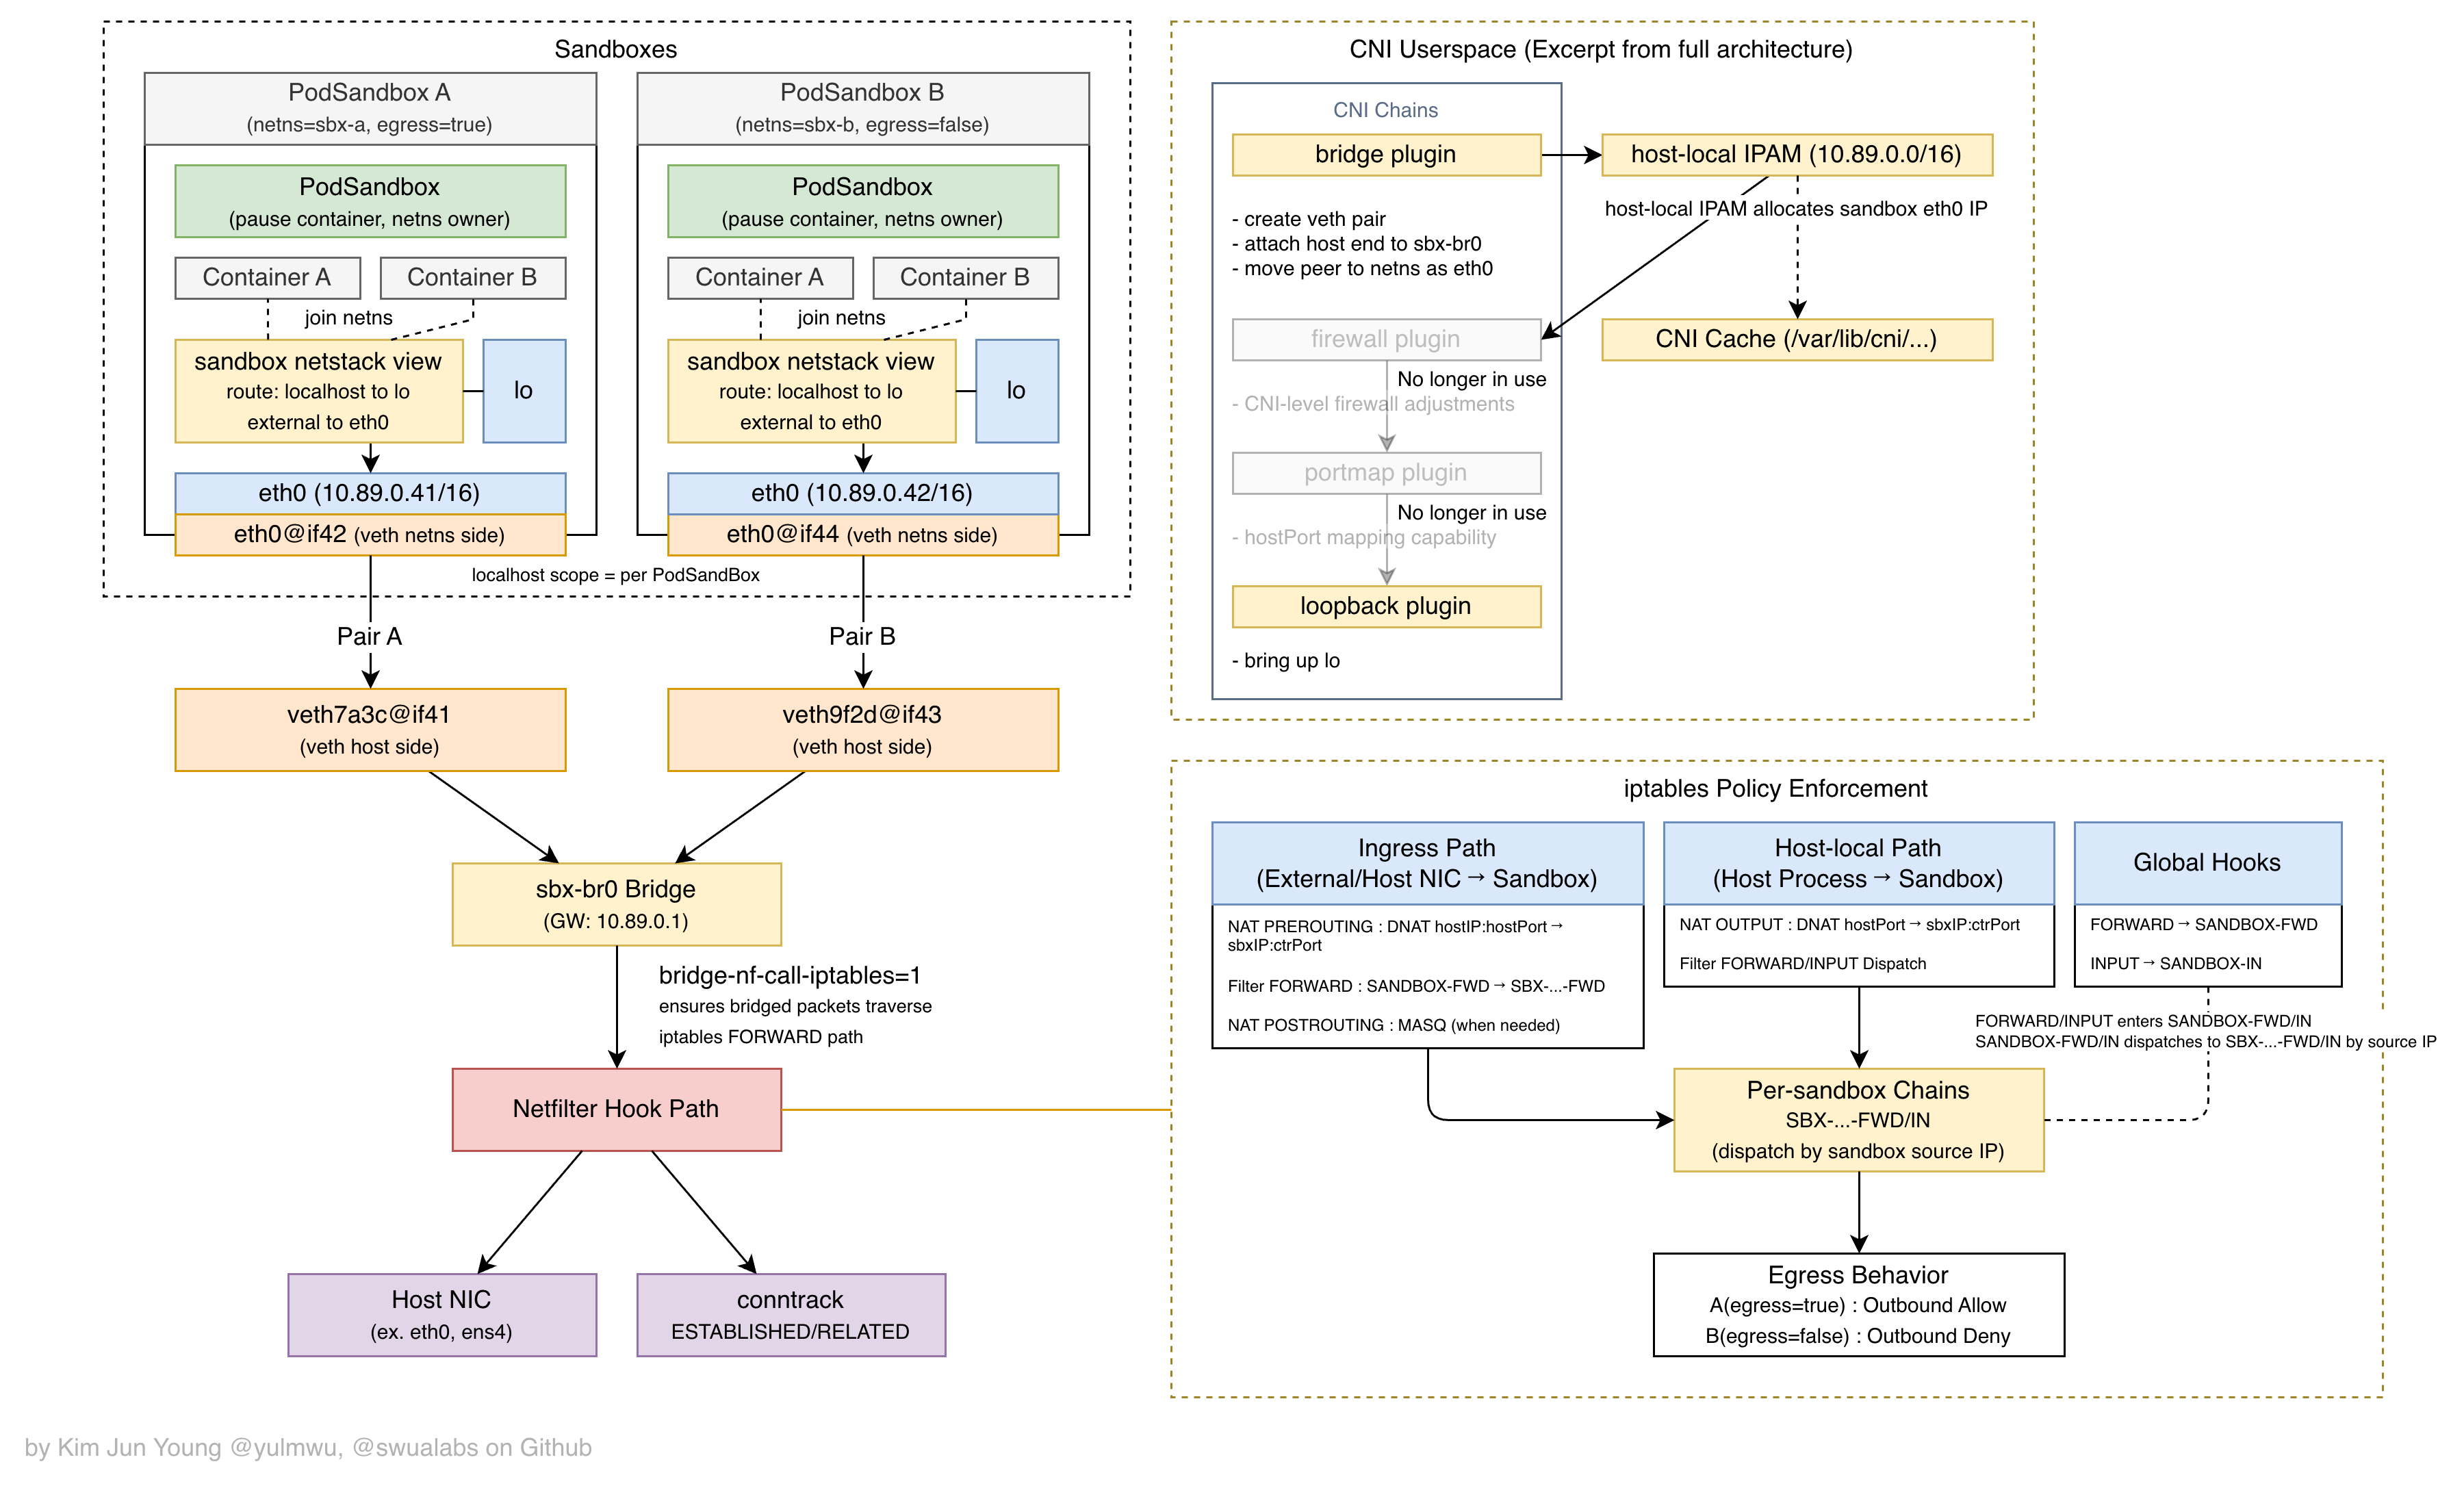
Another core responsibility of sbxlet is its networking model. Internally, it uses the bridge and loopback CNI (Container Network Interface) plugins to configure bridge networking and loopback networking.
Additionally, it leverages host-local IPAM (Host-local IP Address Management) to allocate and manage IP addresses for each sandbox.
Using host-local IPAM, each sandbox is assigned a unique private IP address. The loopback CNI provides localhost networking inside the sandbox, while the bridge CNI enables communication between sandboxes.
Traffic routing is then handled using iptables to support host-to-sandbox access and external traffic entering through the host NIC, including forwarding and NAT (Network Address Translation).
For a more detailed flow, please refer to the architecture diagram below.
[!NOTE]
Although
firewallandportmapare included in the CNI chain, they are no longer used. Their functionality has been replaced with a model that manages forwarding and NAT usingiptables.
The default networking configuration is shown below. These values can be customized through environment variables.
- Bridge Interface:
sbx-br0 - IPAM CIDR:
10.89.0.0/16
State Management and Reconcile Loop
sbxlet stores state files to manage container runtime state, typically using the following paths:
- State storage:
/var/lib/sandboxd/sandboxes - Lock files:
/var/lib/sandboxd/locks
These paths can be changed through environment variables described later, but they are the recommended defaults, and changing them arbitrarily may lead to unexpected behavior.
In addition, sbxlet maintains its own Reconcile Loop independently from the orchestrator.
The Reconcile Loop periodically compares the actual container state with the persisted state files and, when inconsistencies are detected, updates the state files or removes containers if necessary.
[!NOTE]
This project follows the principle that sandboxes may terminate at any time and must never be recovered. Therefore, if a sandbox has terminated or its state file no longer exists, the Reconcile Loop removes the corresponding sandbox state information.
A single sbxlet instance is intended to run on a single node. Running multiple sbxlet instances against the same state storage or allowing concurrent access is not supported.
To interact with a running sbxlet instance, use the proxied sbxorch API or the sbxctl command.
As described later, you can specify the --node option to send API requests directly to the sbxlet instance running on a specific worker node.
However, this approach is not recommended, since it bypasses sbxorch features such as scheduling and the Reconcile Loop, and should only be used when absolutely necessary.
Sandboxd Orchestrator(sbxorch)
This is the official orchestrator of sandboxd-o and is responsible for scheduling sandboxes onto appropriate worker nodes, allocating host ports, and handling the Reconcile loop as well as the Resource/Status Sync Loop.
HTTP Server and Database
This component is an HTTP API server that receives and handles client requests. It also includes Admission logic for validating resource specifications (Specs). For more details about the API, refer to the API documentation or the Swagger documentation.
The sbxorch orchestrator supports proxied APIs that allow requests to target a specific worker node (more precisely, a specific sbxlet instance). These endpoints are available under /api/v1/nodes/:id/.... For additional details, refer to the orchestrator API documentation or the sbxlet API documentation.
The storage backend used by sbxorch to manage objects and resources is SQLite by default.
SQLite was chosen because it is a lightweight file-based database, and distributed sbxorch API server deployments are not currently within the project’s scope.
By default, the database is created at /var/lib/sandboxd/orchestrator.db and acts as the Source of Truth for managing sandbox resources as well as resources such as Node and External.
[!NOTE]
SQLite schema changes are applied through a centralized migration list in
sandboxd-orch/repo/migrations.go. New schema changes should be added there so upgrades remain explicit and testable.
[!NOTE]
etcd was considered during the early stages of development, but was deferred because the operational overhead and complexity were not considered appropriate for the scale of this project.
Additionally, while the current implementation uses relational structures with tightly connected entities, there are plans to redesign the architecture in the future around a key-value model for a faster, simpler, and more hierarchical structure.
Sync Loops
sbxorch internally maintains several Sync Loops to preserve system consistency and stability between sbxlet and sbxorch. The major Sync Loops are as follows:
-
Node Resource Sync Loop: Periodically retrieves node resource status from sbxlet and stores it in the database. This information is used during scheduling to score nodes and place sandboxes onto appropriate worker nodes. Although resource allocation changes are applied logically when scheduling or removing nodes, the final resource state is reconciled and updated by this loop.
-
Sandbox Status Sync Loop: Periodically retrieves sandbox status from sbxlet and stores it in the database. This allows sbxorch to track the state of each sandbox and detect failures, runtime issues in sbxlet, errors inside the sandbox, or other state changes, enabling it to take appropriate actions.
[!NOTE]
The interval of these loops can be adjusted through environment variables, and configuring appropriate intervals is recommended for production environments.
Scheduler/Reconcile Loops
sbxorch generally aims to follow a model similar to Kubernetes’ declarative architecture, and to support this, it includes both a Scheduler Loop and a Reconcile Loop.
The Scheduler Loop is responsible for detecting sandbox resources that require scheduling and assigning them to appropriate worker nodes.
When a Sandbox is created, it initially enters the Pending state (see below for details), which indicates that scheduling is required. The Scheduler Loop continuously detects these pending sandboxes and schedules them onto suitable nodes.
The Reconcile Loop periodically compares the actual system state with the resource state stored in the database. When inconsistencies are detected, it updates resource states or removes resources if necessary.
However, following this project’s principle that sandboxes may terminate at any time and must not be recovered, the Reconcile Loop is currently used only as a TTL (Time To Live)-based sandbox resource cleanup mechanism rather than performing resource restoration.
[!NOTE]
The intervals for both of these loops can also be configured through environment variables, and appropriate values are recommended for production environments.
{"ts":"2026-05-22T18:13:13.560811039+09:00","level":"info","msg":"scheduler tick completed","app":"orchestrator:dev","sandbox_total":0,"pending_count":0}
{"ts":"2026-05-22T18:13:15.559090911+09:00","level":"info","msg":"reconcile tick completed","app":"orchestrator:dev","sandbox_total":0,"deleting_count":0,"expired_count":0}
Sandboxd CLI(sbxctl)
This is a CLI tool equivalent to Kubernetes’ kubectl, used to communicate with the sbxorch API server to manage resource models and inspect system state.
sandboxd control client

Usage:
  sbxctl [command]

Available Commands:
  completion  Generate the autocompletion script for the specified shell
  cordon      Mark node unschedulable
  create      Create resource from YAML file
  delete      Delete resource
  get         Get resources
  help        Help about any command
  label       Add, update, or remove a node label
  logs        Get sandbox logs via orchestrator node proxy
  spec        Print resource in YAML spec form
  uncordon    Mark node schedulable

Flags:
  -c, --config string     path to sbxctl config json (default "/var/lib/sandboxd/sbxctl_config.json")
  -h, --help               help for sbxctl
      --limit int          list limit (default 100)
      --node string        node id for proxy APIs
  -o, --output string      output format: json|yaml|wide
      --secret string      shared secret for orchestrator auth (config file or SBX_SHARED_SECRET)
      --server string      orchestrator base url (config file or SBXCTL_SERVER)
      --timeout duration   request timeout (default 10s)

Use "sbxctl [command] --help" for more information about a command.
The main available options are as follows:
-c, --config: Specifies the path to the sbxctl JSON configuration file. Default:/var/lib/sandboxd/sbxctl_config.json--server: Specifies the base URL of the API server. This option can also be configured through the config file or theSBXCTL_SERVERenvironment variable. For example:http://localhost:8080--secret: The shared secret used to authenticate to the orchestrator. This option can also be configured through the config file (shared_secret) or theSBX_SHARED_SECRETenvironment variable. It must match the orchestrator’sshared_secret.--node: Specifies the target node ID when using the Proxied API. This allows API requests to be sent directly to a specific sbxlet instance. For example:sandboxd-node-1-o, --output: Specifies the output format. Available options arejson,yaml, andwide. Table output is used by default. Thelogscommand always prints raw log lines.get nodes --show-labels: Adds aLABELScolumn to node table output.
The main available commands are as follows:
get: Used to retrieve a list of resources or inspect detailed information for a specific resource. Resource types may be referenced using either their full names (nodes,external,sandboxes) or shorthand forms (n,e,s). Detailed inspection of a resource can be performed using/separators.create: Used to create resources from a YAML file. For example:sbxctl create -f examples/node.yamldelete: Used to delete resources. For example:sbxctl delete node/sandboxd-node-1. A specific resource must be explicitly specified.cordon: Marks a Node as unschedulable so the scheduler stops placing new sandboxes on it while existing sandboxes keep running. For example:sbxctl cordon node/sandboxd-node-1uncordon: Marks a Node schedulable again. For example:sbxctl uncordon node/sandboxd-node-1label: Adds, updates, or removes a Node label through the orchestrator API. For example:sbxctl label node/sandboxd-node-1 region=ap-northeast-2orsbxctl label node/sandboxd-node-1 region-logs: Used to retrieve sandbox-level logs with each line prefixed by the container name. For example:sbxctl logs s/sbx-wordpress-demoreturns lines such as[app] ...and[db] .... For backward compatibility,sbxctl logs s/sbx-wordpress-demo appstill retrieves only theappcontainer logs. Usesbxctl logs s/sbx-wordpress-demo --watchto poll logs and print newly added lines. Internally, this command uses sbxorch’s Proxied API to send requests directly to the sbxlet instance running on the target node and retrieve logs.
Sandboxd Admin CLI(sbxadm)
sbxadm is an administrative CLI for provisioning and managing entire Sandboxd-O clusters — both the control plane (sbxorch) and worker nodes (sbxlet).
It currently targets AWS EC2-based clusters, with support for other cloud providers and on-premises environments planned for the future.
Unlike sbxctl, which is a client that talks to the sbxorch API, sbxadm provisions real infrastructure directly via the AWS SDK for Go — EC2 instances, security groups, IAM instance profiles, Elastic IPs — and persists that state in DynamoDB. It does not rely on a separate IaC tool such as Terraform or CloudFormation.
Sandboxd-O Admin: provisions sbxorch/sbxlet clusters on AWS

Usage:
  sbxadm [command]

Available Commands:
  completion           Generate the autocompletion script for the specified shell
  create               Create a cluster or worker node
  delete               Delete a worker node or an entire cluster
  help                 Help about any command
  info                 Show detailed cluster/worker information
  resize               Resize a cluster control plane or worker EC2 instance
  update-sbxctl-config Refresh /var/lib/sandboxd/sbxctl_config.json on a cluster's public control plane

Flags:
      --env-file string      path to a KEY=VALUE env file (e.g. SBXADM_STORE_DYNAMODB, SBXADM_ORCH_SERVER)
  -h, --help                 help for sbxadm
      --no-color             disable colored output (also honors NO_COLOR env var)
      --orch-server string   override orchestrator base URL (env: SBXADM_ORCH_SERVER; default: derived from the cluster's control plane IP)
      --profile string       AWS profile (env: AWS_PROFILE, default: default)
      --region string        AWS region (default: the region configured for --profile, env: AWS_REGION)
      --store-table string   DynamoDB table for sbxadm state (env: SBXADM_STORE_DYNAMODB)
      --timeout duration     orchestrator API request timeout (default 20s)

Use "sbxadm [command] --help" for more information about a command.
Environment Configuration
Instead of a single JSON config file like sbxctl, sbxadm can also load the infrastructure-bootstrap settings it needs from a flat KEY=VALUE env file (--env-file; real process environment variables always take precedence over the file).
# sbxadm.env
SBXADM_STORE_DYNAMODB=sbxadm_store
SBXADM_ORCH_SERVER=http://<orch-public-ip>:8082
sbxadm --env-file ./sbxadm.env info cluster my-cluster
If --region is omitted, sbxadm falls back to the region configured for --profile (default: default) — the same behavior as the AWS CLI when no --region flag is given.
Cluster/Control Plane Creation
Exactly one control plane (sbxorch) can exist per cluster. The VPC id and the public/private subnets are all validated up front; the command fails if any of them don’t exist or don’t belong to that VPC.
sbxadm create cluster my-cluster \
  --version 0.5.0 \
  --vpc-id vpc-0123456789abcdef0 \
  --public-subnet subnet-0aaa111,subnet-0bbb222 \
  --private-subnet subnet-0ccc333,subnet-0ddd444 \
  --region ap-northeast-2 \
  --orch-instance t3.xlarge \
  --orch-public-endpoint \
  --shared-secret 'my-override-secret' \
  --orch-root-volume-size 16Gi
--orch-public-endpoint: places the control plane in a public subnet with a public IP. Without it, the control plane lands in a private subnet with no public IP.--orch-public-eip: attaches an existing Elastic IP by ARN or allocation id (requires--orch-public-endpoint). If omitted,sbxadmallocates and manages its own Elastic IP, so the address survives instance restarts.--orch-config: a JSON file overlaid on top of theconfigs/sbxorch_config.jsondefaults. Only the keys present in the file are changed; everything else keeps the shipped default.--shared-secret: explicitly sets the cluster’s shared secret instead of lettingsbxadmgenerate one. It must be at least 8 characters.sbxadmprints a warning because this is operationally riskier than the default random secret.- For a private control plane (no
--orch-public-endpoint),sbxadmchecks up front that the chosen private subnet’s route table has a0.0.0.0/0route to a NAT gateway. If there’s no NAT gateway, it fails immediately without creating any AWS resources — both SSM agent registration and downloading the GitHub release artifact require general internet egress (SSM VPC endpoints alone aren’t sufficient).
Creation is logged step by step in a terraform/eksctl-like style (security groups, then IAM instance profiles, then the EC2 instance). If anything fails partway through, every AWS resource created up to that point (EC2 instance, security groups, IAM profiles, Elastic IP) is automatically rolled back. Once the instance is running, sbxadm polls /healthz directly from inside the instance over SSM to confirm sbxorch.service actually came up before declaring the cluster created.
After a successful create, sbxadm also prints:
- the public control-plane URL when
--orch-public-endpointwas used - the cluster shared secret in masked form such as
A***Z, whether it was generated automatically or set explicitly
Worker Node Creation
sbxadm create worker my-worker-1 \
  --cluster my-cluster \
  --version 0.5.0 \
  --instance t3.xlarge \
  --runtime-binary runsc \
  --root-volume-size 64Gi \
  --node-labels region=ap-northeast-2,node-type=general \
  --external host1.example.com
Worker nodes always land in a public subnet, round-robined across the cluster’s public subnets. If --public-eip is omitted, the worker’s Elastic IP is also allocated and managed automatically, same as the control plane; if --external is omitted, that Elastic IP’s address is registered as the External value automatically.
--node-labels is optional and registers metadata.labels on the worker’s Node object at creation time, so sbxorch can immediately use those labels for Sandbox.spec.node_selector scheduling.
If you do pass a hostname to --external (like host1.example.com above) instead of letting it default to the worker’s IP, sbxadm only registers that value with the orchestrator — it does not create or manage any DNS record. You’re responsible for pointing an A record at the worker’s actual public IP (from sbxadm info worker) at your DNS provider yourself; see the note under External below.
Once the instance finishes bootstrapping (including installing gVisor/containerd) and passes the sbxlet.service health check, sbxadm automatically registers a Node object (and an External object, if applicable) with the sbxorch API. Deleting a worker tears down those Node/External objects along with terminating the EC2 instance.
--runtime-binary selects the default containerd runtime handler used by the worker node. The default remains runsc. If a workload is known to have gVisor compatibility issues, you can create a regular runc-based worker with --runtime-binary runc.
sbxadm create worker my-runc-worker \
  --cluster my-cluster \
  --version 0.5.0 \
  --instance c7i.xlarge \
  --runtime-binary runc \
  --root-volume-size 64Gi
Supported values are runsc and runc. If the flag is omitted, runsc is used.
Private ECR Pull Allowlist
sbxadm create worker my-worker-2 \
  --cluster my-cluster \
  --version 0.5.0 \
  --instance t3.xlarge \
  --ecr-repos "my-repo-1,ctf-*"
--ecr-repos grants the cluster’s worker nodes pull-only access to private ECR repositories whose name matches any of the given comma-separated patterns. Patterns may mix exact names and * globs freely (e.g. my-repo-1,ctf-*,other-*); * is matched natively by IAM resource ARNs, so no expansion happens on the sbxadm side.
All workers in a cluster share a single IAM role, so the allowlist is cluster-wide rather than per-worker: each --ecr-repos call merges its patterns into the cluster’s existing allowlist (stored in DynamoDB) and rewrites the role’s inline policy with the full, unioned set — it never removes access previously granted to other workers in the same cluster. The current allowlist is shown in sbxadm info cluster.
On the instance side, sbxadm’s worker bootstrap installs the AWS CLI and a systemd timer that refreshes containerd’s registry auth for the account’s ECR host every 6 hours via aws ecr get-login-password, using the worker’s own IAM role credentials — no static credentials are ever stored on the instance. Repositories that don’t match any granted pattern fail to pull with a 403 Forbidden from ECR, enforced entirely by IAM.
Security Model
Instances created by sbxadm never receive SSH key material. Instead, their IAM instance profile is granted AmazonSSMManagedInstanceCore, so they’re reachable only via AWS Systems Manager Session Manager (port 22 isn’t opened in any security group at all). Health checks work the same way: rather than sending an HTTP request from outside, sbxadm runs curl 127.0.0.1:<port>/healthz directly inside the instance over SSM — this works identically regardless of whether the node has a public endpoint.
A worker’s security group only opens the host port range used by sandbox workloads to the internet (default 10000-32767, matching host_port_min/host_port_max), and only allows traffic to the sbxlet API port (8081) from the control plane’s security group. The control plane’s sbxorch API port (8082) is restricted to the VPC CIDR unless --orch-public-endpoint was given.
Communication between orch and let is authenticated with a shared secret generated automatically at cluster creation time by default (see Authentication above). If needed, sbxadm create cluster --shared-secret ... can set it explicitly instead, but this is warned as a higher-risk operational mode. In both cases the value is stored in DynamoDB and injected into both components’ config files automatically.
Cluster/Worker Info and Refreshing the sbxctl Config
sbxadm info cluster my-cluster
sbxadm info worker my-worker-1 --cluster my-cluster
info cluster prints the instance type, subnet, security group, Elastic IP (and whether it’s auto-allocated or user-supplied), and the final merged JSON config for both the control plane and every worker node.
By default, sbxctl reads its server/shared_secret values from a local file on the control plane instance, /var/lib/sandboxd/sbxctl_config.json. Those values only ever exist in sbxadm’s DynamoDB record per cluster — they’re never written to a file on the instance automatically. So to use sbxctl directly from inside the control plane (e.g. over an SSM session), someone would otherwise have to create or fill in that file by hand.
update-sbxctl-config does this for you: it rebuilds sbxctl_config.json from the cluster’s own record (server, shared_secret) and overwrites /var/lib/sandboxd/sbxctl_config.json on the control plane instance over SSM. There’s no override option — it only ever refreshes from the cluster’s own state:
sbxadm update-sbxctl-config my-cluster
It returns an error for clusters whose control plane isn’t publicly accessible.
Cluster/Worker Resizing
sbxadm resize changes the EC2 instance type of an existing control plane or worker node.
sbxadm resize control-plane my-cluster \
  --instance m7i.2xlarge

sbxadm resize worker my-worker-1 \
  --cluster my-cluster \
  --instance c7i.4xlarge
[!WARNING] Resizing is implemented with the standard EC2 stop -> modify instance type -> start flow. This means downtime is expected.
Resizing the control plane makes the sbxorch API unavailable while the instance is stopped and restarted. Resizing a worker interrupts sbxlet on that node, and sandboxes running on that worker may experience downtime or may need to be recreated depending on runtime behavior.
For this reason, sbxadm prints an explicit warning before resizing, but it does not ask for interactive confirmation.
After the instance starts again, sbxadm waits for the SSM agent and the relevant local health check (sbxorch on port 8082, or sbxlet on port 8081) before persisting the new instance type and refreshed IP metadata back to DynamoDB.
Cluster/Worker Deletion
sbxadm delete worker my-worker-1 --cluster my-cluster
sbxadm delete cluster my-cluster
delete cluster tears down every worker node first, then the control plane, security groups, IAM instance profiles, any auto-allocated Elastic IPs, and finally the DynamoDB record. Deleting a cluster or worker that’s already gone from AWS returns an error.
Example Creation of a Cluster and Worker Node
A complete, end-to-end walkthrough: provisioning the VPC sbxadm will deploy into entirely by hand with the AWS CLI (sbxadm itself never touches VPC/subnet/NAT/IGW resources — it only validates them), then creating a cluster and worker node, inspecting them, and tearing everything down again.
1. Create a VPC with Public/Private Subnets and a NAT Gateway
sbxadm requires at least one public and one private subnet. A private control plane (no --orch-public-endpoint) additionally requires a NAT gateway reachable from that private subnet — sbxadm checks for this up front and refuses to create anything if it’s missing (see Cluster/Control Plane Creation). This example sets one up regardless, since the worker’s host-port range still needs the public subnet’s route to an internet gateway.
REGION=ap-northeast-2

VPC_ID=$(aws ec2 create-vpc --cidr-block 10.80.0.0/16 --region $REGION \
  --tag-specifications 'ResourceType=vpc,Tags=[{Key=Name,Value=sbxadm-demo-vpc}]' \
  --query 'Vpc.VpcId' --output text)

aws ec2 modify-vpc-attribute --vpc-id $VPC_ID --enable-dns-support --region $REGION
aws ec2 modify-vpc-attribute --vpc-id $VPC_ID --enable-dns-hostnames --region $REGION

PUB_SUBNET=$(aws ec2 create-subnet --vpc-id $VPC_ID --cidr-block 10.80.1.0/24 \
  --availability-zone ${REGION}a --region $REGION \
  --tag-specifications 'ResourceType=subnet,Tags=[{Key=Name,Value=sbxadm-demo-public}]' \
  --query 'Subnet.SubnetId' --output text)

PRIV_SUBNET=$(aws ec2 create-subnet --vpc-id $VPC_ID --cidr-block 10.80.2.0/24 \
  --availability-zone ${REGION}a --region $REGION \
  --tag-specifications 'ResourceType=subnet,Tags=[{Key=Name,Value=sbxadm-demo-private}]' \
  --query 'Subnet.SubnetId' --output text)

aws ec2 modify-subnet-attribute --subnet-id $PUB_SUBNET --map-public-ip-on-launch --region $REGION
Attach an internet gateway and route the public subnet’s traffic through it:
IGW_ID=$(aws ec2 create-internet-gateway --region $REGION \
  --tag-specifications 'ResourceType=internet-gateway,Tags=[{Key=Name,Value=sbxadm-demo-igw}]' \
  --query 'InternetGateway.InternetGatewayId' --output text)
aws ec2 attach-internet-gateway --internet-gateway-id $IGW_ID --vpc-id $VPC_ID --region $REGION

PUB_RTB=$(aws ec2 create-route-table --vpc-id $VPC_ID --region $REGION \
  --tag-specifications 'ResourceType=route-table,Tags=[{Key=Name,Value=sbxadm-demo-public-rtb}]' \
  --query 'RouteTable.RouteTableId' --output text)
aws ec2 create-route --route-table-id $PUB_RTB --destination-cidr-block 0.0.0.0/0 --gateway-id $IGW_ID --region $REGION
aws ec2 associate-route-table --route-table-id $PUB_RTB --subnet-id $PUB_SUBNET --region $REGION
Allocate an Elastic IP for the NAT gateway, create the NAT gateway in the public subnet, and route the private subnet’s egress through it:
NAT_EIP_ALLOC=$(aws ec2 allocate-address --domain vpc --region $REGION \
  --tag-specifications 'ResourceType=elastic-ip,Tags=[{Key=Name,Value=sbxadm-demo-nat-eip}]' \
  --query 'AllocationId' --output text)

NAT_GW_ID=$(aws ec2 create-nat-gateway --subnet-id $PUB_SUBNET --allocation-id $NAT_EIP_ALLOC --region $REGION \
  --query 'NatGateway.NatGatewayId' --output text)
aws ec2 wait nat-gateway-available --nat-gateway-ids $NAT_GW_ID --region $REGION

PRIV_RTB=$(aws ec2 create-route-table --vpc-id $VPC_ID --region $REGION \
  --tag-specifications 'ResourceType=route-table,Tags=[{Key=Name,Value=sbxadm-demo-private-rtb}]' \
  --query 'RouteTable.RouteTableId' --output text)
aws ec2 create-route --route-table-id $PRIV_RTB --destination-cidr-block 0.0.0.0/0 --nat-gateway-id $NAT_GW_ID --region $REGION
aws ec2 associate-route-table --route-table-id $PRIV_RTB --subnet-id $PRIV_SUBNET --region $REGION
At this point $VPC_ID, $PUB_SUBNET, and $PRIV_SUBNET are everything sbxadm needs.
2. (Optional) Pre-allocate a Stable Elastic IP for the Control Plane
Without --orch-public-eip, sbxadm allocates and manages its own Elastic IP automatically — which is enough for most use cases and is what the rest of this walkthrough uses. If you instead want to reuse a specific, pre-existing Elastic IP (e.g. one already allow-listed somewhere external), allocate it yourself and pass its allocation id or ARN; sbxadm will only ever associate/disassociate it, never release it, since it didn’t create it:
ORCH_EIP_ALLOC=$(aws ec2 allocate-address --domain vpc --region $REGION \
  --tag-specifications 'ResourceType=elastic-ip,Tags=[{Key=Name,Value=sbxadm-demo-orch-eip}]' \
  --query 'AllocationId' --output text)
echo "$ORCH_EIP_ALLOC"
3. Create the Cluster
sbxadm create cluster my-cluster \
  --version 0.5.0 \
  --vpc-id "$VPC_ID" \
  --public-subnet "$PUB_SUBNET" \
  --private-subnet "$PRIV_SUBNET" \
  --region "$REGION" \
  --orch-instance t3.xlarge \
  --orch-public-endpoint \
  --orch-public-eip "$ORCH_EIP_ALLOC" \
  --orch-root-volume-size 16Gi
Drop --orch-public-eip "$ORCH_EIP_ALLOC" entirely to let sbxadm allocate and manage the control plane’s Elastic IP itself instead (the simpler, recommended default). This step blocks until sbxorch.service’s /healthz check passes over SSM before returning — see Security Model.
4. Create a Worker Node
sbxadm create worker my-worker-1 \
  --cluster my-cluster \
  --version 0.5.0 \
  --instance t3.xlarge \
  --root-volume-size 64Gi \
  --node-labels region=ap-northeast-2,node-type=general \
  --ecr-repos "my-repo-1,ctf-*" \
  --external host1.example.com
As with the control plane, omitting --public-eip lets sbxadm allocate and manage the worker’s Elastic IP automatically. This also blocks until sbxlet.service is healthy, then registers the worker as a Node (and an External object, since --external was given) with the orchestrator automatically.
--external host1.example.com only registers that hostname with the orchestrator; it doesn’t create the DNS record itself. After this step, look up the worker’s public IP via sbxadm info worker my-worker-1 --cluster my-cluster and add an A record for host1.example.com pointing to it at your DNS provider.
5. Inspect and Manage
sbxadm info cluster my-cluster
sbxadm info worker my-worker-1 --cluster my-cluster

# Refresh sbxctl_config.json on the control plane so an operator can SSM into it
# and run sbxctl directly, without hand-editing that file.
sbxadm update-sbxctl-config my-cluster
6. Clean Up
sbxadm delete worker my-worker-1 --cluster my-cluster
sbxadm delete cluster my-cluster
This terminates both EC2 instances, deletes the security groups and IAM instance profiles, and releases any Elastic IPs sbxadm itself allocated (an --orch-public-eip/--public-eip you supplied is only disassociated, never released). It does not touch the VPC/subnets/NAT gateway/IGW from step 1, since sbxadm never created them:
aws ec2 release-address --allocation-id "$ORCH_EIP_ALLOC" --region $REGION  # only if you allocated this in step 2

aws ec2 delete-nat-gateway --nat-gateway-id $NAT_GW_ID --region $REGION
aws ec2 wait nat-gateway-deleted --nat-gateway-ids $NAT_GW_ID --region $REGION
aws ec2 release-address --allocation-id $NAT_EIP_ALLOC --region $REGION

aws ec2 disassociate-route-table --association-id $(aws ec2 describe-route-tables --region $REGION --route-table-ids $PRIV_RTB --query 'RouteTables[0].Associations[0].RouteTableAssociationId' --output text) --region $REGION
aws ec2 delete-route-table --route-table-id $PRIV_RTB --region $REGION
aws ec2 disassociate-route-table --association-id $(aws ec2 describe-route-tables --region $REGION --route-table-ids $PUB_RTB --query 'RouteTables[0].Associations[0].RouteTableAssociationId' --output text) --region $REGION
aws ec2 delete-route-table --route-table-id $PUB_RTB --region $REGION

aws ec2 detach-internet-gateway --internet-gateway-id $IGW_ID --vpc-id $VPC_ID --region $REGION
aws ec2 delete-internet-gateway --internet-gateway-id $IGW_ID --region $REGION

aws ec2 delete-subnet --subnet-id $PUB_SUBNET --region $REGION
aws ec2 delete-subnet --subnet-id $PRIV_SUBNET --region $REGION
aws ec2 delete-vpc --vpc-id $VPC_ID --region $REGION
Resource Model / Objects
The resource model in this project is designed to resemble Kubernetes’ resource model but is simplified to better fit sandbox environments.
At this stage, advanced objects such as Deployment or DaemonSet, as well as concepts like Controllers and reconciliation-based resource management, are intentionally excluded.
The following objects are currently available:
sandboxd.o/v1-Nodesandboxd.o/v1-Externalsandboxd.o/v1-Sandbox
[!NOTE]
API groups exist for structural and compatibility purposes, but they do not currently provide any separate functionality.
Node
A Node represents a worker node onto which sandboxes can be scheduled.
It is a resource used to register an installed sbxlet instance with sbxorch and contains the IP address and port information of the corresponding sbxlet instance.
# examples/node.yaml

apiVersion: sandboxd.o/v1
kind: Node
id: sandboxd-node-1
metadata:
    labels:
        node-type: general
        region: ap-northeast-2
spec:
    ip: '127.0.0.1'
    port: 8081
    unschedulable: false
> sbxctl create -f examples/node.yaml
> sbxctl get nodes -o wide
RESOURCE: node
NAME             STATE  SCHEDULABLE  IP         PORT  EXTERNAL       CPU(ALLOC/USED/AVAIL)  MEM(ALLOC/USED/AVAIL)  LAST_ERROR  HEARTBEAT                       UPDATED
sandboxd-node-1  Ready  Yes          127.0.0.1  8081  host1.swua.kr  3600m/0m/3600m         14342MB/0MB/14342MB                2026-05-22T09:17:40.566923735Z  2026-05-21T02:54:11.293035905Z
Node status can be one of Ready, NotReady, or Unknown, and sandboxes can only be scheduled onto Nodes that are both Ready and not marked spec.unschedulable: true.
- The
Unknownstate occurs when a node has been newly registered and no Heartbeat has been received yet, or when the Threshold or Grace Period has not elapsed sufficiently to determine its status. - The
NotReadystate occurs when a node has not sent a Heartbeat for a certain period of time, or when a Heartbeat was received but the Threshold or Grace Period conditions were not satisfied for the node to be consideredReady. - Setting
spec.unschedulable: trueis a scheduling policy, not a health status. Existing sandboxes on that node remain untouched, but new sandboxes will no longer be scheduled there until the node is uncordoned. metadata.labelsis optional. These labels are used only by sbxorch’s scheduler for exact-match sandbox placement viaspec.node_selector.
External
The External object is a resource used to register a Public IP address or hostname (domain) for a node.
It does not participate in internal networking behavior, but is used as a logical representation of an externally reachable endpoint associated with a node.
# examples/external.yaml

apiVersion: sandboxd.o/v1
kind: External
id: sandboxd-node-external-1
spec:
    node_id: 'sandboxd-node-1'
    external: 'host1.swua.kr'
The node_id field specifies the ID of the Node referenced by this External resource, and the external field represents the externally reachable endpoint associated with that node.
If this object is not configured, the accessible Public IP address or hostname for that node will be displayed as (none).
[!NOTE]
Registering a hostname (instead of a raw IP) as
externalis purely informational — sandboxd-o does not manage DNS for you. If you setexternalto a domain name, you must separately create an A record for it at your external DNS provider, pointing to that node’s actual public IP. Until that A record exists and propagates, the hostname won’t actually resolve to the node, even though it’s correctly registered here.
> sbxctl get external
RESOURCE: external
ID                        NODE_ID          EXTERNAL       UPDATED
sandboxd-node-external-1  sandboxd-node-1  host1.swua.kr  2026-05-21T02:54:12.778649884Z
Sandbox
A Sandbox is a resource that represents an isolated sandbox environment.
It represents a sandbox environment that is provisioned and managed by sbxlet. The following example defines a sandbox environment containing both WordPress and MySQL.
# examples/wordpress.yaml

apiVersion: sandboxd.o/v1
kind: Sandbox
id: sbx-wordpress-demo
spec:
    egress: true
    ttl_seconds: 3600
    node_selector:
        region: ap-northeast-2
    ports:
        - container_port: 80
          protocol: tcp
    containers:
        - name: wordpress
          image: wordpress:6.9.4-php8.3-apache
          args:
              - sh
              - -c
              - >-
                  for i in $(seq 1 90); do php -r
                  '$s=@fsockopen("127.0.0.1",3306,$e,$es,1);
                  if($s){fclose($s); exit(0);} exit(1);'
                  && break; sleep 2; done;
                  exec docker-entrypoint.sh apache2-foreground
          env:
              - WORDPRESS_DB_HOST=127.0.0.1:3306
              - WORDPRESS_DB_USER=wordpress
              - WORDPRESS_DB_PASSWORD=wordpress-pass
              - WORDPRESS_DB_NAME=wordpress
          work_dir: ''
          resource:
              cpu: 1000m
              memory: 1024Mi
        - name: mysql
          image: mysql:8.4
          args: []
          env:
              - MYSQL_DATABASE=wordpress
              - MYSQL_USER=wordpress
              - MYSQL_PASSWORD=wordpress-pass
              - MYSQL_ROOT_PASSWORD=root-pass
          work_dir: ''
          resource:
              cpu: 1000m
              memory: 1024Mi
The description of each field is as follows.
egress, ttl_seconds, node_selector, ports
-
egress: Determines whether this sandbox is allowed to send outbound traffic to external networks. When set totrue, outbound traffic from the sandbox to external networks is allowed. When set tofalse, outbound traffic is blocked. This behavior is enforced by sbxlet’s networking model. -
ttl_seconds: The amount of time (in seconds) before the sandbox is automatically terminated after creation. If this value is0or not specified, the sandbox continues running until it is manually deleted. If a positive value is specified, the sandbox is automatically terminated after the configured duration has elapsed. This mechanism is implemented through the Reconcile Loop, which detects and terminates sandboxes whose TTL has expired. -
node_selector: Optional exact-match label selector for choosing candidate Nodes. This behaves like KubernetesnodeSelector: every key/value pair must exist on the Node with the same value, and multiple entries are evaluated with logical AND. This is a scheduler filter only; it does not implement node affinity, anti-affinity, or taint/toleration behavior. -
ports: The list of ports to expose from this sandbox. Each port consists ofcontainer_portandprotocol.container_portspecifies the port number exposed inside the sandbox, whileprotocolspecifies the protocol used for that port. Currently,tcpandudpare supported. This field is optional, and if omitted, no ports are exposed.Direct Host Port assignment is intentionally not supported because sbxorch maintains and allocates its own Host Port Pool. Following the project’s philosophy of exposing large numbers of Host Ports to arbitrary users, manual Host Port assignment has been intentionally disallowed.
[!WARNING]
egress: falsecan be useful in scenarios such as:
- Intentionally preventing participants in CTF/Wargame VM environments from invoking external webhooks
- Running sandboxes in environments where outbound access to external networks must be prohibited due to security policies or internal governance requirements
However, disabling this option blocks all outbound traffic, meaning operations such as
apt-getor application-level external API calls will no longer work.In addition, some DNS resolvers may not function properly, so you should ensure that all required packages and applications are already included in the container image and verify that the application can operate correctly without outbound network access.
Therefore, in the wordpress.yaml example above, the sandbox is automatically terminated by the Reconcile Loop after one hour (3600 seconds) from creation, and TCP port 80 is exposed inside the sandbox.
Additionally, since egress is set to true, outbound traffic to external networks is permitted for this sandbox.
If node_selector is set and no Ready and schedulable Node matches all requested labels, the sandbox remains unschedulable and fails with the same control-plane scheduling error path used for other infeasible placements.
volumes
A Sandbox may define sandbox-local shared ephemeral volumes through spec.volumes.
- name: runtime-state
  ephemeral_storage: 128Mi
-
name: The volume name. It must be unique within the sandbox. The name is used to build host-side mount paths, so it must match^[A-Za-z0-9][A-Za-z0-9_.-]{0,63}$(no path separators or..). -
ephemeral_storage: Required size limit for the shared tmpfs volume. Once this limit is exceeded, writes returnENOSPC.
Volumes are sandbox-local only. They are created when the sandbox starts and are deleted when the sandbox is removed. Sharing a volume across different sandboxes is not supported.
volume_mounts
Each container may mount one or more sandbox-local shared volumes through volume_mounts.
- name: runtime-state
  mount_path: /var/www/html
  read_only: false
-
name: References one of the entries declared inspec.volumes. -
mount_path: Absolute path inside the container where the shared volume will be mounted. -
read_only: Optional flag that mounts the volume read-only for that container.
[!NOTE]
/tmpremains reserved for the container’s own ephemeral tmpfs budget and cannot be used as a shared volume mount path.
containers
Sandbox fundamentally follows and is built upon the PodSandbox model, and therefore consists of a Pause Container and one or more Application Containers.
The containers field represents the list of Application Containers included in this sandbox.
Each container is composed of name, image, args, env, work_dir, volume_mounts, security/runtime options, and resource.
The following is an example container specification capable of running a sample application.
- name: my-app
  image: my-app-image:latest
  args: []
  env:
      - SECRET_KEY=supersecretkey
  work_dir: '/app'
  volume_mounts:
      - name: runtime-state
        mount_path: /srv/runtime
  resource:
      cpu: 100m
      memory: 256Mi
      ephemeral_storage: 96Mi
-
name: The name of the container. It must be unique within the sandbox. Rather than generating it randomly, the name is explicitly specified so that it can be configured directly by the client. -
image: The container image. This must be an OCI (Open Container Initiative)-compatible image reference. For example:my-app-image:latestordocker.io/library/my-app-image:latest. The implementation first attempts to use an image already available on the node, and only pulls from the registry if the image does not exist locally. -
args: The command and argument list executed when the container starts. For example:["sh", "-c", "echo Hello World"]. This field is optional, and if omitted, the container starts using the image’s default command and arguments. -
env: A list of environment variables available inside the container. Each environment variable is represented as a string inKEY=VALUEformat. This field is optional, and if omitted, no additional environment variables are injected. -
work_dir: The working directory of the container. The container switches to this directory at startup. This field is optional, and if omitted, the container uses its default working directory. -
resource: The resources allocated to the container. While Kubernetes typically uses a Request/Limit model, this project simplifies resource allocation by using a single resource model consisting ofcpuandmemory.In other words, this behaves similarly to Kubernetes’ Guaranteed QoS model.
cpurepresents the CPU resources allocated to the container, andmemoryrepresents the memory resources allocated to the container. These values act as both Request and Limit and determine the maximum amount of resources the container can consume.ephemeral_storageis optional and controls writable filesystem limits. When set, sbxlet applies this total budget by splitting it into:- root writable layer (
/) = 80% - temporary filesystem (
/tmp) = 20%
The root writable layer and
/tmpwill returnENOSPCwhen each split limit is exceeded.CPU values are expressed in millicores, for example
100mrepresents0.1CPU.Memory values are expressed in bytes, for example
256Mirepresents 256 mebibytes (approximately 268,435,456 bytes).Resource enforcement is implemented using cgroups, and gVisor is custom patched, built, and used for proper enforcement.
For more details, refer to the Reference section below.
- root writable layer (
Container Security and Runtime Options
Each container may define Docker Compose-like security and runtime options. These options are validated by sbxorch, forwarded to sbxlet, and then translated into CRI LinuxContainerSecurityContext and mount settings.
Supported fields:
cap_add: Linux capabilities to add to the container, for exampleSYS_PTRACE.cap_drop: Linux capabilities to drop from the container, for exampleALL.security_opt: Container security profile options.no-new-privileges,seccomp, andapparmorare supported.read_only: Runs the container root filesystem as read-only when set totrue.tmpfs: Adds custom tmpfs mounts at specific paths inside the container.
Supported security_opt values:
no-new-privileges:true|falseseccomp=runtime/defaultseccomp=unconfinedseccomp=localhost/<absolute-path>apparmor=runtime/defaultapparmor=unconfinedapparmor=localhost/<profile>
Supported tmpfs.options values:
ro,rwnosuid,suidnodev,devnoexec,execmode=<octal>size=<bytes|k/m/g|Ki/Mi/Gi>
[!WARNING] These options intentionally expose low-level container security controls. In normal operation, directly overriding them is not recommended unless the workload has a clear compatibility requirement and the resulting security trade-off has been reviewed.
In particular, loosening options such as
cap_add,security_opt: ["seccomp=unconfined"],security_opt: ["no-new-privileges:false"], or disabling read-only rootfs can materially weaken isolation.
[!NOTE] The options above were verified on
runcworkers. Some options may behave differently or may not work as expected onrunsc/gVisor workers because gVisor virtualizes syscall handling and filesystem behavior rather than directly exposing the same kernel/runtime semantics as runc.
Example:
apiVersion: sandboxd.o/v1
kind: Sandbox
id: root_manager_revenge
spec:
    egress: false
    ttl_seconds: 3600
    ports:
        - host_port: 0
          container_port: 31337
          protocol: tcp
    readiness_probe:
        protocol: tcp
        port: 31337
        initial_delay_seconds: 10
        period_seconds: 5
        timeout_seconds: 1
        success_threshold: 1
        failure_threshold: 30
    containers:
        - name: app
          image: ghcr.io/sandboxd-o/example:latest
          args: []
          env: []
          work_dir: ''
          cap_drop:
              - ALL
          cap_add:
              - CHOWN
              - SETGID
              - SETUID
              - SYS_PTRACE
          security_opt:
              - no-new-privileges:true
          read_only: true
          tmpfs:
              - mount_path: /run
                options: rw,nosuid,nodev,noexec,mode=0755
              - mount_path: /tmp
                options: rw,nosuid,nodev,exec,mode=1777
          resource:
              cpu: 1000m
              memory: 1024Mi
When read_only: true is used, any path that the application must write to at runtime should be explicitly provided as a writable tmpfs mount. For example, services that need /run or /tmp should declare writable tmpfs mounts as shown above.
[!NOTE] However, in the case of
/dev/shm, it appears thatrunscinternally mounts a separatetmpfs.As a result, it could not be controlled at the code level in the current implementation. Further investigation and experimentation will be conducted in the future to determine whether limits can be enforced for this mount point as well.
Readiness Probe
Sandboxd-O supports a Readiness Probe feature for sandboxes.
A Readiness Probe is a mechanism used to determine whether a sandbox is ready. Until the sandbox is considered ready, external access is not allowed.
The following example demonstrates its usage, and it behaves similarly to Kubernetes’ Readiness Probe model.
apiVersion: sandboxd.o/v1
kind: Sandbox
id: sbx-nginx
spec:
    egress: true
    ttl_seconds: 3600
    ports:
        - container_port: 80
          protocol: tcp
    readiness_probe:
        protocol: http
        path: /
        port: 80
        initial_delay_seconds: 10
        period_seconds: 5
        timeout_seconds: 1
        success_threshold: 1
        failure_threshold: 5
    containers:
        - name: app
          image: nginx:latest
          args: []
          env: []
          work_dir: ''
          resource:
              cpu: 150m
              memory: 64Mi
              ephemeral_storage: 96Mi
-
readiness_probe: A field used to configure the Readiness Probe. It determines whether the sandbox is considered ready. This field itself is optional, but the fields below become required once it is specified. protocol: Specifies the protocol used by the Readiness Probe. Supported values arehttpandtcp.- For the HTTP protocol, an internal HTTP GET request is performed, and the sandbox is considered ready when the response satisfies
200 <= status < 400. - For the TCP protocol, an internal TCP connection attempt (
Dial) is performed, and the sandbox is considered ready when the connection succeeds. - UDP is not supported due to its protocol characteristics.
- For the HTTP protocol, an internal HTTP GET request is performed, and the sandbox is considered ready when the response satisfies
-
path: Specifies the path used by the Readiness Probe whenhttpis selected. For example, setting/healthzsends an HTTP GET request to that endpoint inside the sandbox. port: Specifies the port that the Readiness Probe will target. This must match one of thecontainer_portvalues defined in theportsfield.
The following additional options control Readiness Probe behavior:
-
initial_delay_seconds: Specifies the delay (in seconds) after sandbox creation before the first Readiness Probe execution. During this period, the sandbox is considered not ready. -
period_seconds: Specifies the interval (in seconds) between repeated Readiness Probe executions. -
timeout_seconds: Specifies the timeout (in seconds) for each probe request. If no response is received or the connection attempt fails within this duration, the attempt is treated as failed. -
success_threshold: Specifies the number of consecutive successful probe attempts required for the sandbox to be considered ready. For example, setting this to1marks the sandbox as ready after the first successful attempt. -
failure_threshold: Specifies the number of consecutive failed probe attempts required before the sandbox is considered not ready. For example, setting this to5marks the sandbox as not ready after five consecutive failures.
When a Readiness Probe is configured, the sandbox state immediately after provisioning starts as:
Creatingin sbxletScheduledin sbxorch
Once the probe succeeds and the sandbox is determined to be ready:
- sbxlet transitions the sandbox to
Running - sbxorch also transitions the sandbox to
Running
If the probe fails and the sandbox is determined to be not ready:
- sbxlet transitions the sandbox to
Error - sbxorch transitions the sandbox to
Failed
This means the Readiness Probe directly affects sandbox state transitions and allows access to remain blocked until the sandbox is actually ready.
If no Readiness Probe is configured, the sandbox transitions to Running immediately after provisioning. In such cases, even though the sandbox appears as Running, the application inside may not yet be fully initialized.
Therefore, using a Readiness Probe is recommended to more accurately reflect real application readiness.
[!NOTE]
This feature was introduced starting from v0.3.0. For more details, refer to PR #15.
Sandbox/Container State
In sbxlet, sandboxes and containers have the following states, and each state is mapped to the corresponding sbxorch sandbox state.
- sbxlet Sandbox states:
Creating,Running,Deleting,Error - sbxlet Container states:
Creating,Running,Stopped,Error,Unknown
The state of an sbxlet sandbox transitions to Running once all containers reach the Running state.
If any container enters the Error state, the sandbox transitions to Error. In this case, the error message is recorded in the Last Error field.
Additionally, when a sandbox is being removed, its state transitions to Deleting.
- sbxorch Sandbox states:
Pending,Scheduled,Running,Failed,Deleting
The sandbox state in sbxorch is determined by mapping the corresponding sandbox state from sbxlet.
A sandbox is initially created in the Pending state, then scheduled and assigned to a node. Once the sandbox managed by sbxlet on that node reaches the Running state, the sandbox state in sbxorch also transitions to Running.
If the sandbox enters the Error state in sbxlet, the corresponding sbxorch sandbox transitions to Failed.
Likewise, when a sandbox is deleted through sbxorch, its state transitions to Deleting.
[!NOTE]
If container-level dependencies are required, it is recommended to implement dependency checks and wait logic through custom scripts in the container’s
argsfield, as shown in thewordpress.yamlexample. For example, if the WordPress container depends on the MySQL container, the WordPress container can include a script inargsthat waits until MySQL is ready.This is separate from the Readiness Probe described above. The Readiness Probe provides health-check mechanisms such as TCP Dial or HTTP GET checks to transition the sandbox state to
Running, but it does not directly manage dependencies or readiness between containers.
This information can be checked using commands such as sbxctl get sandboxes or sbxctl get sandboxes/:ID, or through the API.
> sbxctl get s -o wide
RESOURCE: sandbox
NAME                PHASE    NODE             EXTERNAL       IP          PORTS          EGRESS  CONTAINERS  EXPIRE_AT                       LAST_ERROR  CREATED
sbx-wordpress-demo  Running  sandboxd-node-1  host1.swua.kr  10.89.1.35  22761/tcp->80  true    2           2026-05-22T10:45:58.249474717Z              2026-05-22T09:45:58.249474717Z

> sbxctl get s/sbx-wordpress-demo -o yaml
sandbox:
    created_at: "2026-05-22T09:45:58.249474717Z"
    id: sbx-wordpress-demo
    spec:
        containers:
            - args:
                - sh
                - -c
                - for i in $(seq 1 90); do php -r '$s=@fsockopen("127.0.0.1",3306,$e,$es,1); if($s){fclose($s); exit(0);} exit(1);' && break; sleep 2; done; exec docker-entrypoint.sh apache2-foreground
              env:
                - WORDPRESS_DB_HOST=127.0.0.1:3306
                - WORDPRESS_DB_USER=wordpress
                - WORDPRESS_DB_PASSWORD=wordpress-pass
                - WORDPRESS_DB_NAME=wordpress
              image: wordpress:6.9.4-php8.3-apache
              name: wordpress
              resource:
                cpu: 1000m
                memory: 1024Mi
            - env:
                - MYSQL_DATABASE=wordpress
                - MYSQL_USER=wordpress
                - MYSQL_PASSWORD=wordpress-pass
                - MYSQL_ROOT_PASSWORD=root-pass
              image: mysql:8.4
              name: mysql
              resource:
                cpu: 1000m
                memory: 1024Mi
        egress: true
        ports:
            - container_port: 80
              protocol: tcp
        ttl_seconds: 3600
    status:
        assigned_ports:
            - container_port: 80
              host_port: 22761
              protocol: tcp
        expire_at: "2026-05-22T10:45:58.249474717Z"
        external: host1.swua.kr
        ip: 10.89.1.35
        node_name: sandboxd-node-1
        phase: Running
    updated_at: "2026-05-22T09:46:10.588422069Z"
[!NOTE]
The final resource allocation of a sandbox is determined as the sum of the resources allocated to its containers. Therefore, in the example above, the sandbox is calculated to use 2 vCPUs (2000m) and 2048Mi of memory.
Installation, Build and Usage
Requirements
- x86-64 architecture
- Ubuntu 24.04 LTS or later (tested on the AWS EC2 Ubuntu 24.04 AMI)
- Go 1.25.5 or later
- Other binary versions can be checked in the install script, and all components are installed automatically.
[!NOTE]
ARM architecture is not officially supported. It may be built and used separately, but it is not officially tested or supported.
- …and it does not require virtualization technologies such as KVM, QEMU, or a hypervisor! This project is built on container technology. While it requires the kernel version and features needed by gVisor’s
runscruntime, it does not require separate virtualization technology.
Installation Runtime Dependencies
This project requires runtime dependencies such as Containerd, CRI Plugins, and gVisor (runsc), and additionally requires CNI plugins to be configured.
It also requires runtime environment setup such as enabling certain kernel options (bridge-nf-call-iptables, etc.) and registering systemd services.
Additionally, the gVisor runtime shim used by this project is a custom-patched version, so the patched binary is automatically included and installed.
An installation script covering these steps is provided at scripts/install.sh, and runtime dependencies can be installed using that script.
chmod +x scripts/install.sh
sudo ./scripts/install.sh
[!NOTE]
The installation script must be executed with sudo privileges, and it has been tested on x86-64 architecture and Ubuntu 24.04 LTS or later.
Build and Usage
At the moment, this project can either be built directly from source or used by downloading prebuilt binaries from releases.
The following example demonstrates how to clone the source code via git and build it locally.
git clone https://github.com/swualabs/sandboxd-o.git
cd sandboxd-o

make build
After building, the sbxlet, sbxorch, and sbxctl binaries will be generated under the ./build directory.
You can start sbxlet and sbxorch by executing these binaries with sudo privileges.
The following script demonstrates one example of running sbxlet and sbxorch in the background.
sudo install -d /var/lib/sandboxd
sudo cp configs/sbxlet_config.json /var/lib/sandboxd/sbxlet_config.json
sudo cp configs/sbxorch_config.json /var/lib/sandboxd/sbxorch_config.json

sudo ./build/sbxlet > /dev/null 2>&1 &
sudo ./build/sbxorch > /dev/null 2>&1 &
More detailed installation and usage guides will be provided in the future.
Configuration
sbxlet, sbxorch, and sbxctl now use JSON config files by default.
sbxlet:/var/lib/sandboxd/sbxlet_config.jsonsbxorch:/var/lib/sandboxd/sbxorch_config.jsonsbxctl:/var/lib/sandboxd/sbxctl_config.json
Each binary also accepts --config or -c to use a different path.
Environment variables are still supported as compatibility overrides, but they are no longer the recommended configuration mechanism.
Authentication (shared secret)
sbxorch, sbxlet, and sbxctl authenticate every privileged HTTP call with a single static shared secret. All three components must be configured with the same secret value; communication only succeeds when they match.
- Config field:
shared_secret(in each component’s JSON config file) - Environment override:
SBX_SHARED_SECRET(applies to all three) sbxctladditionally accepts a--secretflag
How it works:
- Outgoing requests carry the secret in an
Authorization: Bearer <secret>header. - Servers reject any request to a privileged route whose token does not match, returning
401 Unauthorized. The token is compared in constant time. - The public, unauthenticated routes are limited to
GET /healthzand/swagger/*so health checks and API docs keep working.
sbxorch and sbxlet fail closed: they refuse to start when shared_secret is empty.
[!WARNING] The committed example configs ship with a placeholder
shared_secret(MY_SHARED_SECRET) so the daemons can start out of the box. This value is publicly known and must be changed before any production use — otherwise the authentication provides no protection. Set the same strong, randomly generated value on every component, for exampleopenssl rand -hex 32.
sbxlet
Example file: configs/sbxlet_config.json
sudo ./build/sbxlet --config /var/lib/sandboxd/sbxlet_config.json
sbxorch
Example file: configs/sbxorch_config.json
sudo ./build/sbxorch --config /var/lib/sandboxd/sbxorch_config.json
sbxctl
Example file: configs/sbxctl_config.json
Compatible environment variable override: SBXCTL_SERVER
./build/sbxctl --config /var/lib/sandboxd/sbxctl_config.json get sandboxes
Testing
make test
# make test-cover
The target test coverage is at least 70% for both overall and PATCH coverage.
However, since there are components that are difficult to test—such as sbxlet—certain exceptions are defined. Please refer to codecov.yaml for details.
Appendix A. Performance and Benchmarking
This section presents the benchmarking results of Sandboxd-O provisioning performance using the following specification containing a single Nginx container.
apiVersion: sandboxd.o/v1
kind: Sandbox
id: perf-nginx
spec:
    egress: false
    ports:
        - container_port: 80
          protocol: tcp
    readiness_probe:
        protocol: http
        path: /
        port: 80
        initial_delay_seconds: 1
        period_seconds: 1
        timeout_seconds: 1
        success_threshold: 1
        failure_threshold: 99
    containers:
        - name: nginx
          image: nginx:latest
          resource:
              cpu: 500m
              memory: 512Mi
              ephemeral_storage: 128Mi
During the performance measurement process, the following probes were used as measurement targets. Data was collected by adding detailed timing logs for each stage inside sbxlet.
pod_sandbox_create_total: Total time required for PodSandbox creation (including namespace setup, base networking, and runtime initialization)container_create_start_total: Total time for a single container includingCreateContainer+StartContainer+ state verificationcontainer_image_pull: Time spent checking image availability and attempting image pull (may be extremely small in the case of cache hits)network_policy_apply: Time required to apply sandbox firewall/isolation rules (iptables)hostport_publish_apply: Time required to apply Host Port DNAT ruleswait_sandbox_ready: Waiting time until the runtime determines that the container has reached theRunningstatewait_readiness_probe: Time spent waiting until the Readiness Probe succeeds and sbxlet proceeds to mark the sandbox asRunningstate_refresh_and_save_running: Time required to refresh the final runtime state and persist theRunningstate
Finally, total represents the overall elapsed time from the moment sbxlet enters the actual provisioning function until the runtime state is stored as Running.
Additionally, client_ready_ms represents the total elapsed time from immediately before sending the POST /api/v1/sandboxes request from the sbxorch perspective until repeated GET /api/v1/sandboxes/{id} polling observes the sandbox state as Running (or terminal failure state).
In other words, this metric represents the provisioning latency perceived from the user/control-plane perspective.
The test was performed by repeating the same sandbox specification 45 times, and the collected data was analyzed using p50, p95, and p99 tail latency metrics.
Client Baseline
| metric | n | mean_ms | p50_ms | p95_ms | p99_ms | max_ms |
|---|---|---|---|---|---|---|
| client_ready_ms | 45 | 18718.034532 | 18941.967529 | 19030.195312 | 19073.408203 | 19107.492676 |
[!NOTE]
The following sbxorch environment variable was used in this measurement environment:
ORCH_STATUS_SYNC_INTERVAL=20sThis means that sbxorch was configured to synchronize sandbox state from sbxlet every 20 seconds.
As a result,
client_ready_msis measured according to sbxorch’s status synchronization interval (20 seconds), which explains why the observed values were approximately around 20 seconds.This metric is based on sbxorch’s perspective. In practice, when the client sends a Status GET API request, the status is updated accordingly, so the actual perceived transition time to
Runningis expected to be shorter.In fact, testing confirmed that the sandbox transitioned to
Runningand became reachable in approximately 2 seconds (matching sbxlet’s total latency), before sbxorch updated the state through its synchronization loop.
Sbxlet Internal Baseline
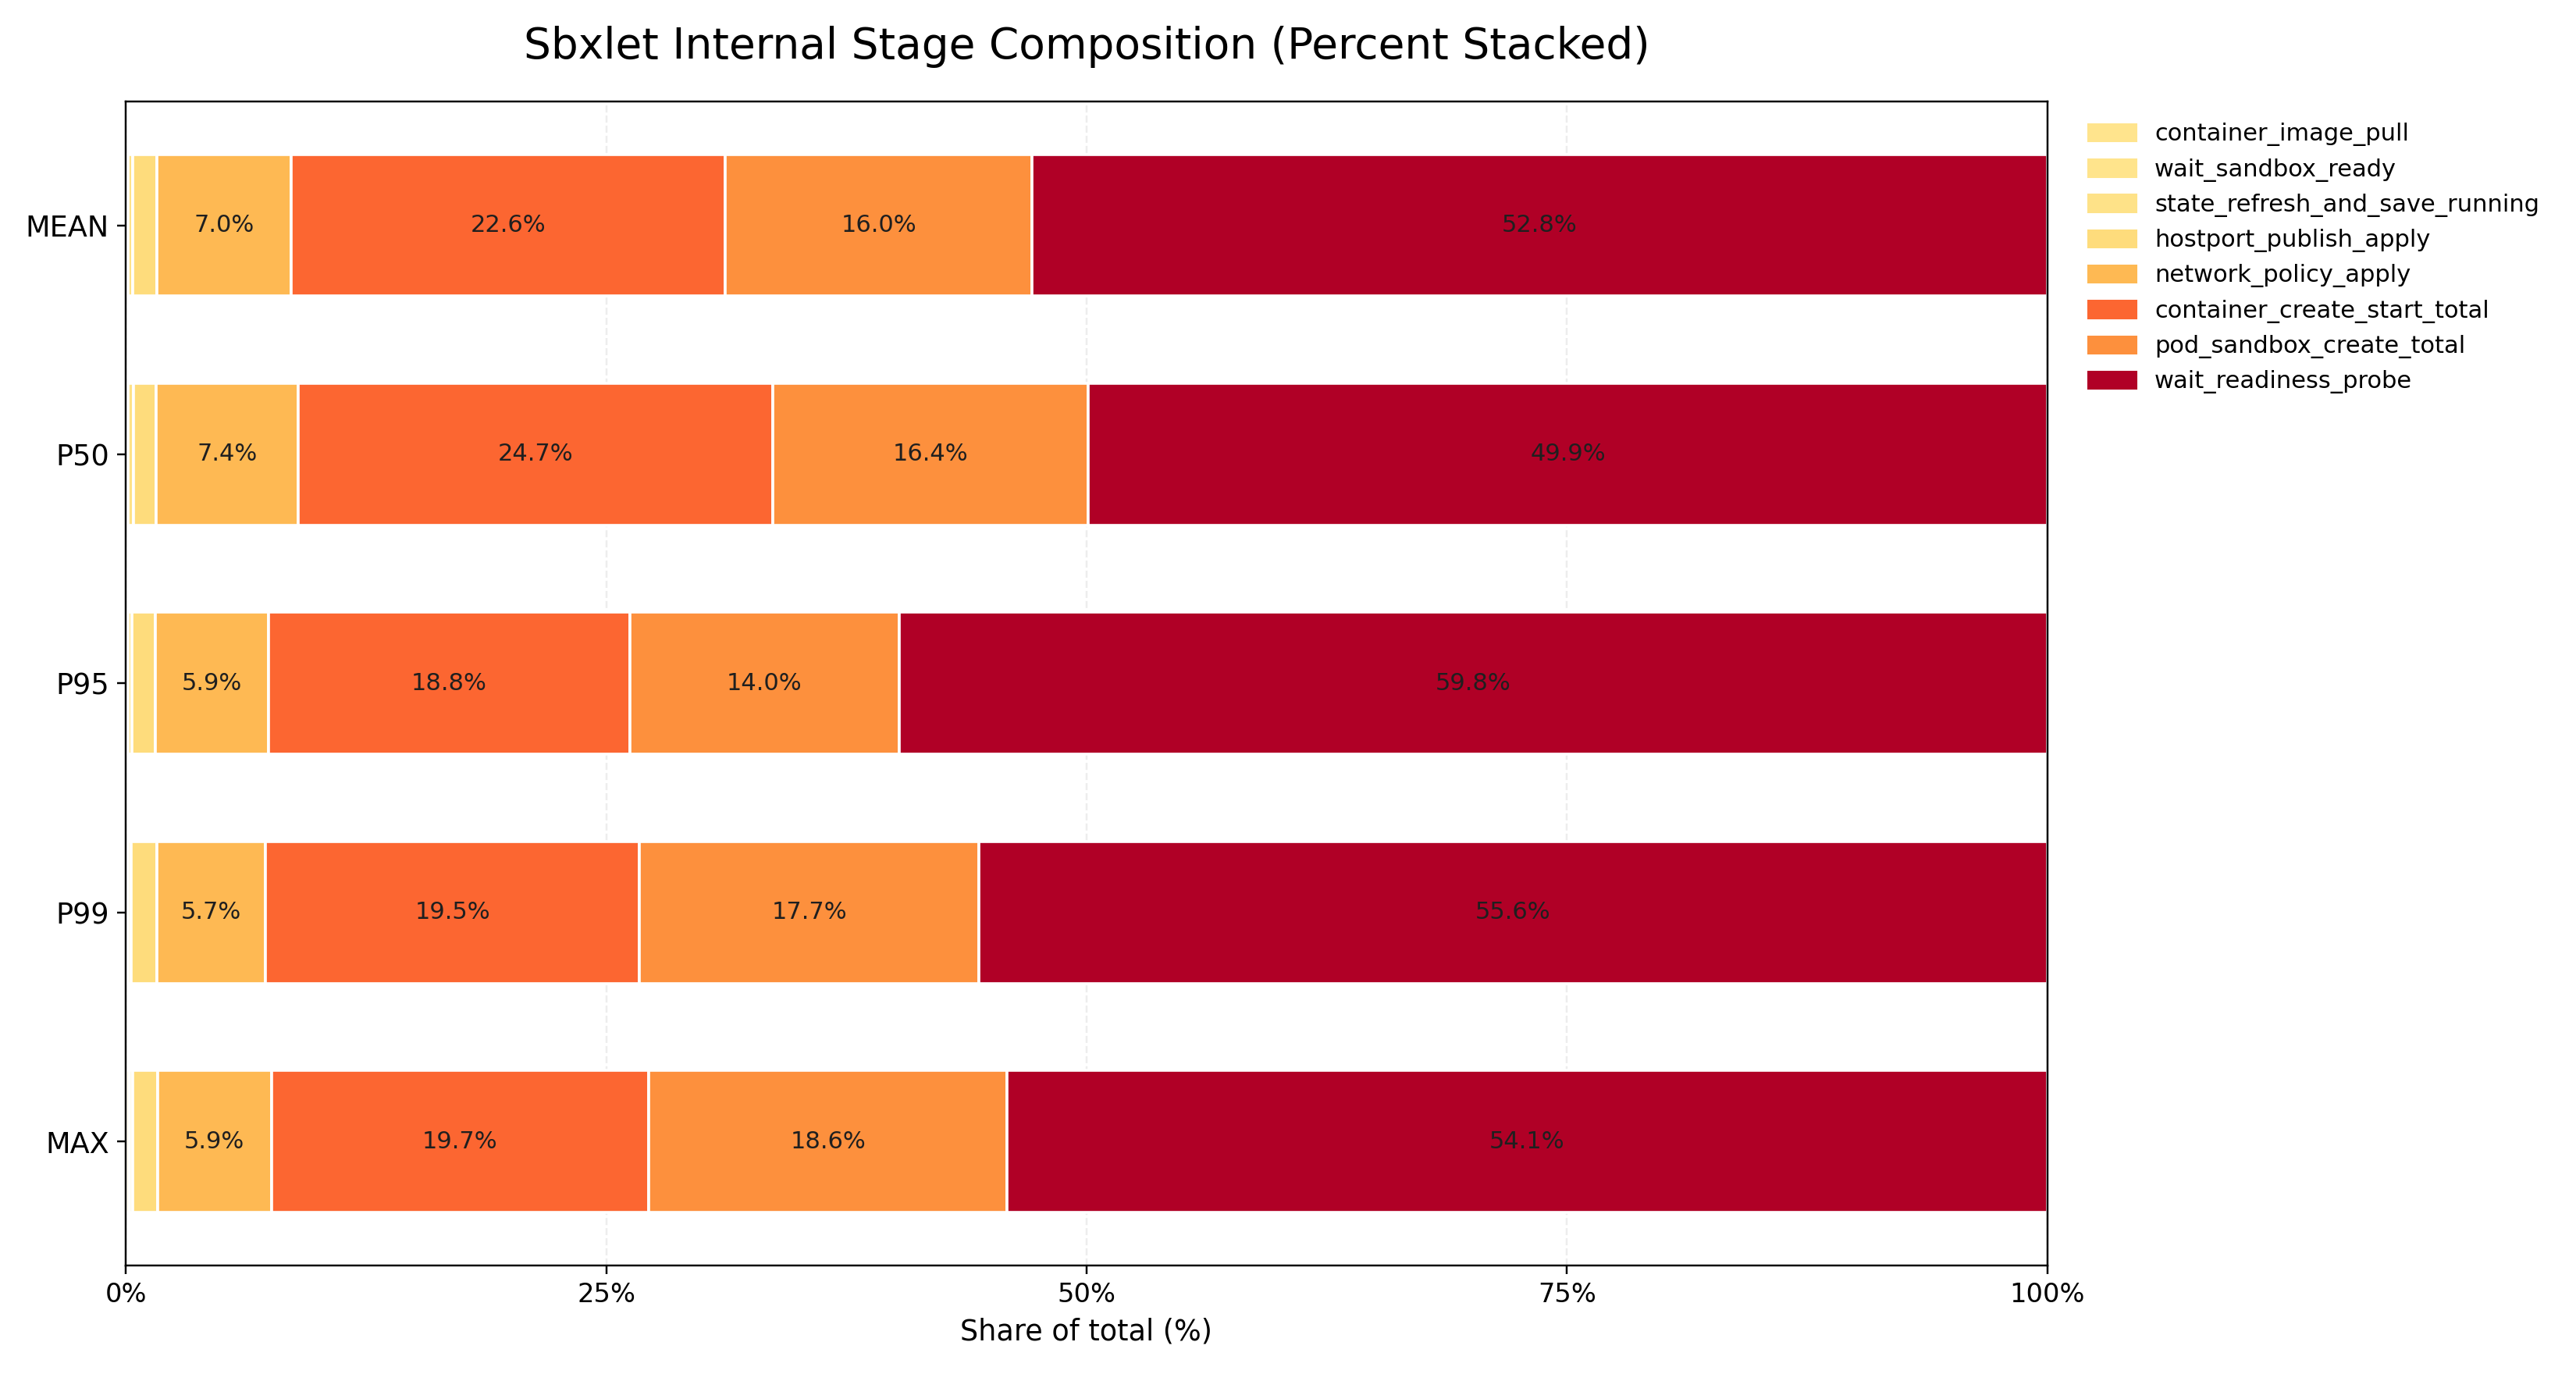
| metric | n | mean_ms | p50_ms | p95_ms | p99_ms | max_ms |
|---|---|---|---|---|---|---|
| total | 45 | 2178.621589 | 2053.916593 | 2944.276319 | 3097.327348 | 3320.588127 |
| pod_sandbox_create_total | 45 | 344.272735 | 330.796320 | 472.243653 | 649.635123 | 711.289052 |
| container_image_pull | 45 | 0.555835 | 0.514975 | 0.973611 | 0.991320 | 1.023044 |
| container_create_start_total | 45 | 487.206278 | 497.574547 | 634.109749 | 716.261264 | 749.595281 |
| network_policy_apply | 45 | 150.309222 | 149.313072 | 197.676209 | 208.353703 | 226.132524 |
| wait_sandbox_ready | 45 | 1.664390 | 1.506291 | 2.342074 | 2.573512 | 5.834114 |
| hostport_publish_apply | 45 | 27.188316 | 23.946189 | 42.280091 | 48.185709 | 48.505696 |
| wait_readiness_probe | 45 | 1138.231510 | 1005.326693 | 2013.692176 | 2043.987995 | 2064.558837 |
| state_refresh_and_save_running | 45 | 5.369700 | 5.502309 | 6.457015 | 6.796266 | 7.011295 |
Sbxlet Stage (Containerd CRI)
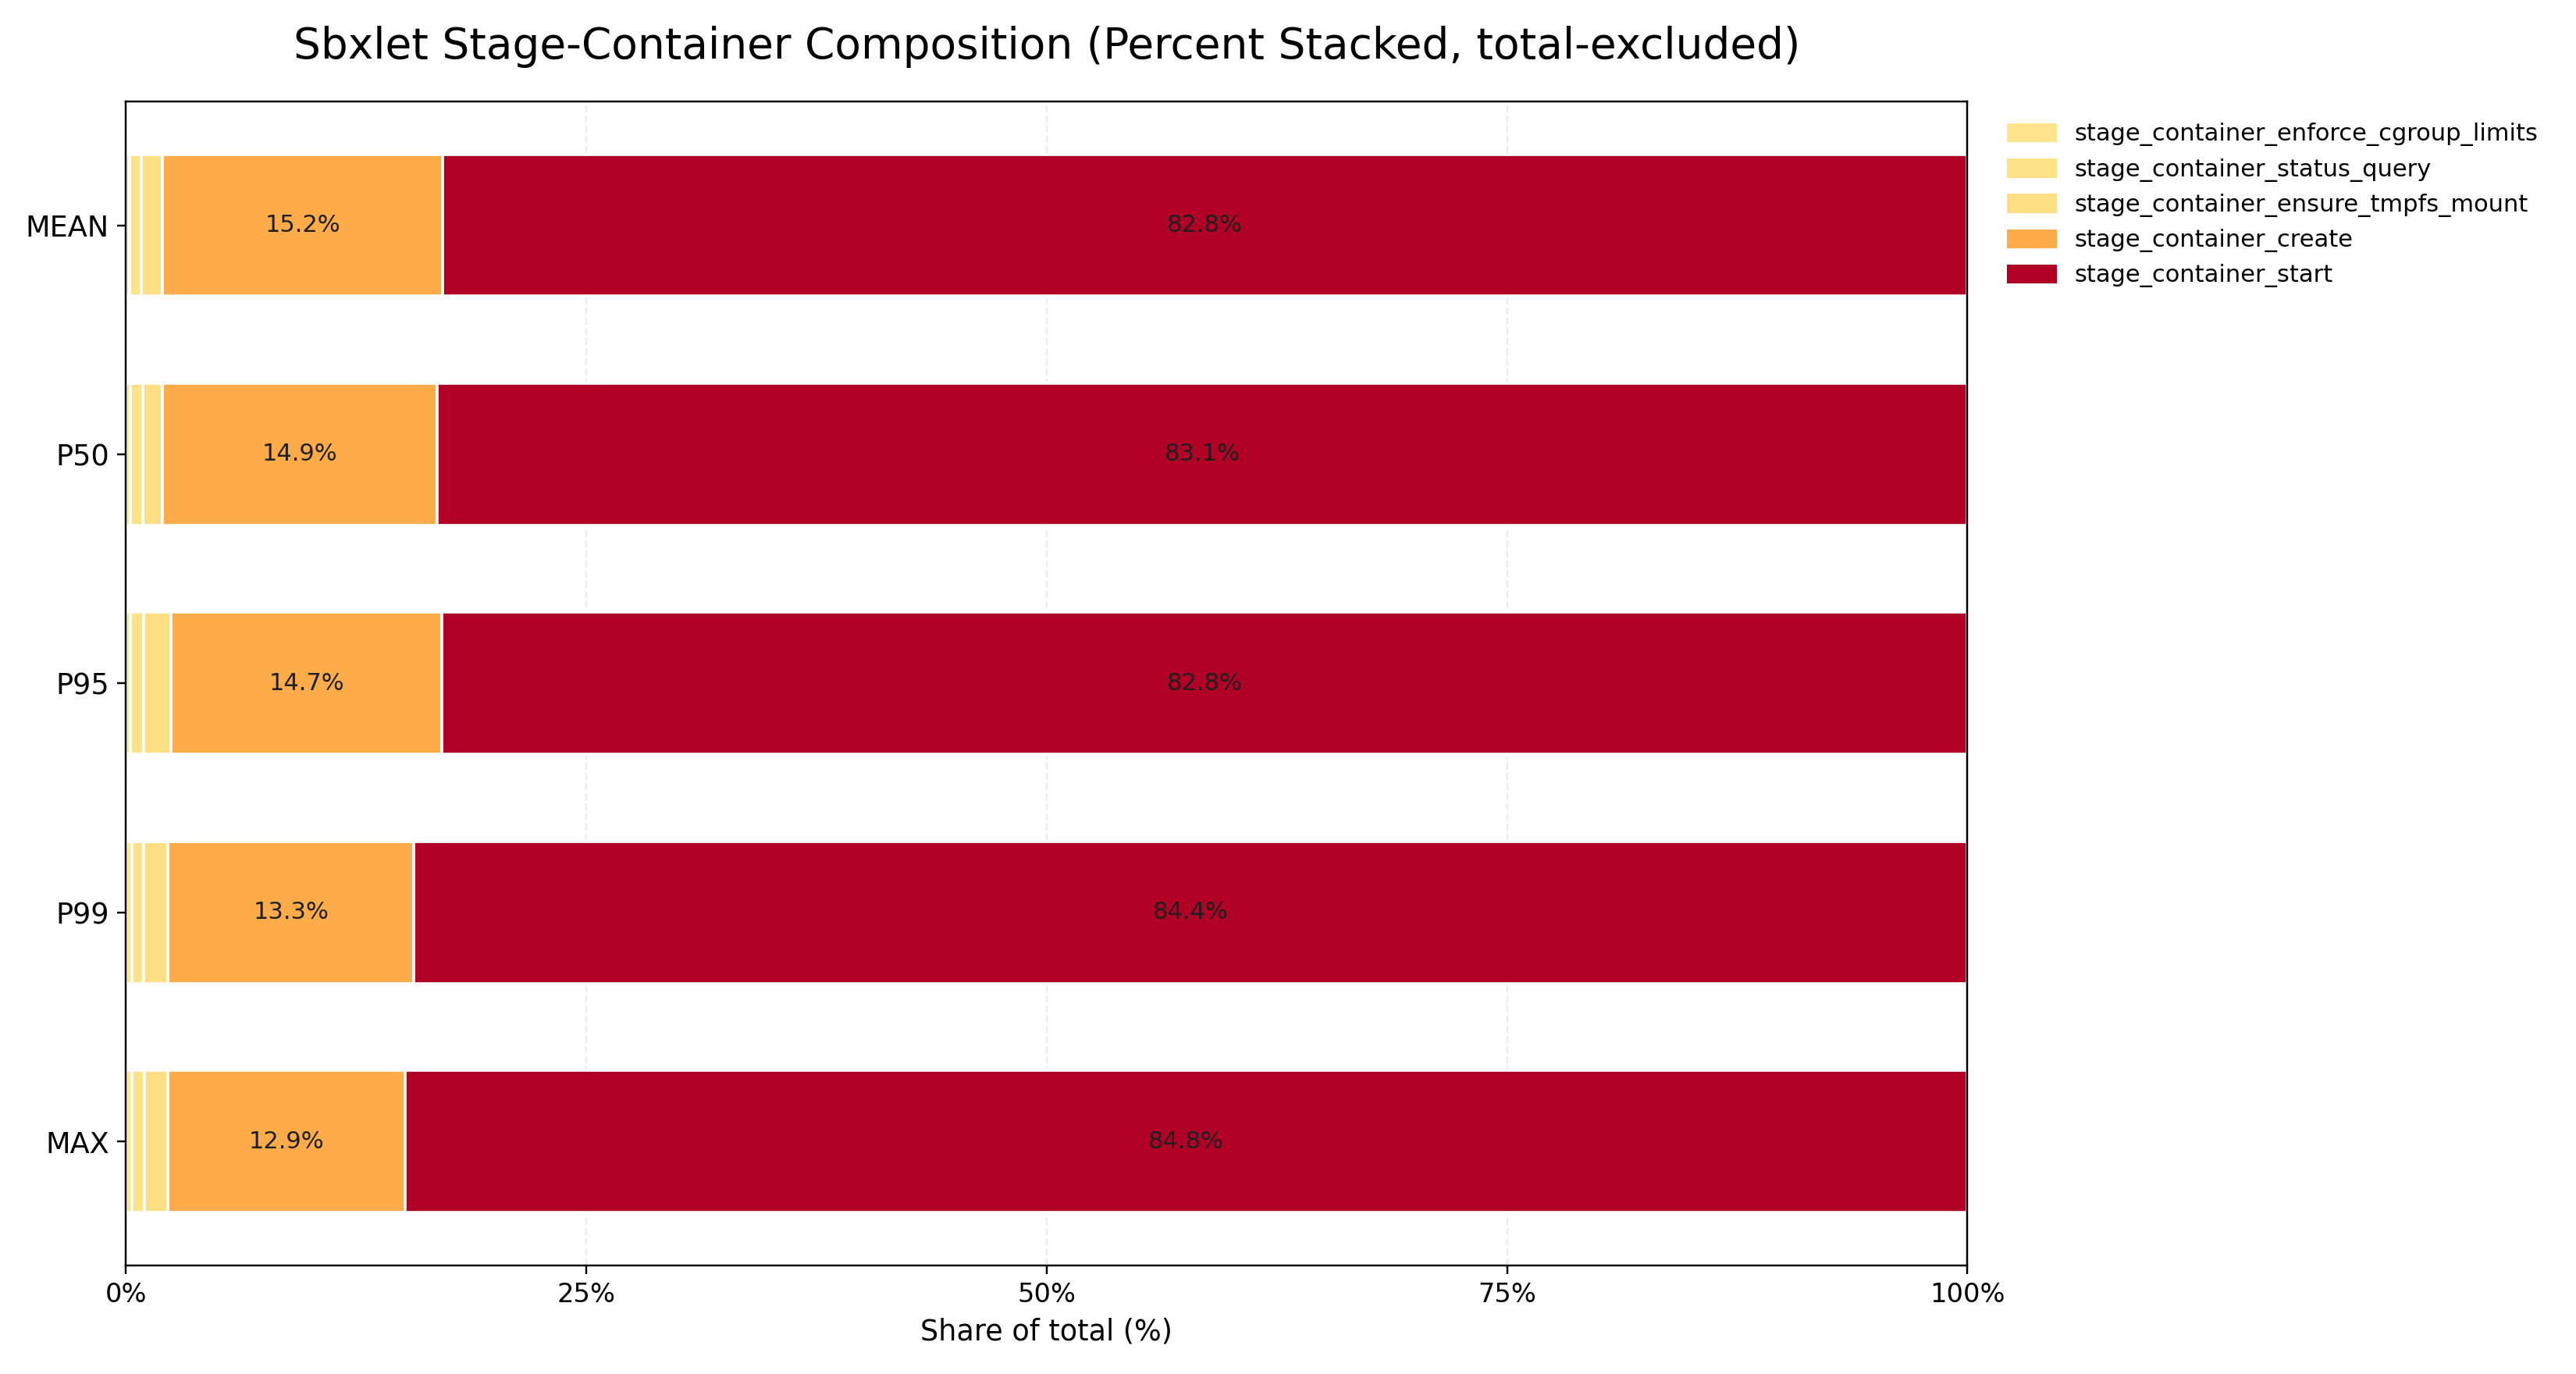
| metric | n | mean_ms | p50_ms | p95_ms | p99_ms | max_ms |
|---|---|---|---|---|---|---|
| stage_container_ensure_tmpfs_mount | 45 | 5.244724 | 4.924421 | 8.973015 | 9.476388 | 9.643016 |
| stage_container_create | 45 | 69.486650 | 70.458002 | 89.674067 | 96.330383 | 96.715802 |
| stage_container_start | 45 | 378.973056 | 392.003143 | 504.173811 | 609.396929 | 637.010683 |
| stage_container_enforce_cgroup_limits | 45 | 0.961051 | 1.031276 | 1.463898 | 2.425223 | 2.492357 |
| stage_container_status_query | 45 | 2.935109 | 3.331555 | 4.397661 | 4.638227 | 4.982841 |
| stage_container_create_start_total | 45 | 482.228314 | 493.870857 | 630.107004 | 712.854420 | 745.647821 |
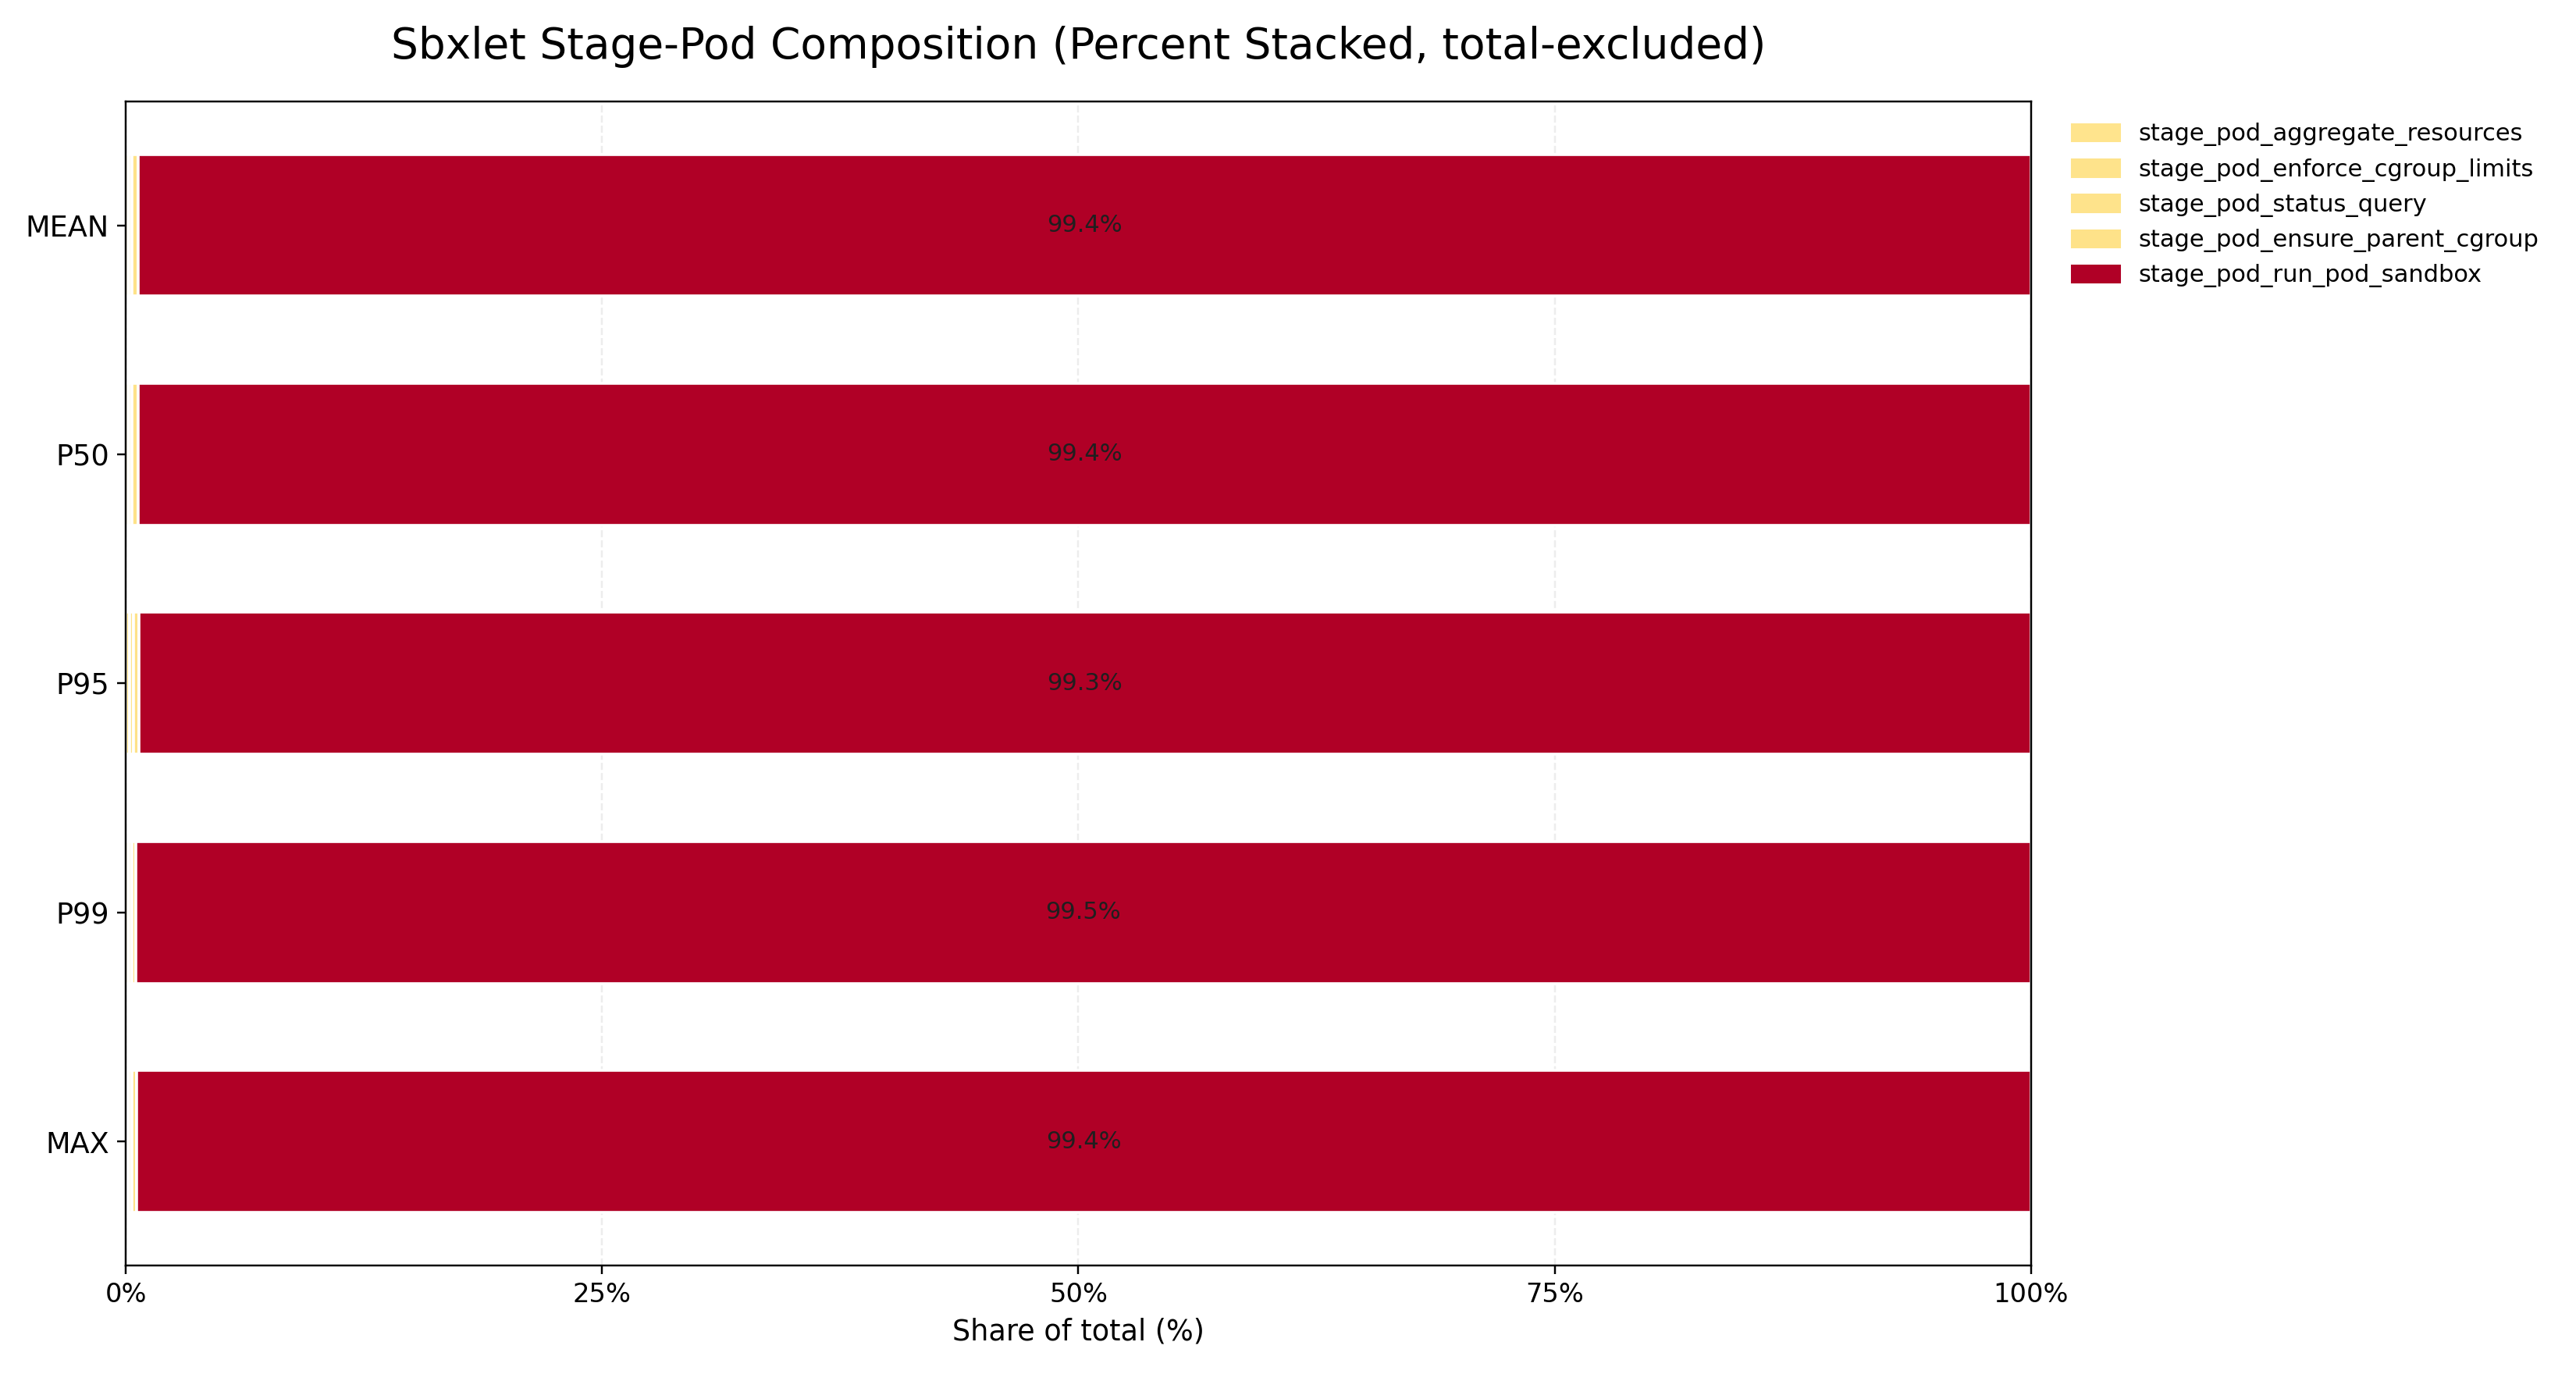
| metric | n | mean_ms | p50_ms | p95_ms | p99_ms | max_ms |
|---|---|---|---|---|---|---|
| stage_pod_aggregate_resources | 45 | 0.015076 | 0.014904 | 0.016146 | 0.016723 | 0.044544 |
| stage_pod_ensure_parent_cgroup | 45 | 0.982889 | 0.987719 | 1.117943 | 1.138562 | 1.717180 |
| stage_pod_run_pod_sandbox | 45 | 307.015569 | 289.886447 | 401.243166 | 599.556773 | 683.984414 |
| stage_pod_enforce_cgroup_limits | 45 | 0.502330 | 0.441017 | 0.801416 | 0.924747 | 1.116165 |
| stage_pod_status_query | 45 | 0.505591 | 0.439205 | 0.857806 | 0.963953 | 1.038865 |
| stage_pod_create_total | 45 | 340.123423 | 326.675724 | 468.357043 | 645.852200 | 707.446993 |
Compare Low vs High Resource Configurations
The following graph compares the results from the baseline configuration (200m / 256Mi) with the higher-spec configuration (3000m / 8Gi).
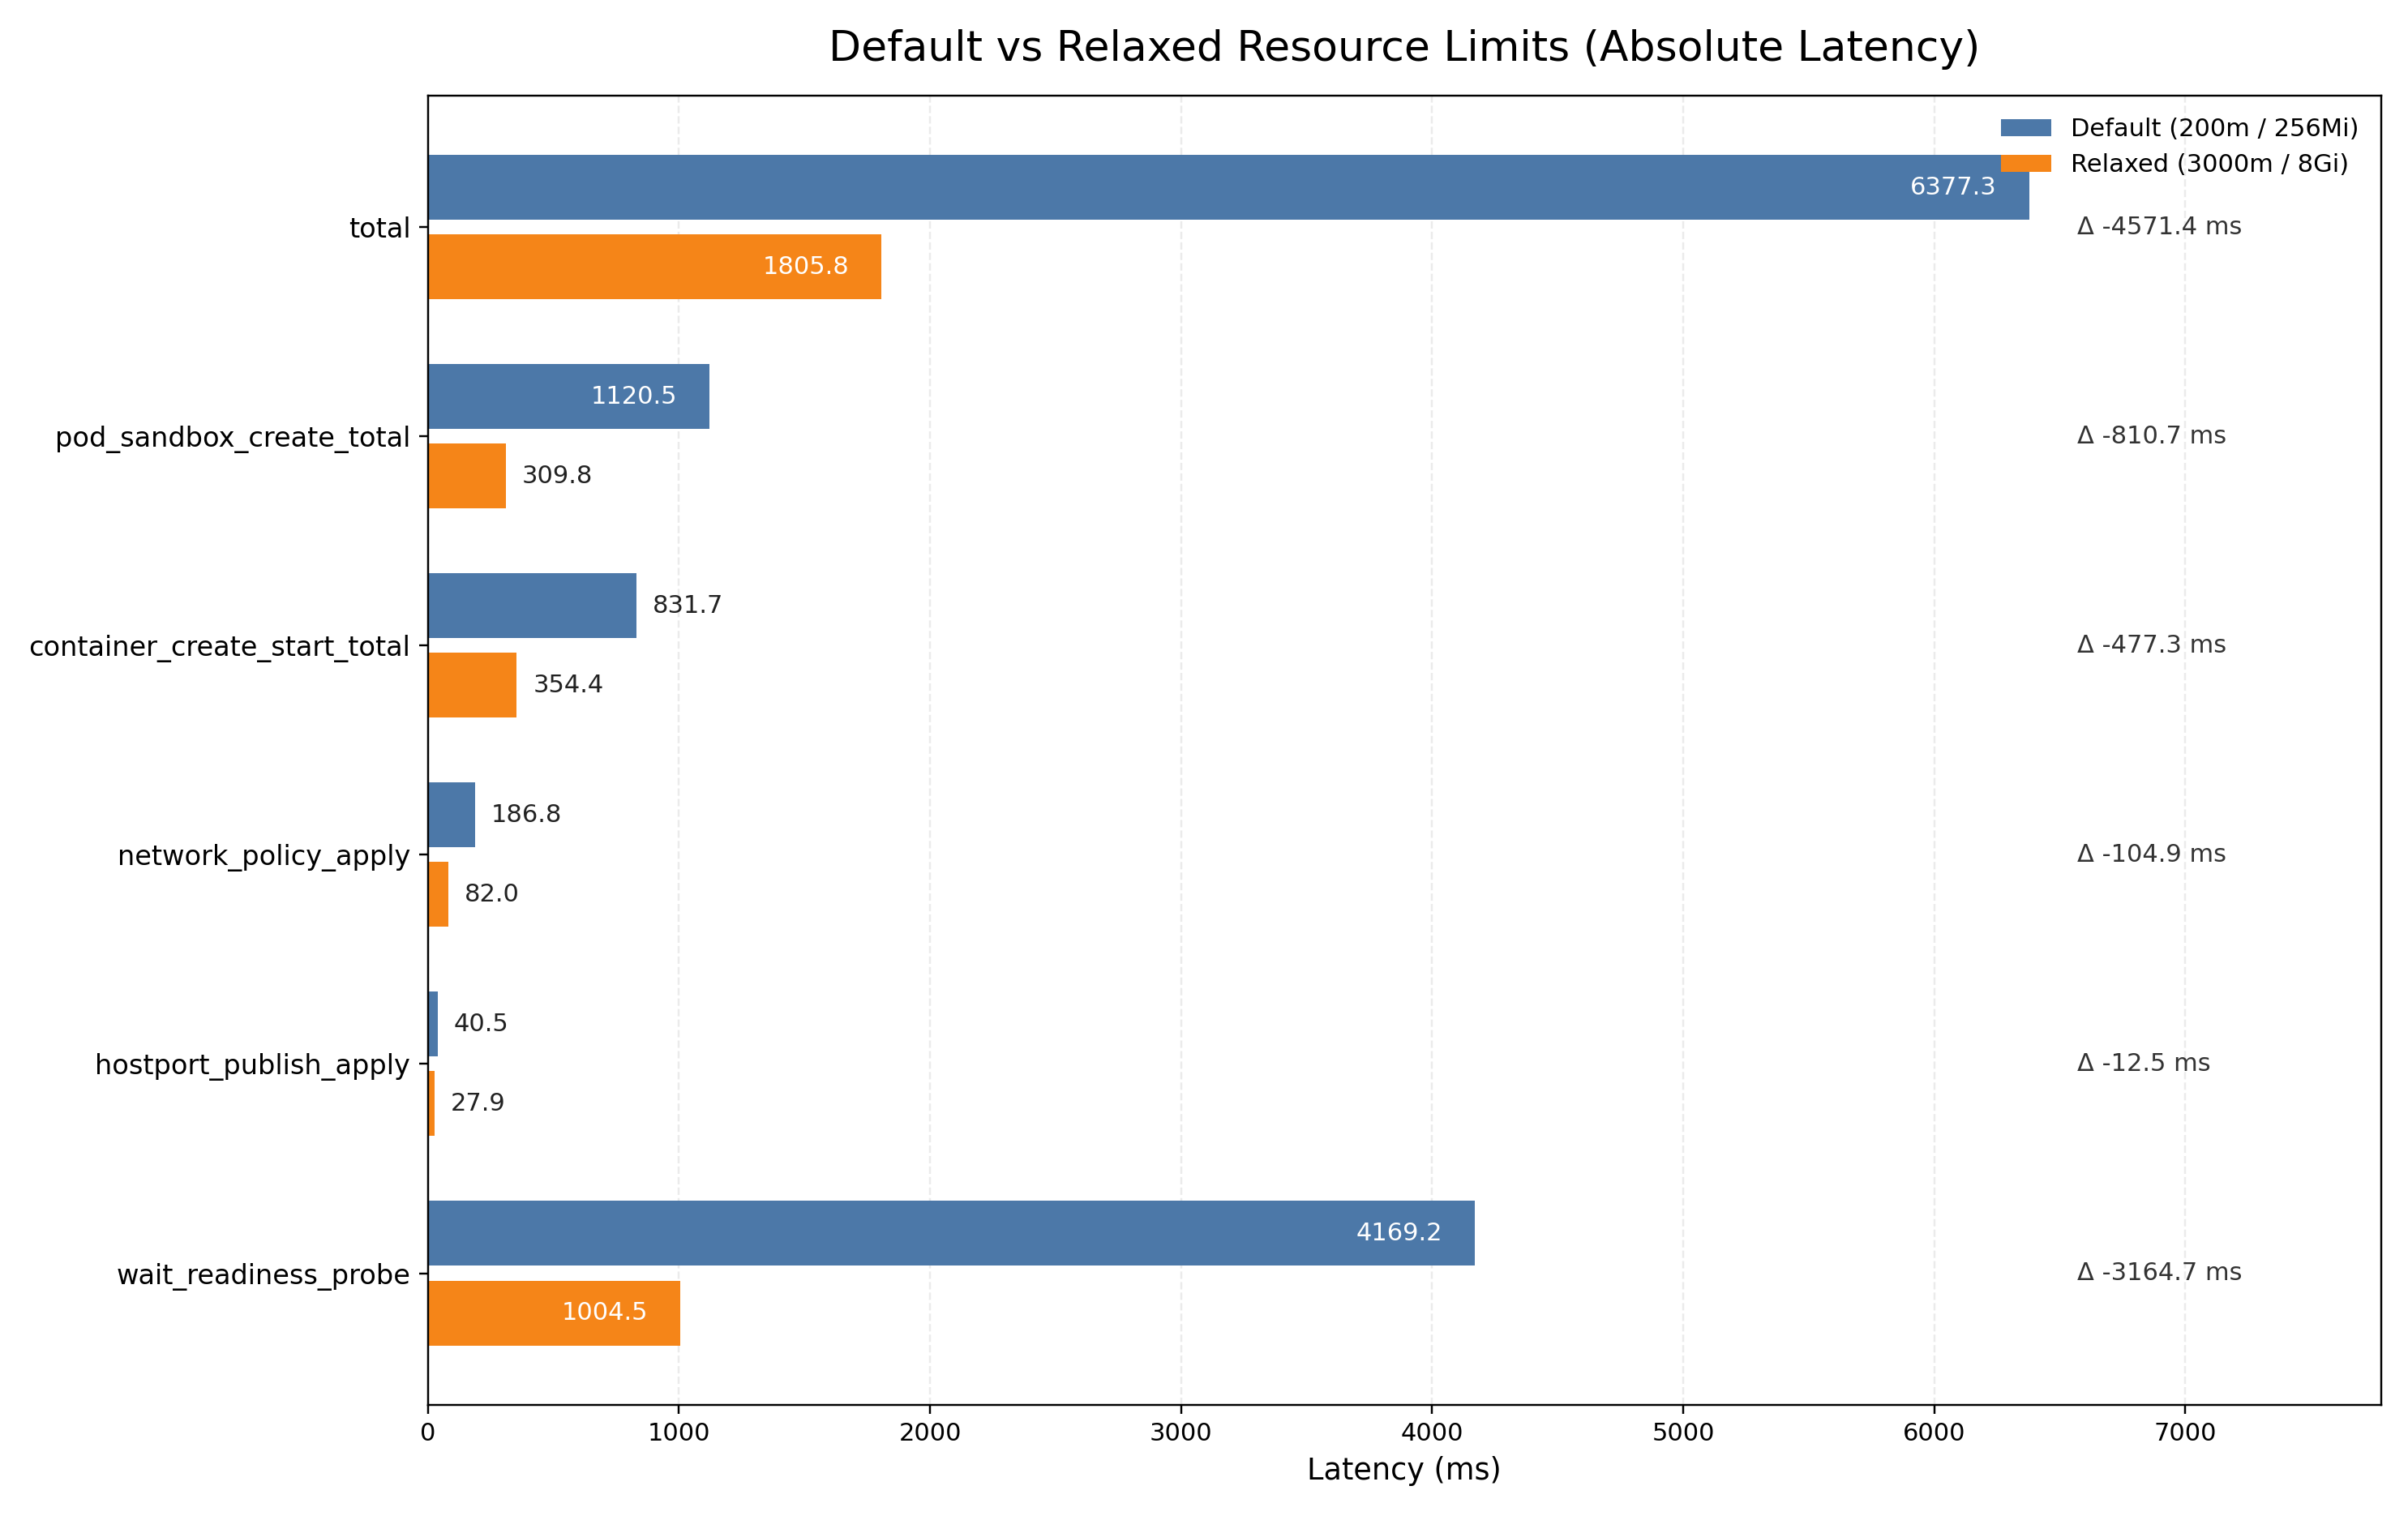
Sweep
In this section, we present benchmarking results obtained by provisioning the same sandbox specification five times each across seven different resource configurations, ranging from 200m / 256Mi up to 3000m / 8Gi.
The benchmark used the specification shown below. Since the original Nginx configuration provisioned too quickly for meaningful comparison, the following image was used instead.
apiVersion: sandboxd.o/v1
kind: Sandbox
id: perf-sweep
spec:
    egress: false
    ports:
        - container_port: 80
          protocol: tcp
    readiness_probe:
        protocol: http
        path: /
        port: 80
        initial_delay_seconds: 1
        period_seconds: 1
        timeout_seconds: 1
        success_threshold: 1
        failure_threshold: 99
    containers:
        - name: web
          image: httpd:2.4
          resource:
              cpu: ...
              memory: ...
              ephemeral_storage: 128Mi
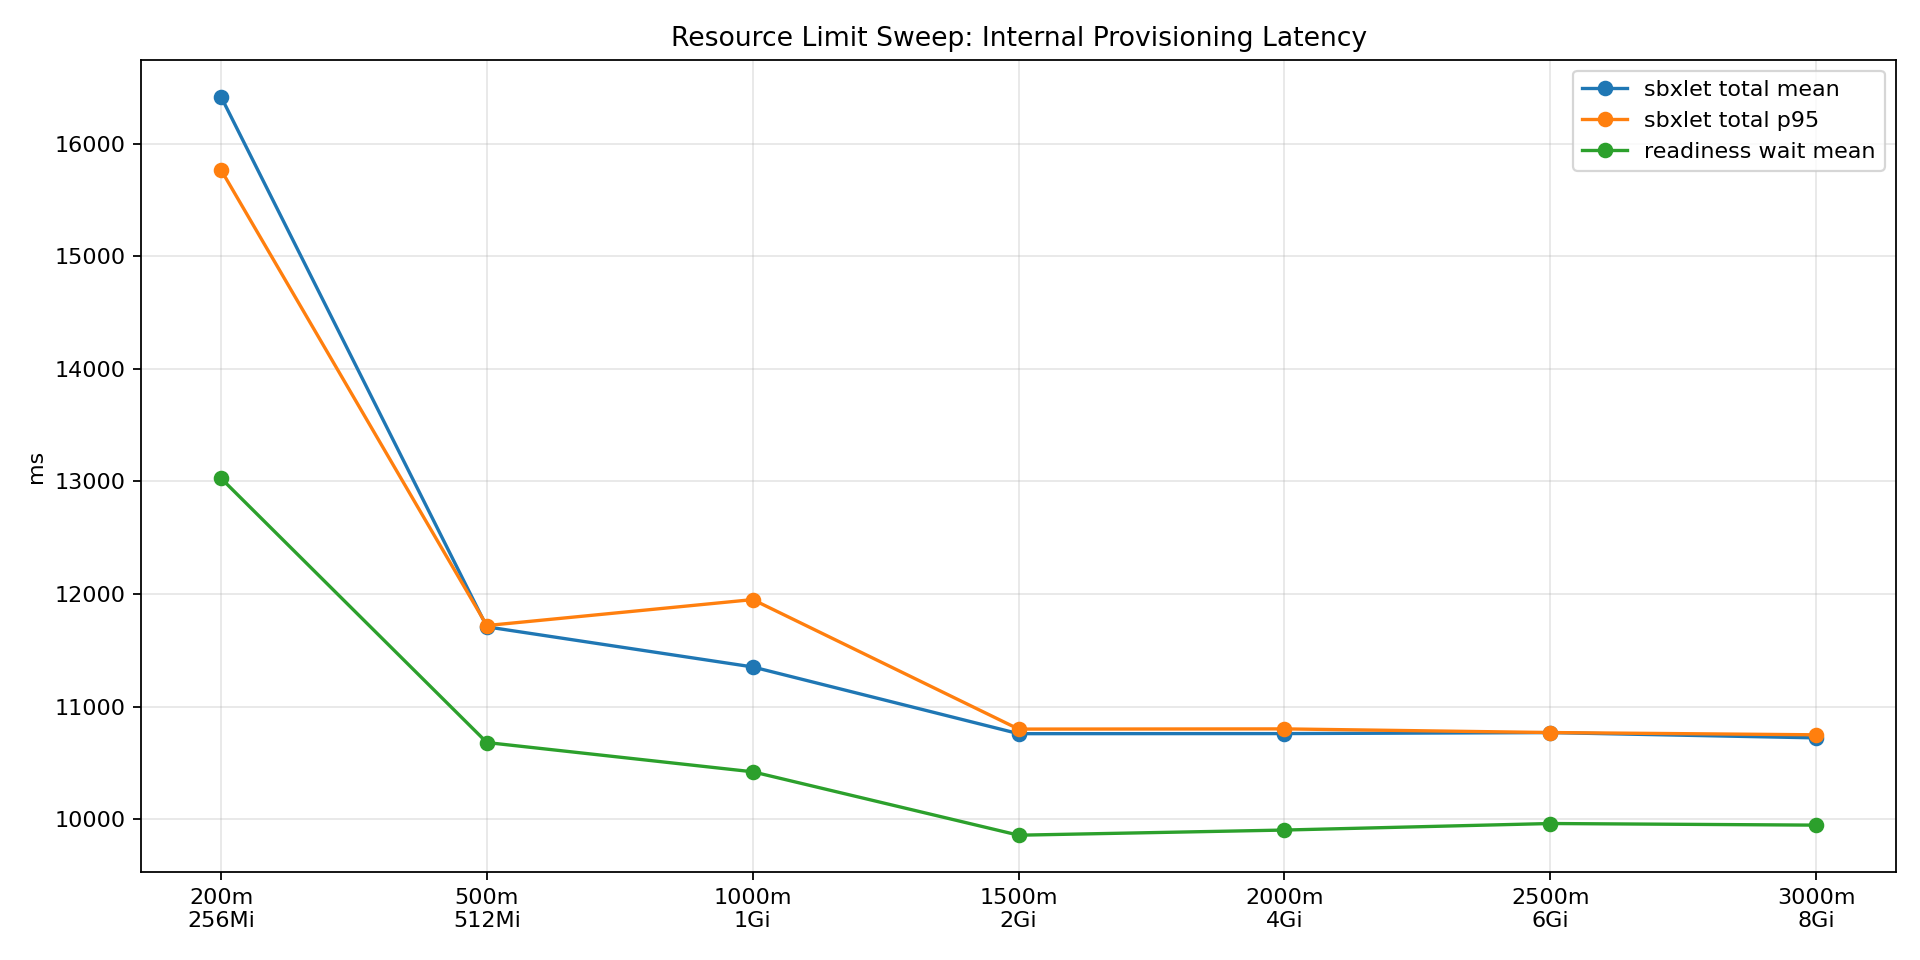
| cpu | memory | runs | client_ready_ms_mean | client_ready_ms_p95 | total_ms_mean | total_ms_p95 | wait_readiness_probe_ms_mean | wait_readiness_probe_ms_p95 | pod_sandbox_create_total_ms_mean | pod_sandbox_create_total_ms_p95 | container_create_start_total_ms_mean | container_create_start_total_ms_p95 | network_policy_apply_ms_mean | network_policy_apply_ms_p95 | hostport_publish_apply_ms_mean | hostport_publish_apply_ms_p95 | wait_sandbox_ready_ms_mean | wait_sandbox_ready_ms_p95 | state_refresh_and_save_running_ms_mean | state_refresh_and_save_running_ms_p95 | container_image_pull_ms_mean | container_image_pull_ms_p95 |
|---|---|---|---|---|---|---|---|---|---|---|---|---|---|---|---|---|---|---|---|---|---|---|
| 200m | 256Mi | 5 | 21201.933 | 18981.647 | 16416.674 | 15766.847 | 13027.553 | 13169.428 | 1000.999 | 1188.498 | 980.898 | 1170.267 | 200.309 | 219.472 | 31.527 | 35.575 | 2.772 | 3.705 | 3.830 | 5.445 | 0.670 | 0.919 |
| 500m | 512Mi | 5 | 18933.306 | 19011.784 | 11707.671 | 11719.316 | 10680.224 | 10663.161 | 327.285 | 384.406 | 498.121 | 537.331 | 140.145 | 169.921 | 27.755 | 24.883 | 1.508 | 1.761 | 8.016 | 12.724 | 0.605 | 0.680 |
| 1000m | 1Gi | 5 | 18959.392 | 18994.345 | 11351.656 | 11949.836 | 10420.365 | 11039.037 | 285.077 | 287.233 | 395.608 | 429.625 | 179.611 | 183.337 | 41.041 | 45.896 | 2.137 | 1.979 | 5.469 | 5.669 | 0.555 | 0.635 |
| 1500m | 2Gi | 5 | 18928.689 | 18906.061 | 10758.871 | 10799.677 | 9857.296 | 9883.222 | 284.922 | 299.824 | 366.950 | 383.775 | 183.918 | 203.932 | 36.787 | 45.268 | 2.731 | 3.340 | 1.771 | 1.865 | 0.554 | 0.904 |
| 2000m | 4Gi | 5 | 18928.480 | 18957.647 | 10759.727 | 10801.446 | 9903.016 | 9938.695 | 264.116 | 272.214 | 368.668 | 393.849 | 150.056 | 171.543 | 39.491 | 47.820 | 2.076 | 2.458 | 1.809 | 1.863 | 0.418 | 0.448 |
| 2500m | 6Gi | 5 | 18913.278 | 18960.410 | 10768.598 | 10769.095 | 9961.016 | 9994.026 | 283.675 | 282.587 | 343.380 | 352.567 | 119.984 | 150.648 | 32.075 | 40.505 | 1.812 | 1.719 | 1.813 | 1.822 | 0.556 | 0.564 |
| 3000m | 8Gi | 5 | 18904.753 | 19060.329 | 10721.606 | 10748.990 | 9946.710 | 9985.840 | 269.232 | 263.255 | 308.798 | 334.199 | 122.453 | 119.776 | 38.340 | 46.761 | 1.890 | 2.460 | 1.979 | 2.074 | 0.314 | 0.317 |
[!NOTE]
Likewise,
client_ready_msfollows sbxorch’s status synchronization interval, which is why it was measured at approximately 20 seconds.As a result, this metric is not particularly meaningful for performance evaluation and should be treated only as a reference value. For actual provisioning performance analysis, it is more appropriate to use the
total_msmetric.
The following shows provisioning time metrics for resource configurations ranging from the initial 64m / 256Mi up to 1500m / 2Gi.
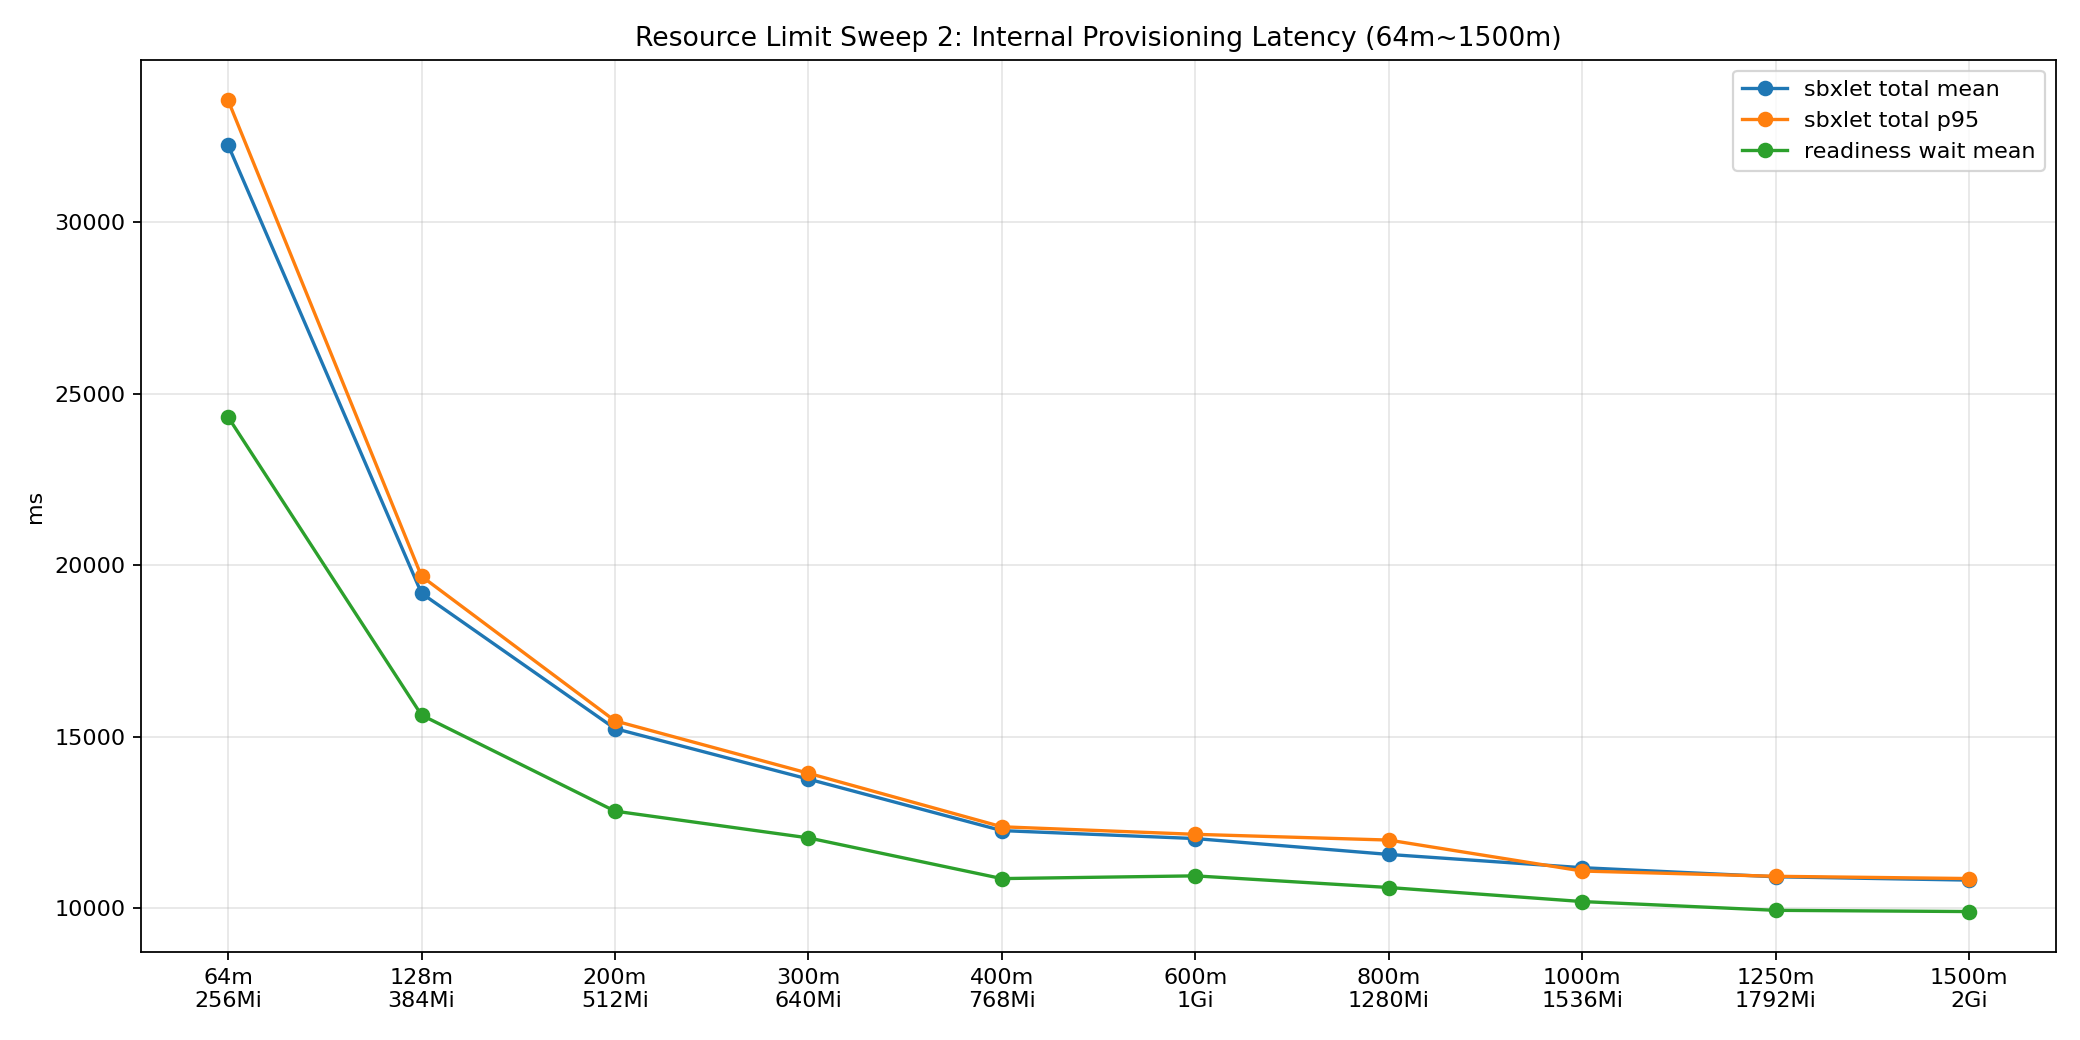
| cpu | memory | runs | client_ready_ms_mean | client_ready_ms_p95 | total_ms_mean | total_ms_p95 | wait_readiness_probe_ms_mean | wait_readiness_probe_ms_p95 | pod_sandbox_create_total_ms_mean | pod_sandbox_create_total_ms_p95 | container_create_start_total_ms_mean | container_create_start_total_ms_p95 | network_policy_apply_ms_mean | network_policy_apply_ms_p95 | container_image_pull_ms_mean | container_image_pull_ms_p95 | hostport_publish_apply_ms_mean | hostport_publish_apply_ms_p95 | state_refresh_and_save_running_ms_mean | state_refresh_and_save_running_ms_p95 | wait_sandbox_ready_ms_mean | wait_sandbox_ready_ms_p95 |
|---|---|---|---|---|---|---|---|---|---|---|---|---|---|---|---|---|---|---|---|---|---|---|
| 64m | 256Mi | 5 | 44552.815 | 50456.955 | 32251.761 | 33555.515 | 24321.115 | 24790.973 | 4645.292 | 5087.526 | 2978.005 | 3206.482 | 226.729 | 235.598 | 0.858 | 0.953 | 47.941 | 46.779 | 4.131 | 5.634 | 3.910 | 4.573 |
| 128m | 384Mi | 5 | 38440.381 | 38677.380 | 19181.087 | 19677.163 | 15628.733 | 16194.279 | 1887.490 | 2136.663 | 1418.087 | 1465.719 | 188.833 | 241.473 | 0.774 | 0.931 | 28.767 | 35.020 | 5.093 | 5.345 | 2.158 | 3.211 |
| 200m | 512Mi | 5 | 18698.062 | 18735.332 | 15235.219 | 15460.760 | 12828.257 | 13073.202 | 1060.795 | 1081.291 | 1077.892 | 1167.639 | 196.593 | 234.618 | 1.115 | 1.116 | 34.064 | 43.208 | 5.355 | 5.429 | 2.355 | 2.448 |
| 300m | 640Mi | 5 | 18834.925 | 18865.565 | 13761.889 | 13932.861 | 12048.247 | 12050.953 | 629.772 | 818.901 | 826.332 | 947.325 | 204.232 | 229.309 | 0.744 | 0.947 | 26.943 | 27.424 | 5.393 | 5.610 | 1.673 | 1.784 |
| 400m | 768Mi | 5 | 18856.024 | 18899.073 | 12260.881 | 12371.831 | 10861.231 | 10986.690 | 517.968 | 617.594 | 632.707 | 665.078 | 187.306 | 195.846 | 0.678 | 0.715 | 35.510 | 46.106 | 5.076 | 5.447 | 1.846 | 2.404 |
| 600m | 1Gi | 5 | 18903.773 | 18965.015 | 12028.595 | 12152.140 | 10940.812 | 11041.821 | 325.810 | 362.435 | 575.783 | 645.470 | 132.273 | 143.523 | 0.608 | 0.680 | 27.903 | 30.065 | 5.520 | 5.552 | 1.858 | 2.215 |
| 800m | 1280Mi | 5 | 18818.910 | 18883.067 | 11565.526 | 11984.752 | 10601.326 | 11042.828 | 276.507 | 291.984 | 452.828 | 534.219 | 170.300 | 187.307 | 0.609 | 0.726 | 37.013 | 45.128 | 4.602 | 5.136 | 2.559 | 3.002 |
| 1000m | 1536Mi | 5 | 18856.507 | 18864.181 | 11179.475 | 11081.915 | 10191.833 | 9992.137 | 342.176 | 387.094 | 375.443 | 368.430 | 193.452 | 205.708 | 0.615 | 0.869 | 41.179 | 46.633 | 5.447 | 6.665 | 2.721 | 3.218 |
| 1250m | 1792Mi | 5 | 18885.384 | 18980.821 | 10913.947 | 10928.295 | 9935.708 | 9964.596 | 335.752 | 348.697 | 408.990 | 426.969 | 161.214 | 180.381 | 0.706 | 0.922 | 40.588 | 48.257 | 3.068 | 3.089 | 2.845 | 2.600 |
| 1500m | 2Gi | 5 | 18855.397 | 18893.716 | 10816.679 | 10862.563 | 9899.840 | 9934.223 | 303.800 | 320.247 | 387.655 | 399.730 | 160.988 | 185.320 | 0.572 | 0.624 | 38.036 | 48.348 | 1.831 | 1.998 | 2.407 | 2.993 |
Discussion
-
Using the baseline resource configuration (500m / 512Mi) and an Nginx container, sandbox provisioning was observed to complete in approximately 2 seconds. This represents the total provisioning latency, including container runtime initialization, network configuration, and readiness probe waiting time.
-
In the Sbxlet Internal Baseline measurements, the stage with the highest latency was
wait_readiness_probe, which represents the waiting period until the readiness probe succeeds. This is directly related to the time required for the container to become actually ready and may vary depending on readiness probe configuration and runtime specifications. -
In the Resource Sweep measurements, a downward trend was observed as resource specifications increased. Under the current specification and environment, the most significant improvement occurred in the transition from 200m / 256Mi to 500m / 512Mi, while provisioning time did not decrease significantly beyond the 1500m / 2Gi range.
-
Additionally, using the httpd container benchmark, the largest reduction in provisioning time was observed when moving from 128m / 384Mi to 200m / 512Mi. Beyond approximately 400m / 768Mi, provisioning time no longer decreased substantially. This suggests that there may be a minimum resource threshold required for the runtime to prepare containers efficiently.
[!WARNING]
The results above assume a Warm Cache state for container images. Under Cold Cache conditions, significantly higher latency may occur during the image pull stage.
In addition, actual provisioning time may vary depending on runtime behavior, networking configuration, and readiness probe settings. Therefore, these results should be treated only as reference measurements for the specific environment and specifications tested.
Production-Scale CTF Load Test
This section presents the results of performance validation conducted using Sandboxd-O in a production-like environment on the SMCTF CTF platform.
The test was performed under the following assumptions, which are nearly identical to the scale used during the actual operation of SCA CTF 2026. (It later demonstrated exceptional stability during the actual medium-to-large-scale operation of SCA CTF 2026.)
| Item | Value |
|---|---|
| User scale | 60 teams, with up to 2 concurrent Sandboxes per team |
| Total concurrent Sandboxes | 120 |
| Maximum Sandbox resources | 1000m CPU, 1024Mi memory |
| Maximum required resources | 120000m=120vCPU, 122880Mi=120GiB memory |
| Control Plane | 1x m7i.4xlarge (16 vCPU / 64 GiB, $0.8 per hour) |
| Workers | 10x c7i.4xlarge (16 vCPU / 32 GiB, $0.7 per hour) |
| Control Plane configuration | create_rps=200, create_burst=240, status_sync_interval=2s, status_sync_batch_size=200, status_sync_max_parallel=16 |
| Validation method | Created 120 Sandboxes almost simultaneously, then performed TCP probes against all targets every 15 seconds for 10 minutes (600 seconds) |
Scenario 1. profile_migration Image
This image contains a Pwnable challenge used in SCA CTF and is one of the challenges with the highest vCPU resource requirements.
| Item | Value |
|---|---|
| Creation result | 120/120 Running, 0 failures |
| 10-minute TCP soak | 4920/4920 successful, 0 failures, 100% success rate |
| Average Worker host CPU utilization | Approximately 0.65% |
| Average Control Plane host CPU utilization | Approximately 0.06% |
| Metric | mean | median | p95 | p99 | max |
|---|---|---|---|---|---|
create_http_ms |
1034.610 |
1085.952 |
1602.509 |
1695.229 |
1695.285 |
time_to_scheduled_ms |
8333.865 |
8014.179 |
12251.279 |
13576.774 |
13715.233 |
time_to_running_ms |
14609.158 |
14548.306 |
18163.670 |
19197.435 |
19227.568 |
| TCP latency (10-minute soak) | 9.089 |
7.451 |
18.805 |
26.013 |
36.365 |
[!NOTE]
create_http_msrepresents the elapsed time from when the client sends aPOST /api/v1/sandboxesrequest until sbxorch returns the HTTP response.
Rather than testing an application that continuously consumes a large amount of CPU, this scenario primarily validates whether the system can handle concurrent creation requests, reliably bring all 120 Sandboxes into the Running state, and continuously maintain external TCP connectivity.
The following graphs visualize the results of Scenario 1.
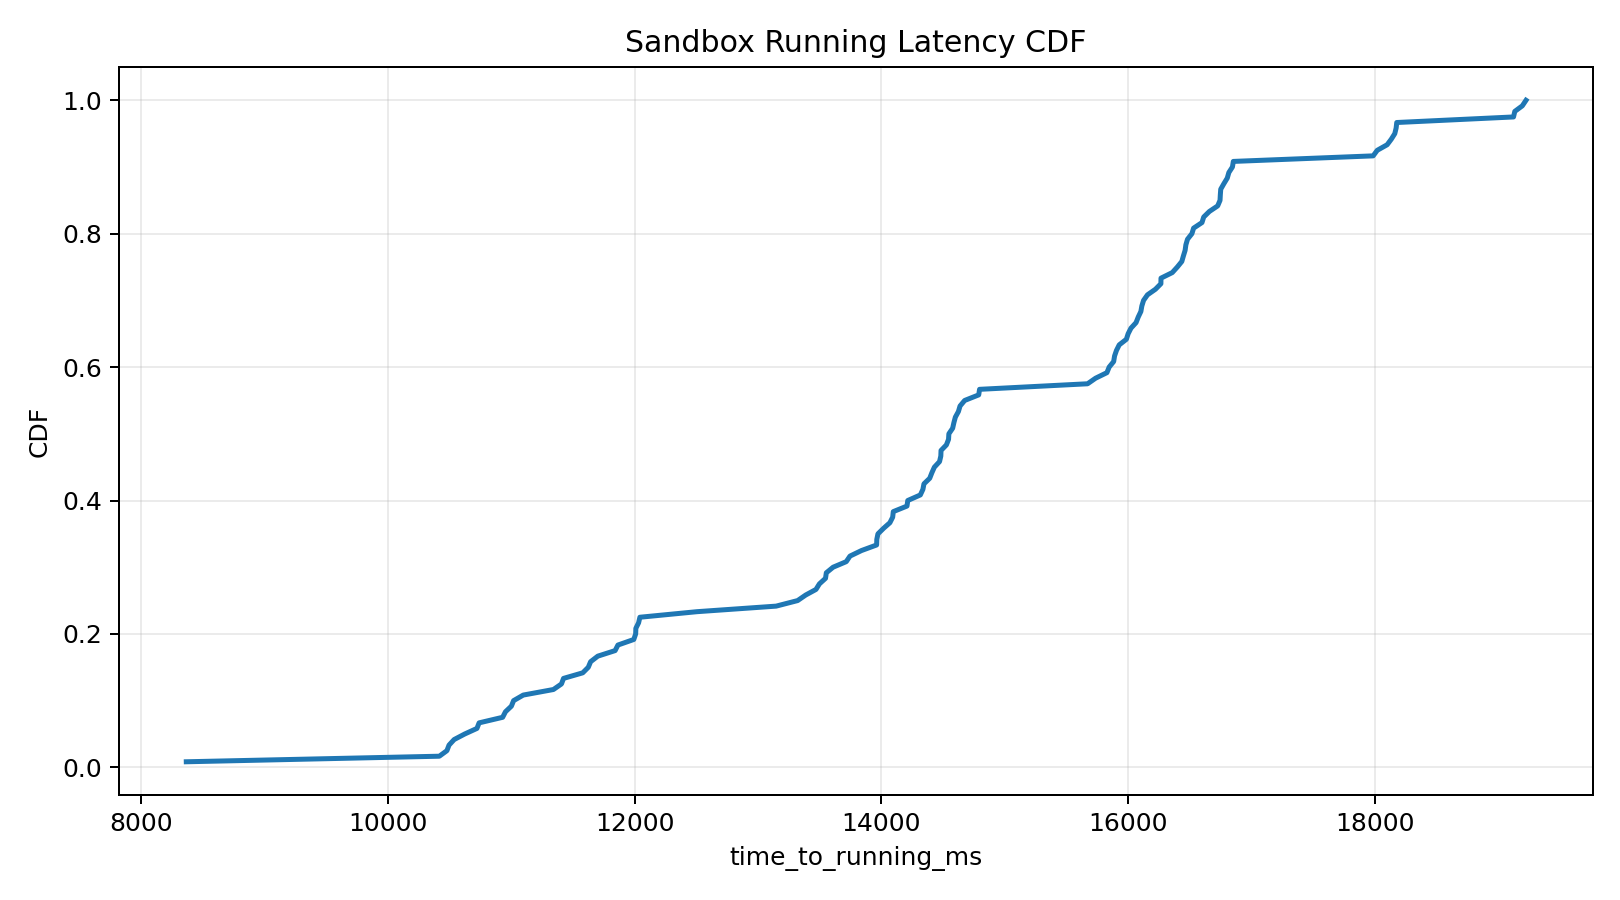
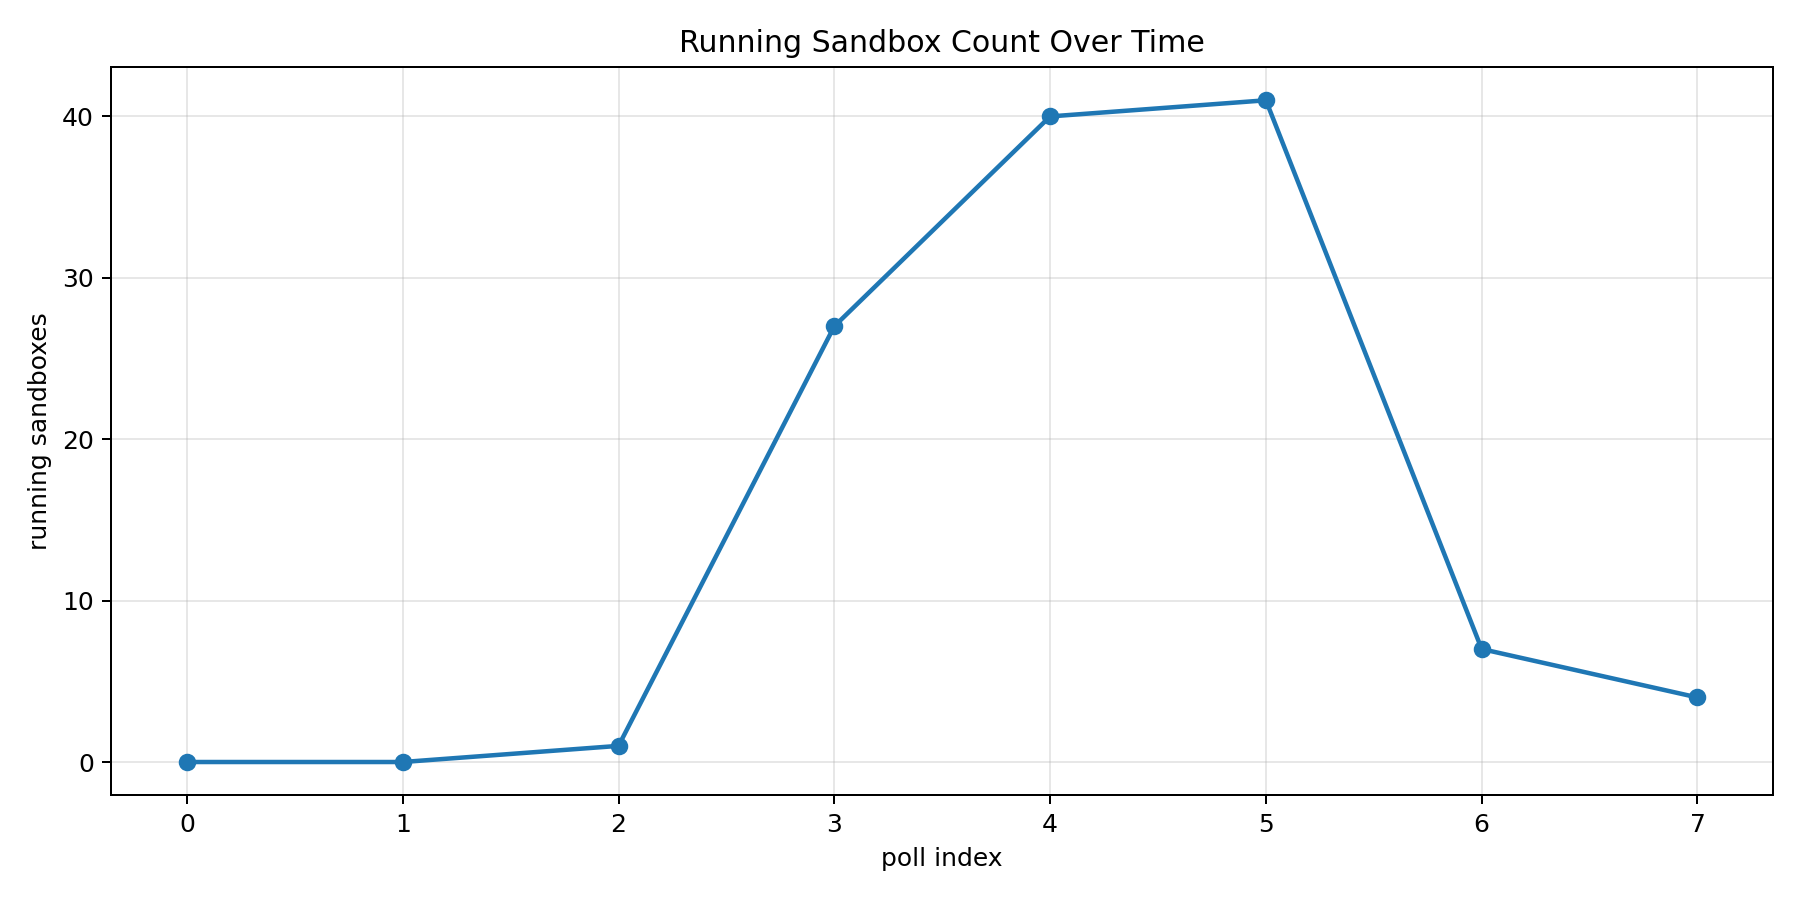
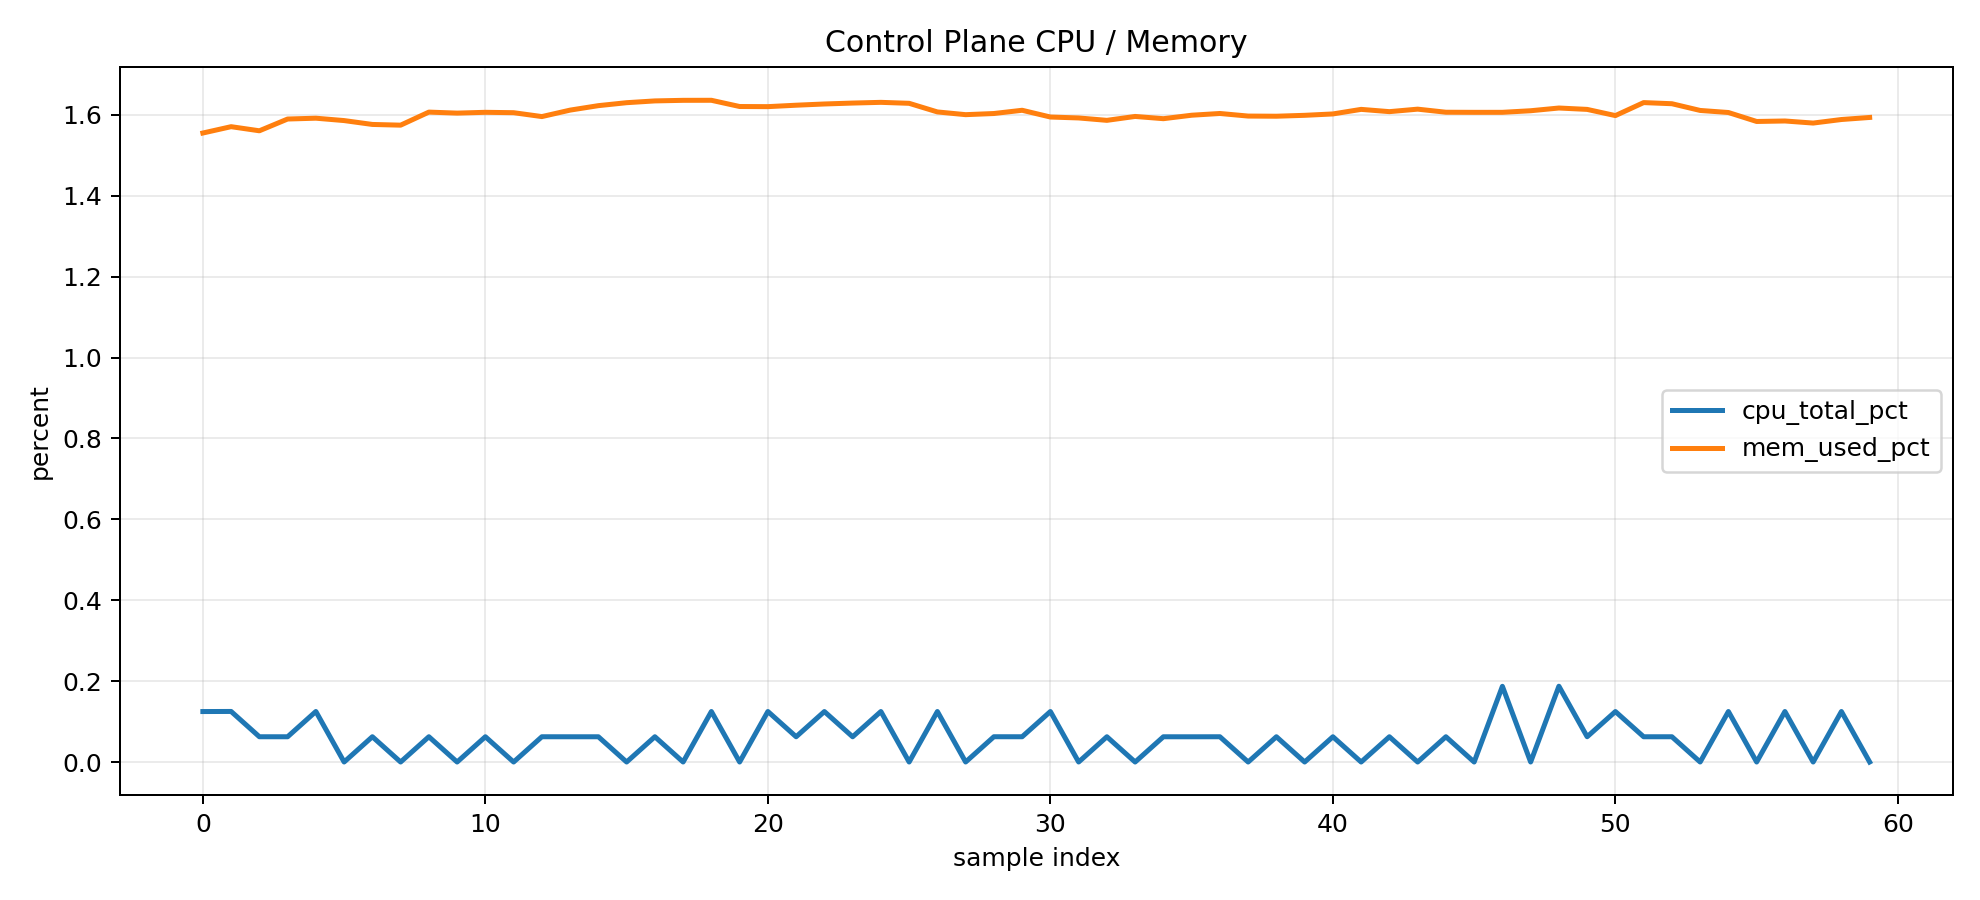
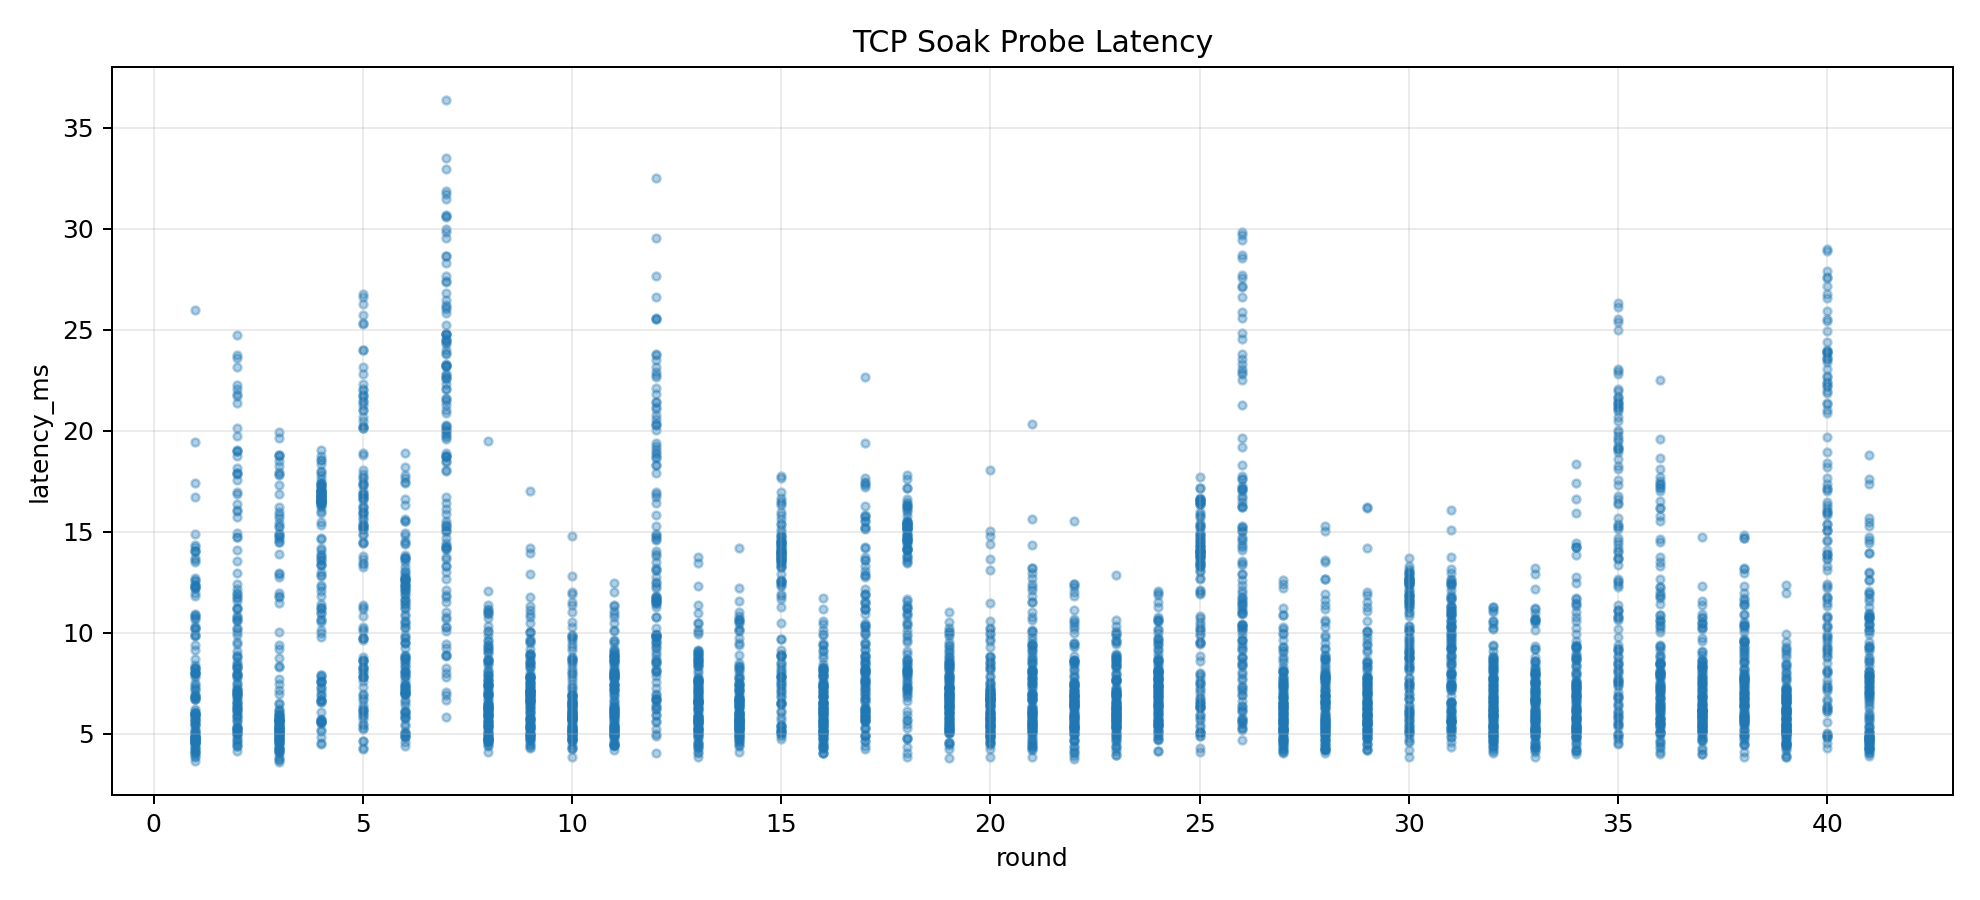
Scenario 2. stressbox CPU/Memory Isolation Validation
| Item | Value |
|---|---|
| Application behavior | Each Sandbox listens on 31337/tcp while continuously generating load with STRESS_CPU_BURNERS=1 and STRESS_ALLOC_MIB=900 |
| Creation result | 120/120 Running, 0 failures |
| 10-minute TCP soak | 4920/4920 successful, 0 failures, 100% success rate |
| Per-worker placement result | Every worker hosted 12 Sandboxes, using 12000m CPU and 12288MB memory |
| Worker CPU utilization | Host mean-of-means of approximately 74.53%, with per-host p99 peaks generally around ~76% |
| Worker memory utilization | Per-host p95 values generally ranged from 38.7% to 39.0% during steady state |
| Average Control Plane host CPU utilization | Approximately 0.11% |
| Metric | mean | median | p95 | p99 | max |
|---|---|---|---|---|---|
create_http_ms |
1101.485 |
1205.113 |
1800.048 |
1878.291 |
1927.224 |
time_to_scheduled_ms |
7940.786 |
8480.855 |
12178.036 |
12495.589 |
12754.145 |
time_to_running_ms |
10967.894 |
10089.630 |
15539.765 |
15710.335 |
15715.322 |
| TCP latency (10-minute soak) | 9.975 |
8.083 |
21.697 |
30.637 |
42.620 |
This scenario validates whether workloads are evenly distributed across nodes and whether external TCP connectivity remains stable for 10 minutes when running 120 applications that continuously consume CPU and memory resources.
The following graphs visualize the results of Scenario 2.
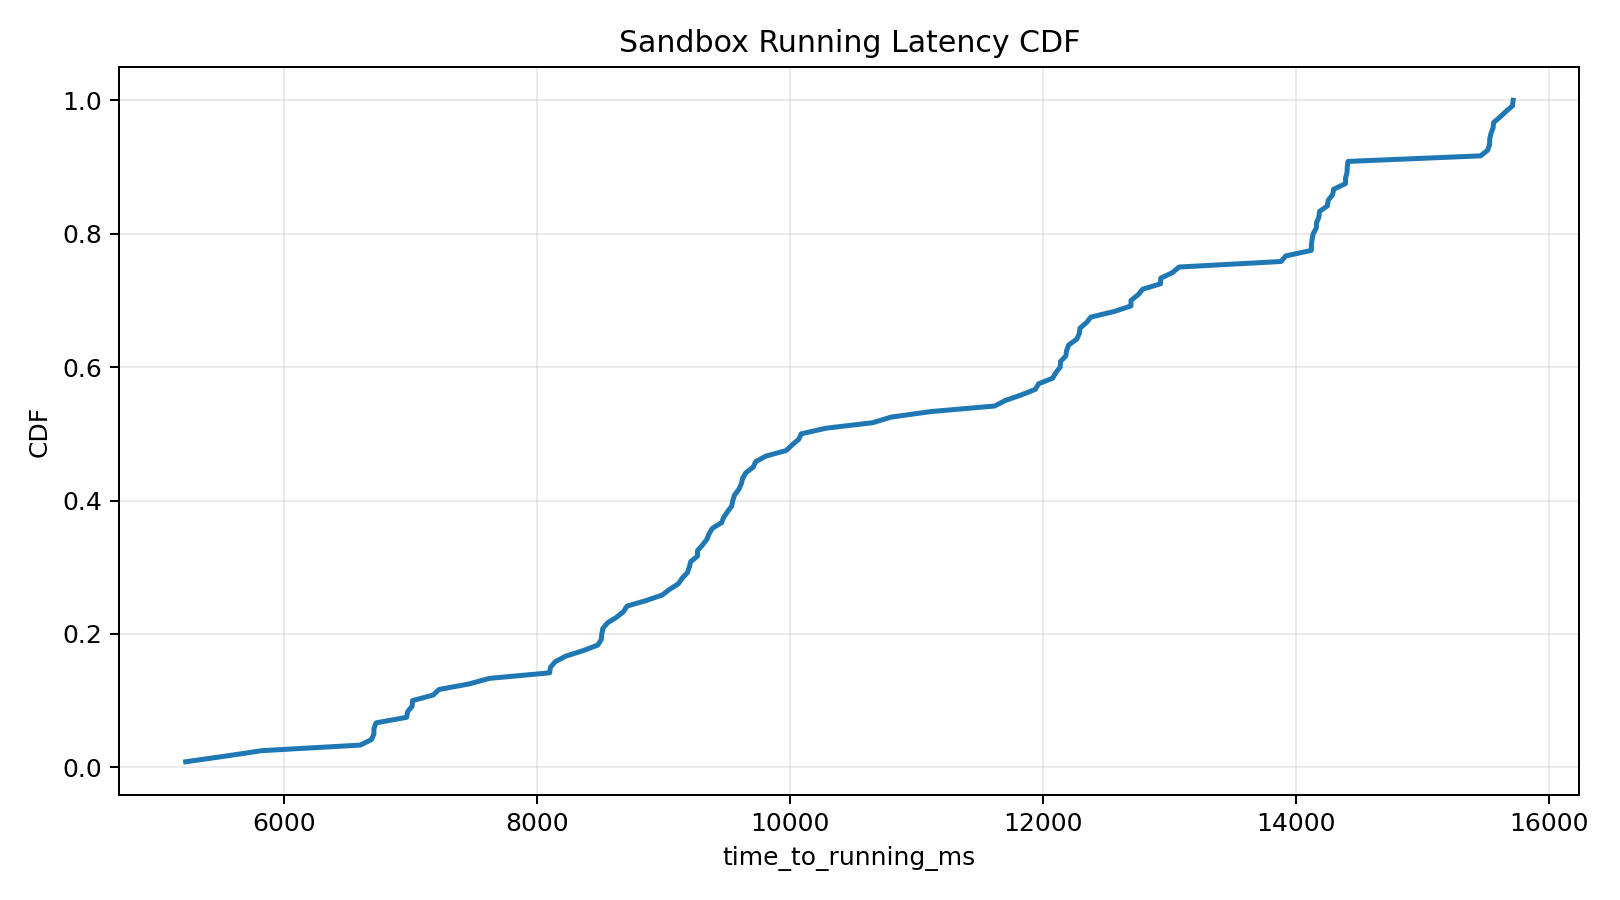
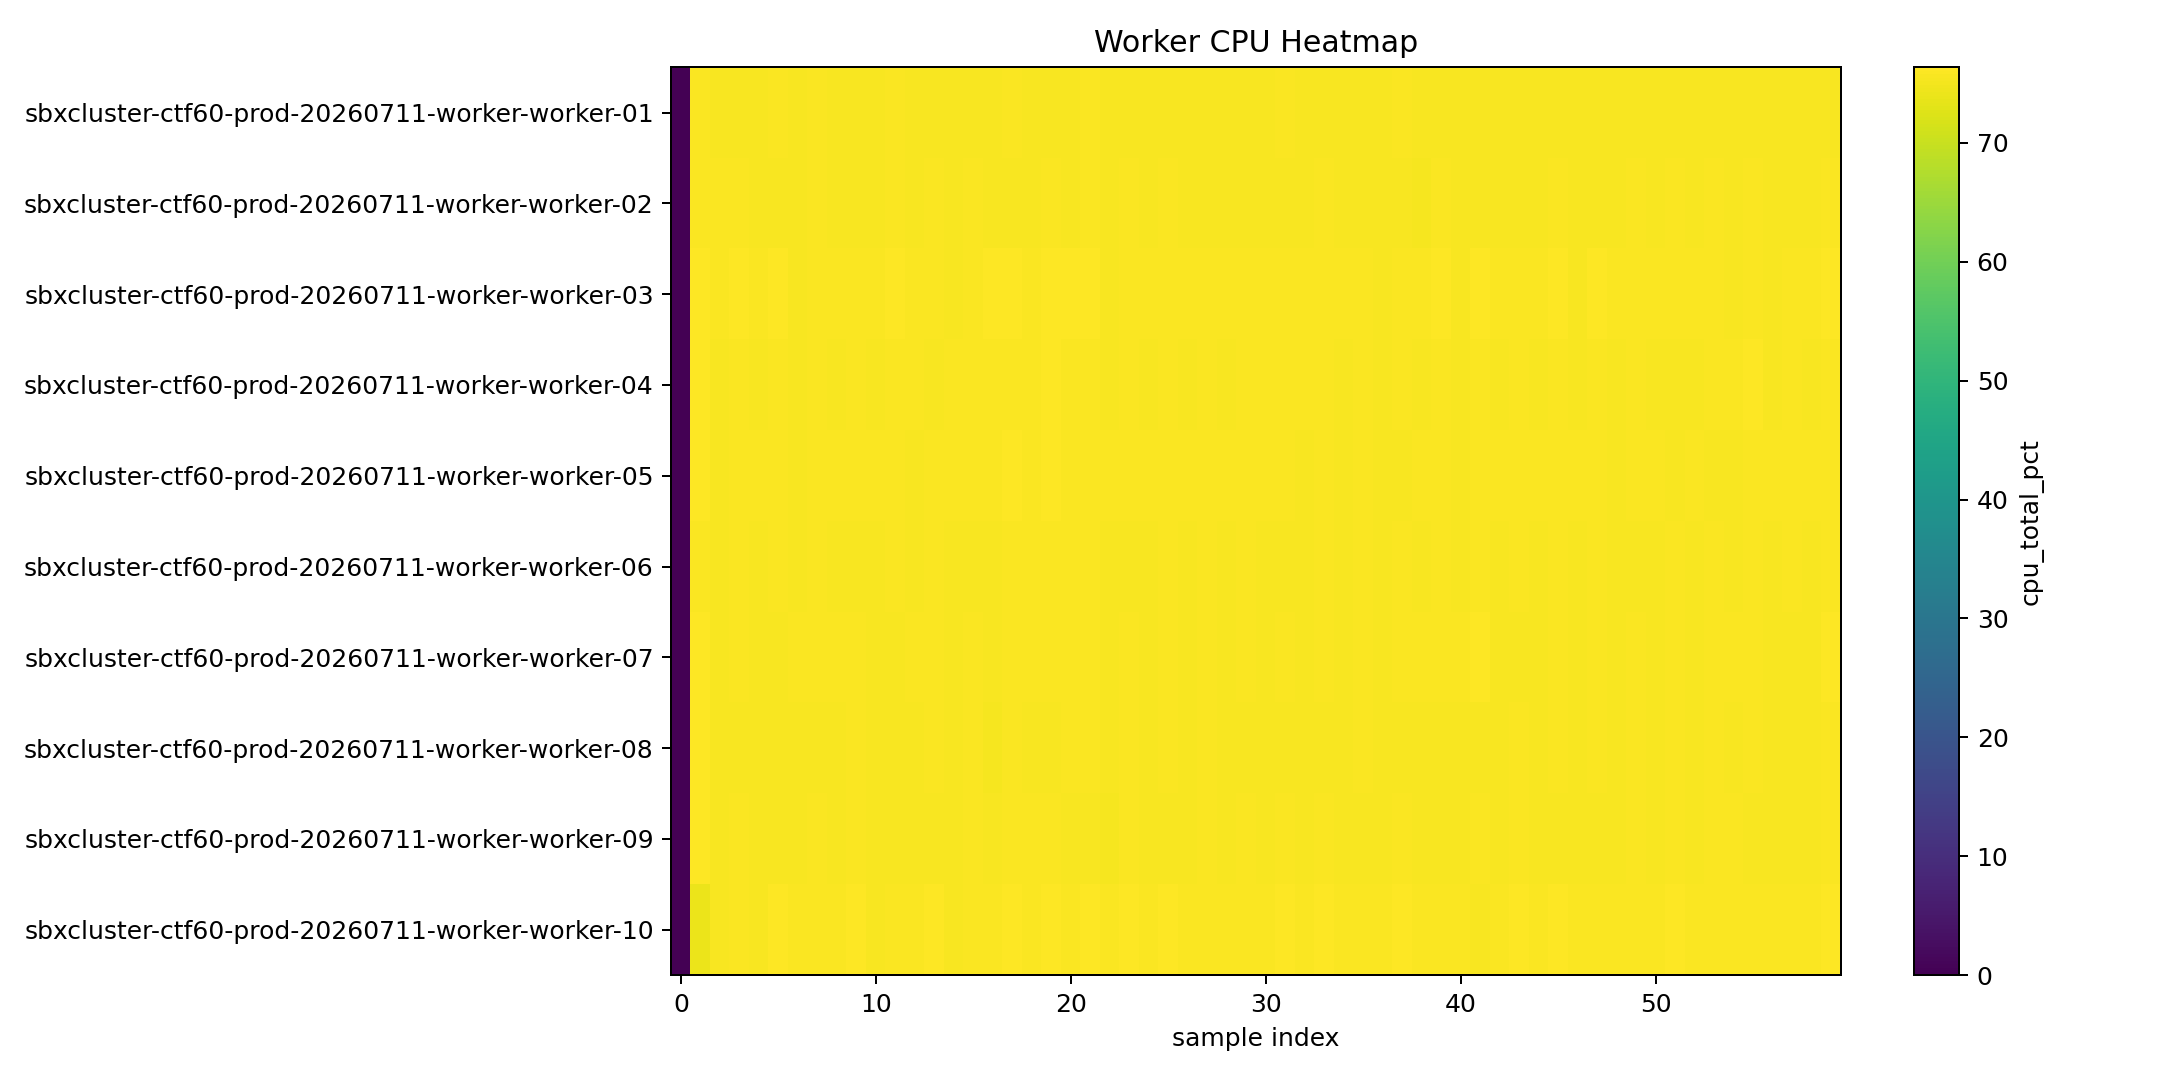
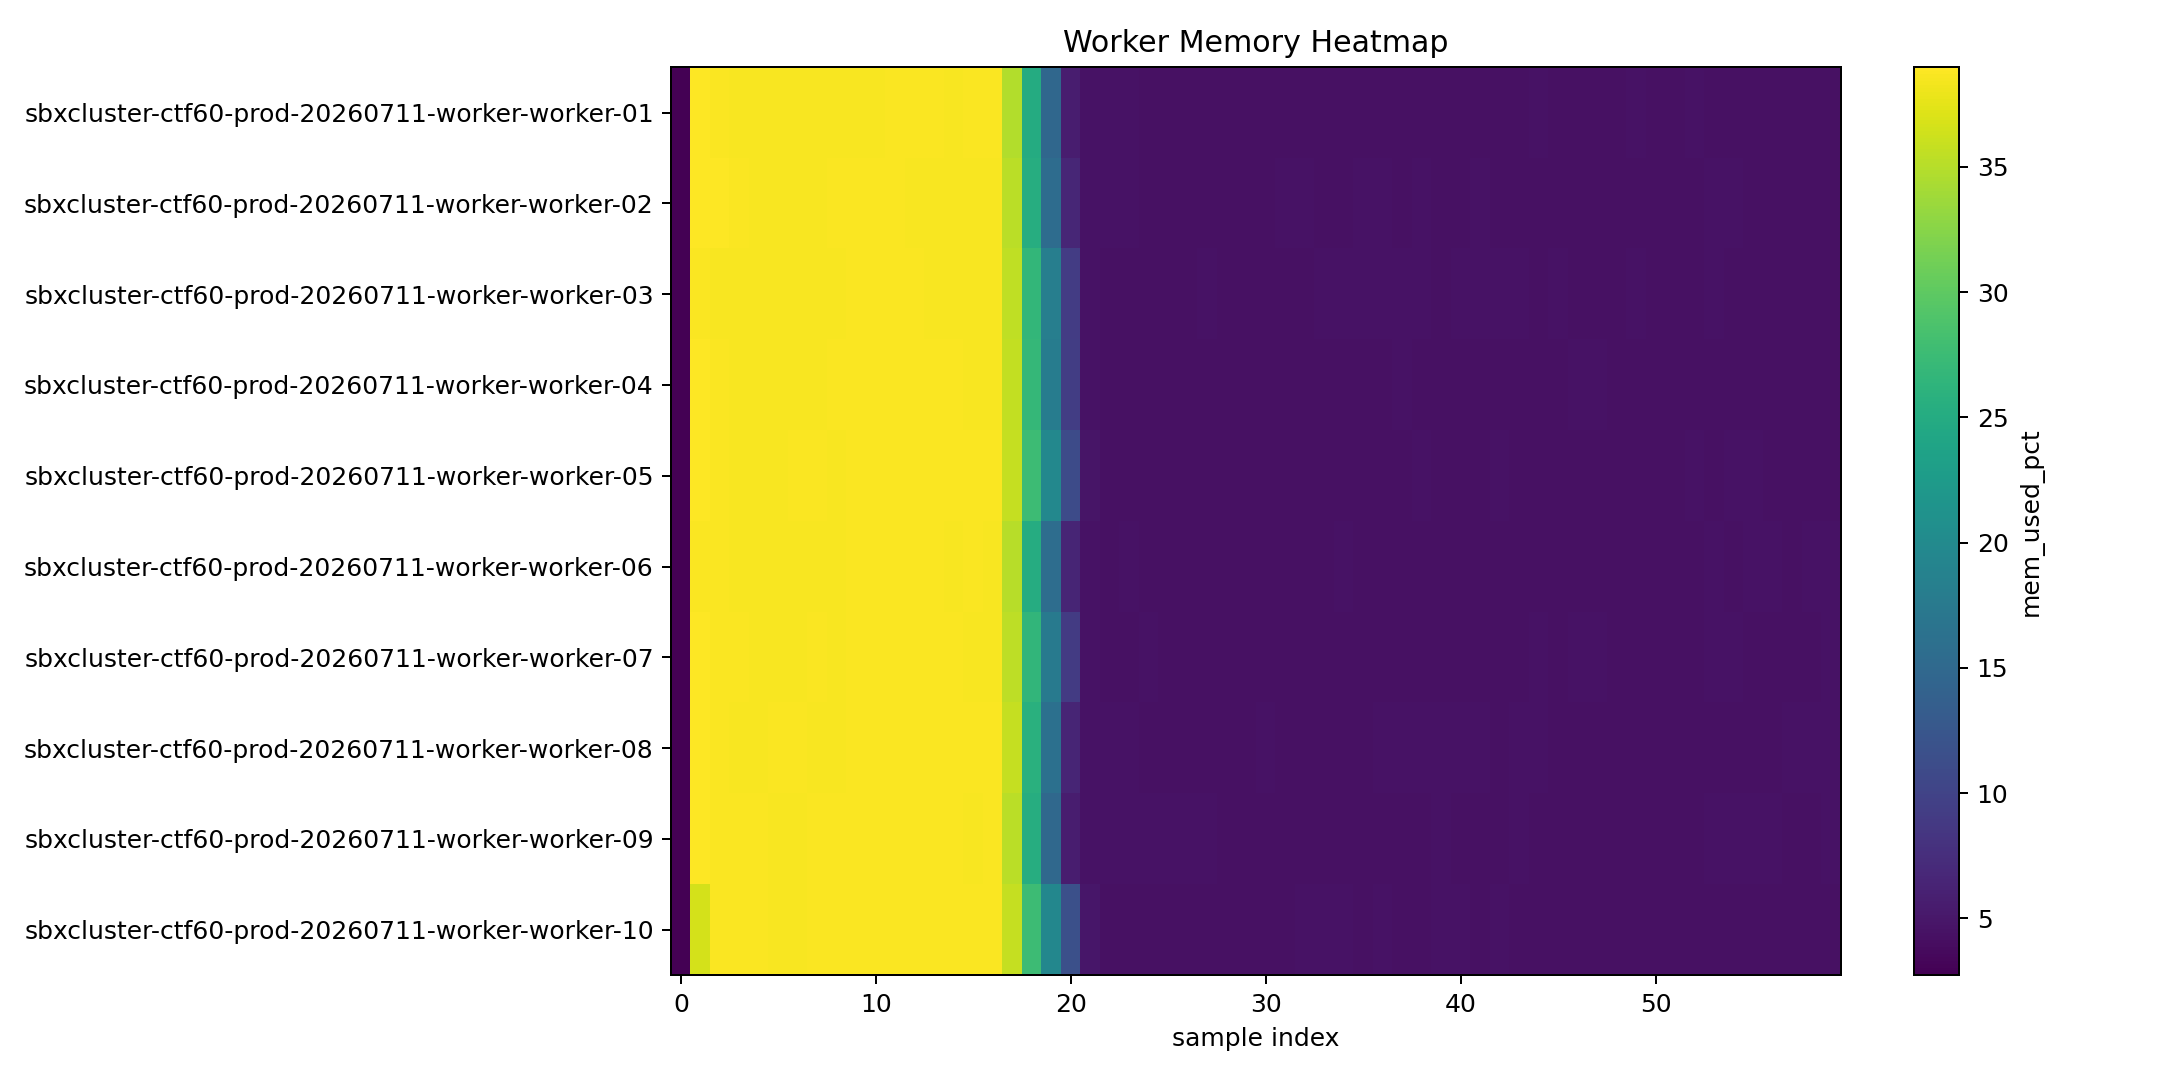
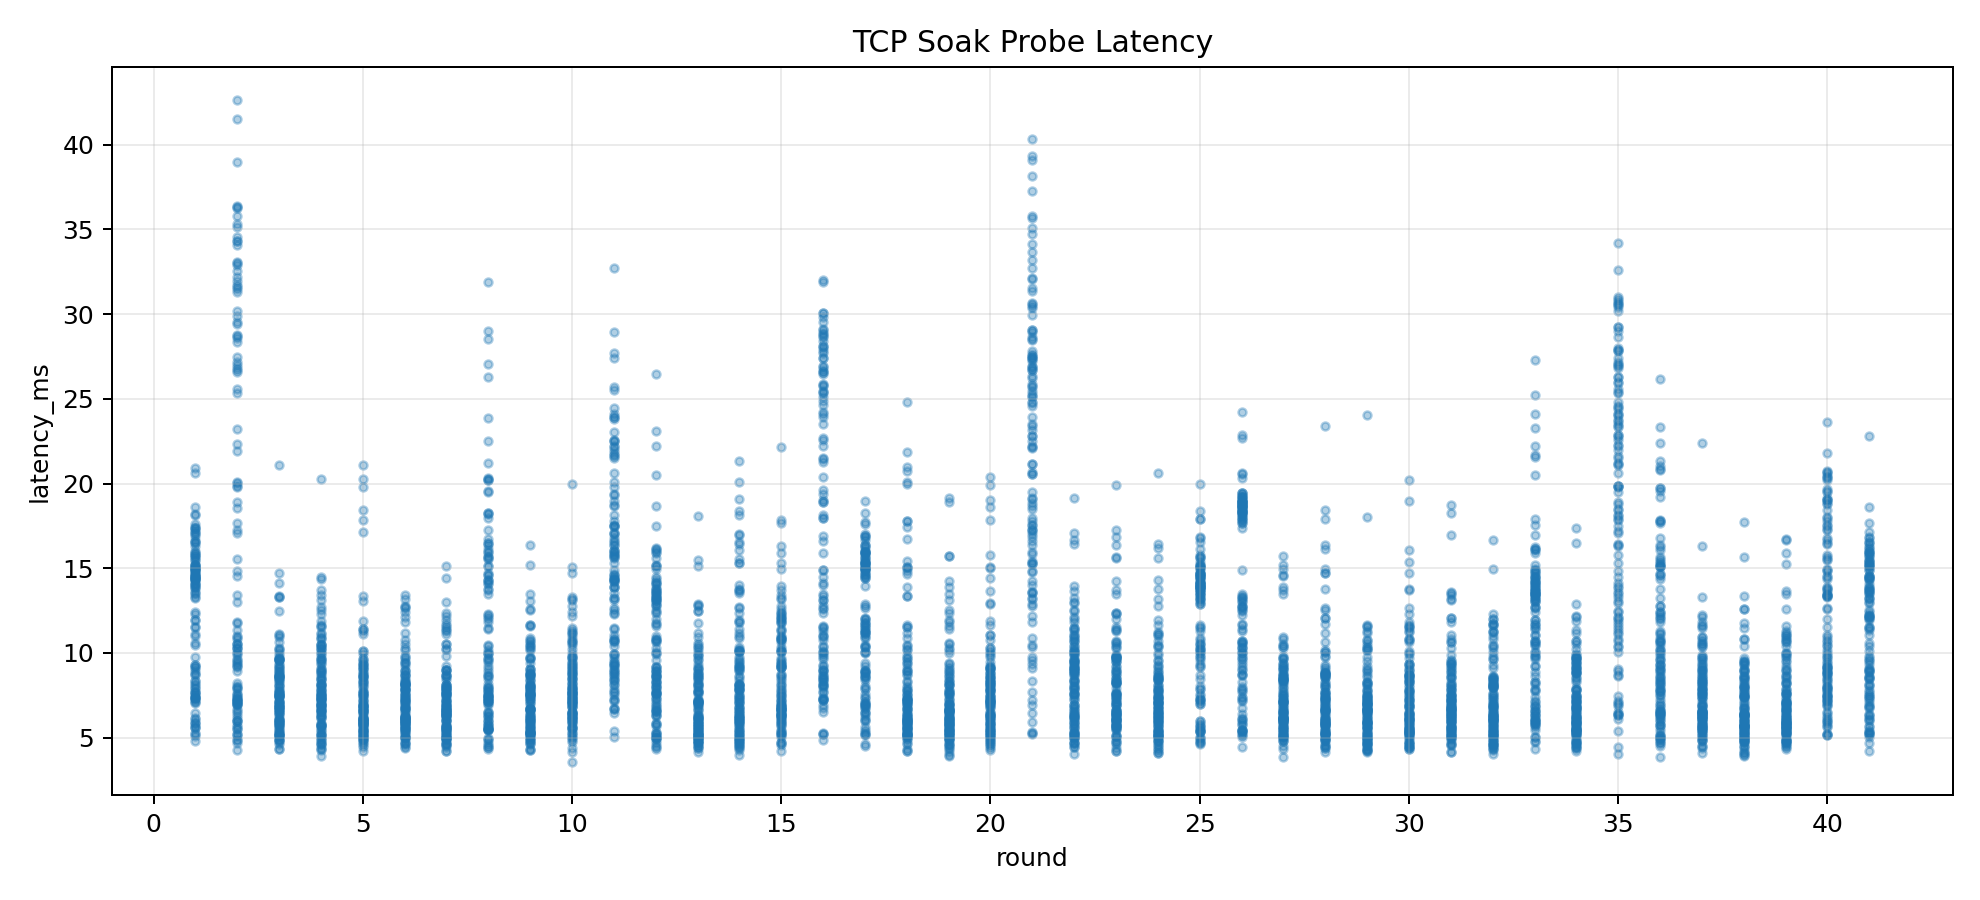
Conclusion
Overall, both scenarios completed successfully without any Sandbox failures or loss of TCP connectivity. Even under the maximum expected production load of 120 concurrent Sandboxes, Sandboxd-O maintained stable scheduling behavior, balanced worker utilization, and consistent provisioning latency, demonstrating that the platform is suitable for production-scale CTF deployments.
Extended Scale Test: 100 Teams / 200 VMs
This section repeats the same production-style validation at a larger assumed operating scale of 100 teams and 200 total Sandboxes.
| Item | Value |
|---|---|
| User scale | 100 teams, with up to 2 concurrent Sandboxes per team |
| Total concurrent Sandboxes | 200 |
| Maximum Sandbox resources | 1000m CPU, 1024Mi memory |
| Maximum required resources | 200000m=200vCPU, 204800Mi=200GiB memory |
| Control Plane | 1x m7i.4xlarge |
| Workers | 15x c7i.4xlarge |
| Control Plane configuration | create_rps=320, create_burst=400, status_sync_interval=2s, status_sync_batch_size=400, status_sync_max_parallel=32 |
| Validation method | Created 200 Sandboxes almost simultaneously, then performed TCP probes against all targets every 15 seconds for 10 minutes (600 seconds) |
| Estimated production EC2 cost | Approximately $39.26 for a 3-hour cluster occupancy assumption |
[!NOTE]
The initial plan was to use
16x c7i.4xlarge, but the AWS account hit a256 vCPUon-demand quota. The final topology used15x c7i.4xlarge, which still provided216 vCPUof allocatable worker CPU and was sufficient for the 200-Sandbox test.
Scenario 1. profile_migration Image at 200 Sandboxes
| Item | Value |
|---|---|
| Creation result | 200/200 Running, 0 failures |
| Final 10-minute TCP soak | 8200/8200 successful, 0 failures, 100% success rate |
| Average Worker host CPU utilization | Approximately 0.68% |
| Average Control Plane host CPU utilization | Approximately 0.13% |
| Placement distribution | 5 workers with 14 Sandboxes each, 10 workers with 13 Sandboxes each |
| Metric | mean | median | p95 | p99 | max |
|---|---|---|---|---|---|
create_http_ms |
1424.160 |
1567.780 |
2226.187 |
2633.453 |
2741.399 |
time_to_scheduled_ms |
11870.112 |
11347.198 |
19011.432 |
19367.964 |
19457.729 |
time_to_running_ms |
18304.090 |
18411.368 |
23084.530 |
24910.987 |
24954.544 |
| TCP latency (10-minute soak) | 13.097 |
8.277 |
29.230 |
35.178 |
1015.595 |
[!NOTE]
The first 10-minute soak run observed two transient
2sTCP probe timeouts on a single worker. A second 10-minute steady-state soak against the same 200 running Sandboxes then completed with8200/8200successful probes, and the table above uses that final recheck result.
This scenario verifies that Sandboxd-O can still accept, schedule, and stabilize 200 concurrent challenge instances when the workload itself is not CPU-heavy.
The following graphs visualize the results of the 200-Sandbox run for Scenario 1.
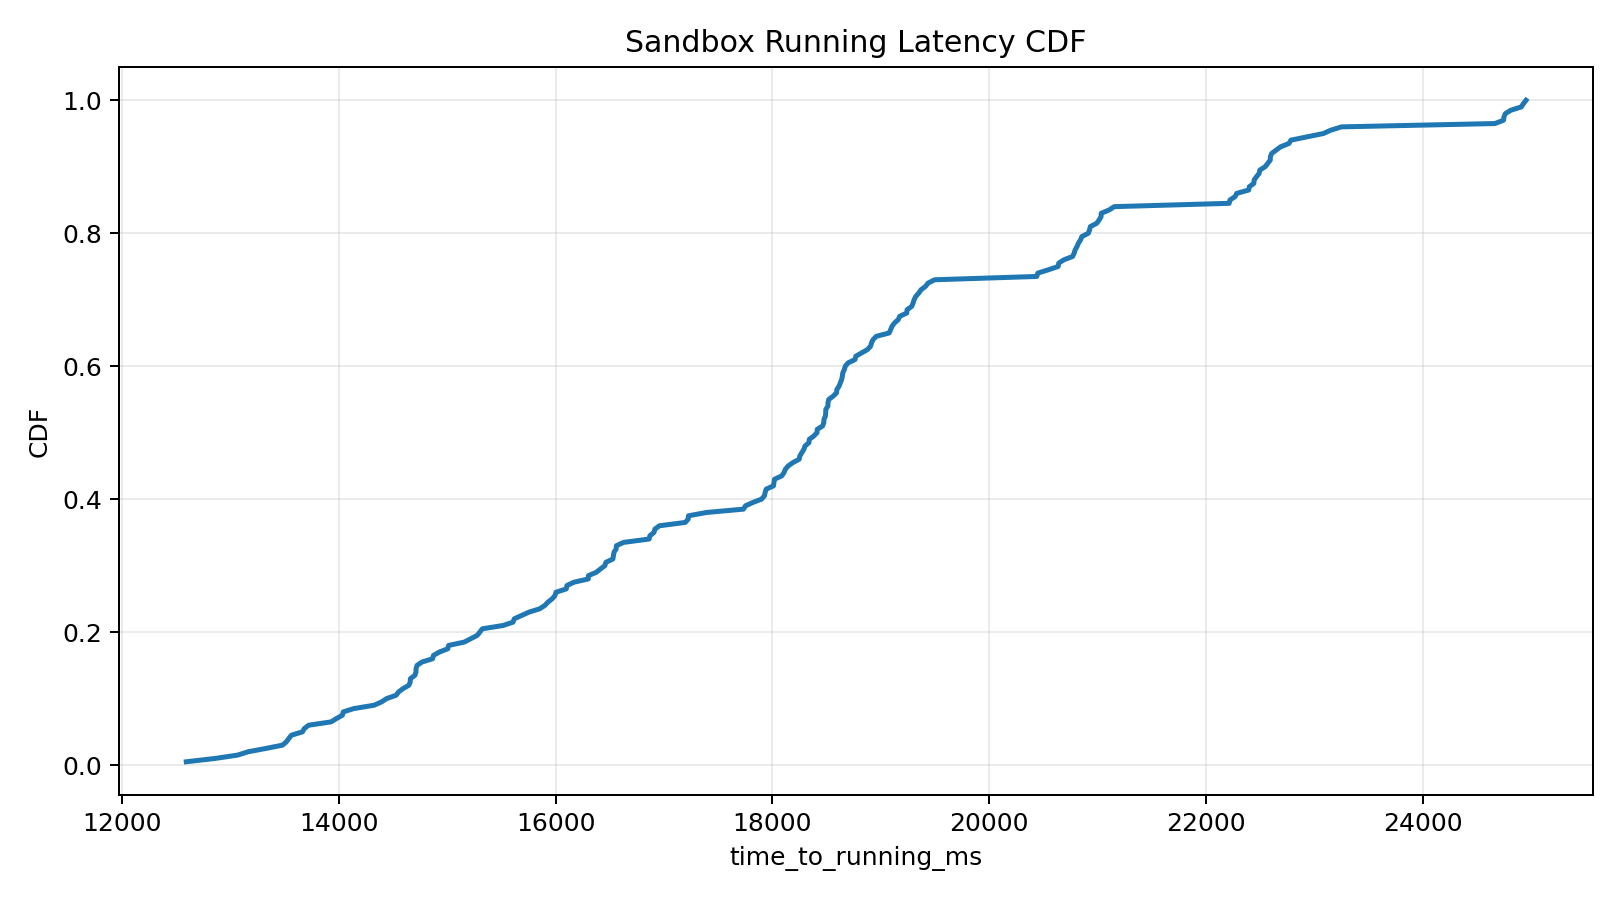
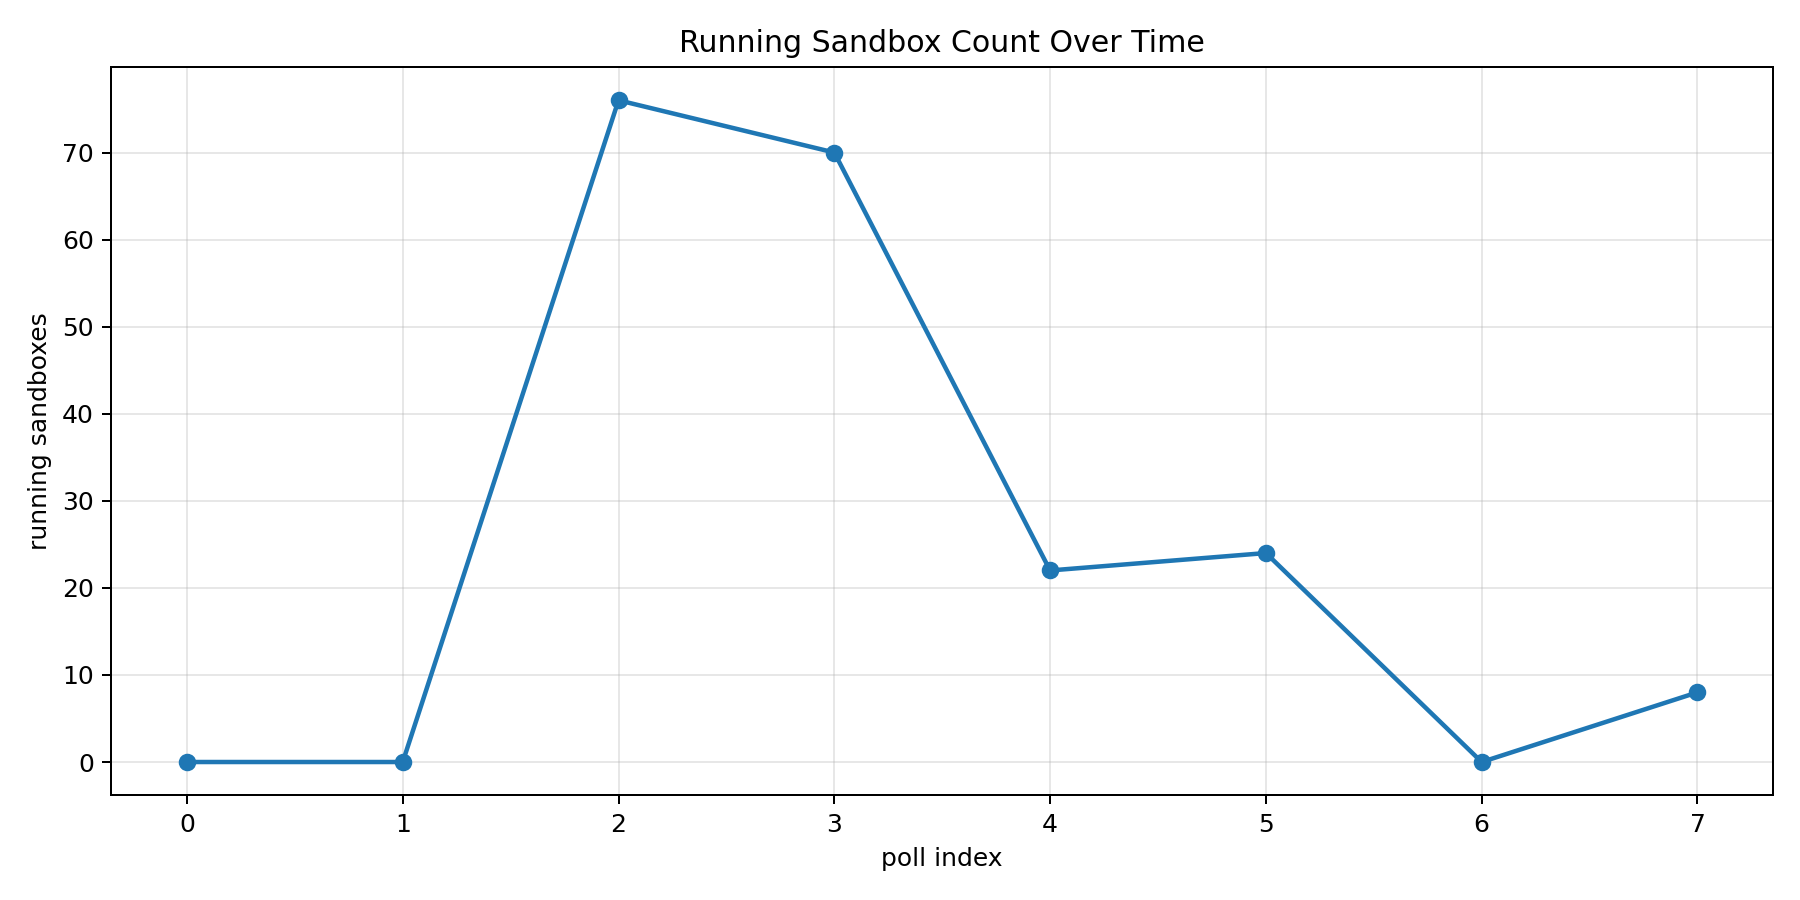
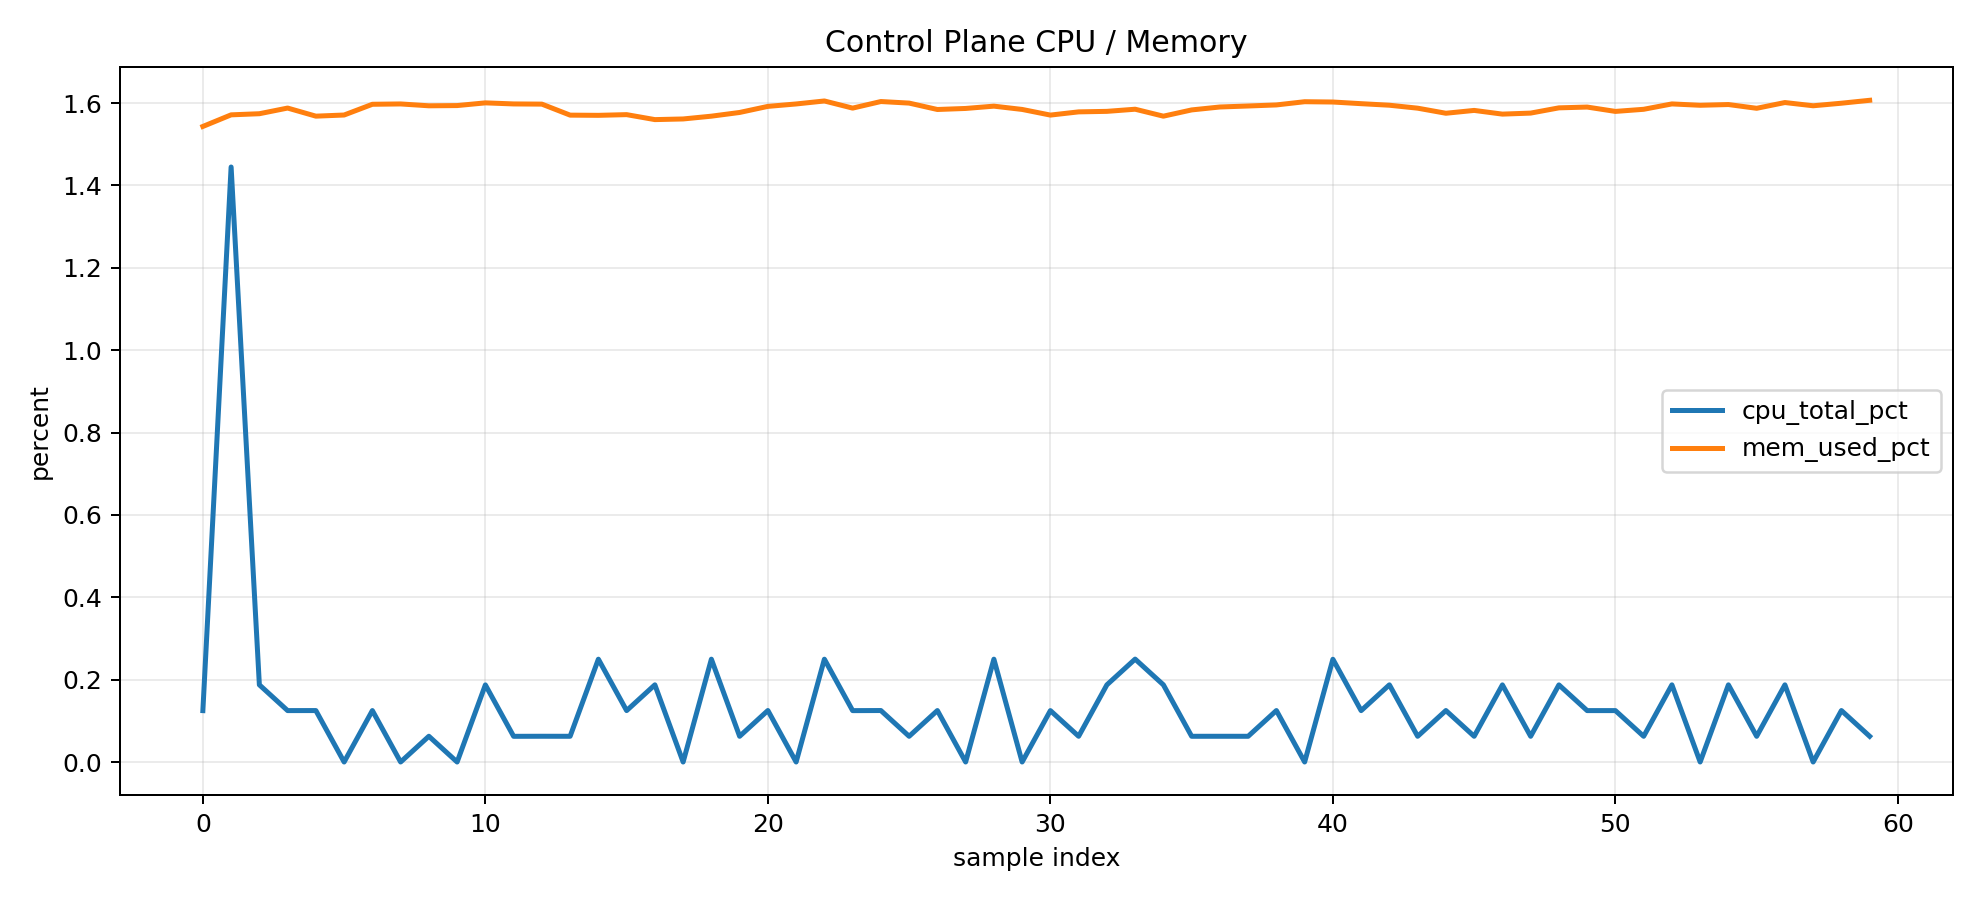
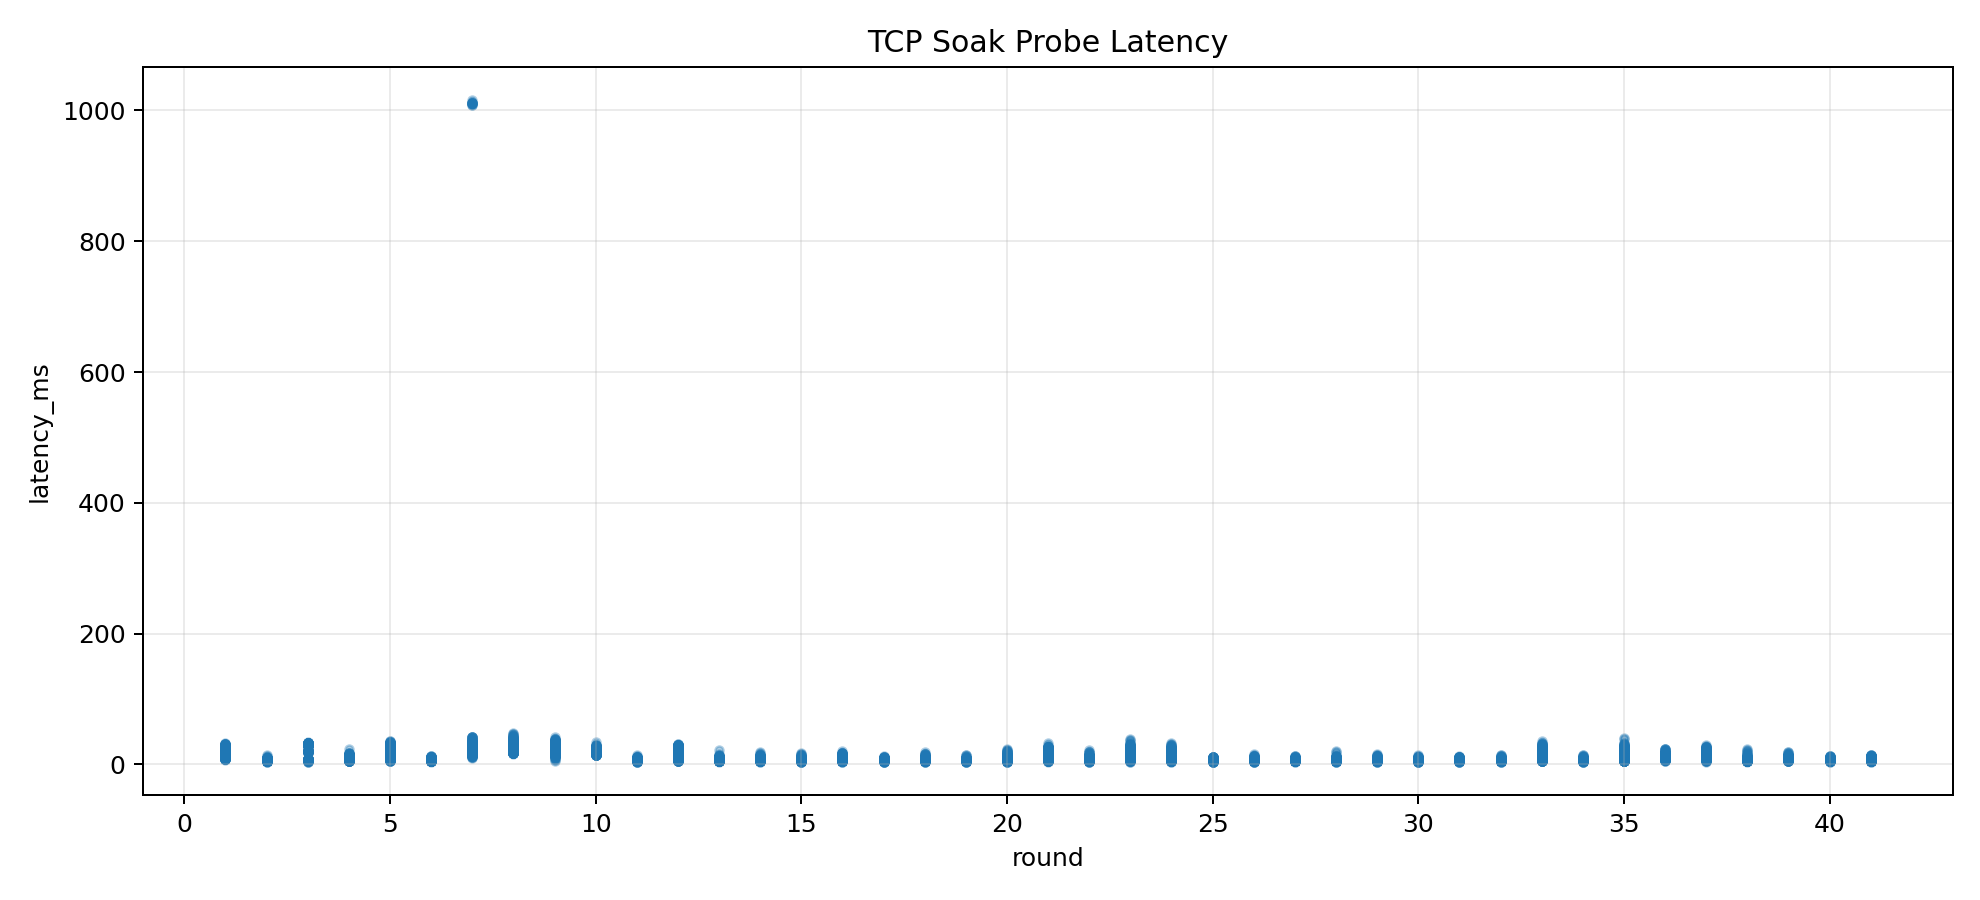
Scenario 2. stressbox CPU/Memory Isolation at 200 Sandboxes
| Item | Value |
|---|---|
| Application behavior | Each Sandbox listens on 31337/tcp while continuously generating load with STRESS_CPU_BURNERS=1 and STRESS_ALLOC_MIB=900 |
| Creation result | 200/200 Running, 0 failures |
| 10-minute TCP soak | 8200/8200 successful, 0 failures, 100% success rate |
| Placement distribution | 5 workers with 14 Sandboxes each, 10 workers with 13 Sandboxes each |
| Worker CPU utilization | Host mean-of-means of approximately 81.87% |
| Worker memory utilization | Host mean-of-means of approximately 16.16%; per-host p95 was about 41.7% for 13-Sandbox workers and 44.7% for 14-Sandbox workers |
| Average Control Plane host CPU utilization | Approximately 0.11% |
| Metric | mean | median | p95 | p99 | max |
|---|---|---|---|---|---|
create_http_ms |
1546.083 |
1553.294 |
2581.768 |
2710.133 |
2874.608 |
time_to_scheduled_ms |
12738.641 |
13785.120 |
19407.396 |
19721.066 |
19860.031 |
time_to_running_ms |
15550.673 |
15538.076 |
21300.438 |
22415.681 |
23453.155 |
| TCP latency (10-minute soak) | 12.490 |
9.871 |
29.407 |
41.736 |
89.340 |
This scenario validates whether Sandboxd-O can keep 200 continuously CPU- and memory-consuming Sandboxes evenly distributed across workers while preserving external TCP reachability for the full 10-minute soak period.
The following graphs visualize the results of the 200-Sandbox run for Scenario 2.
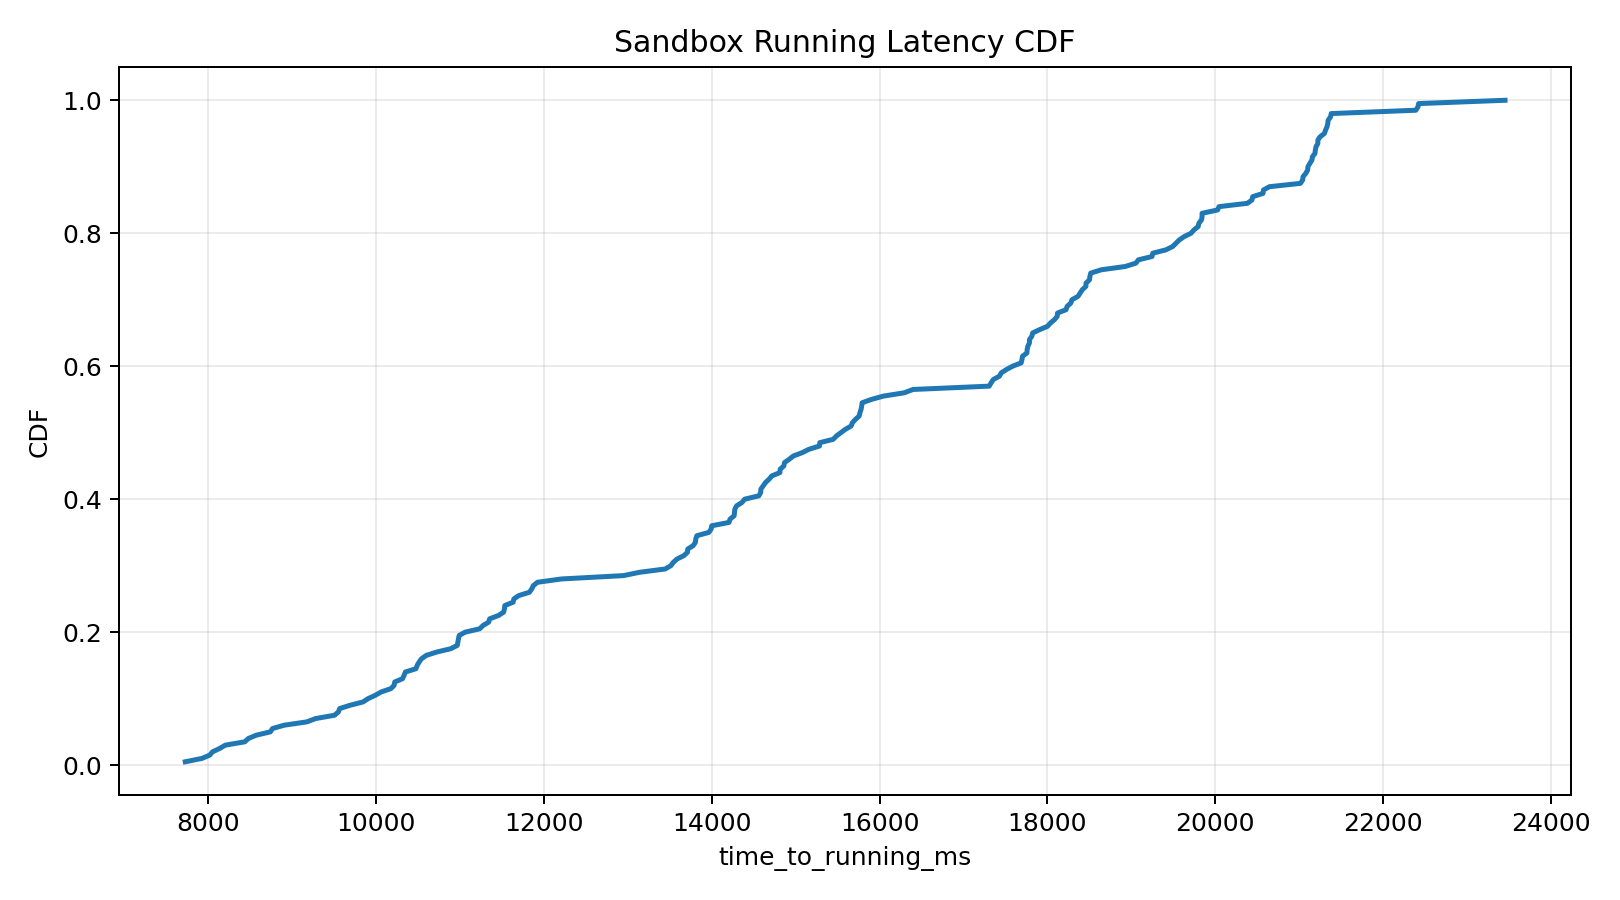
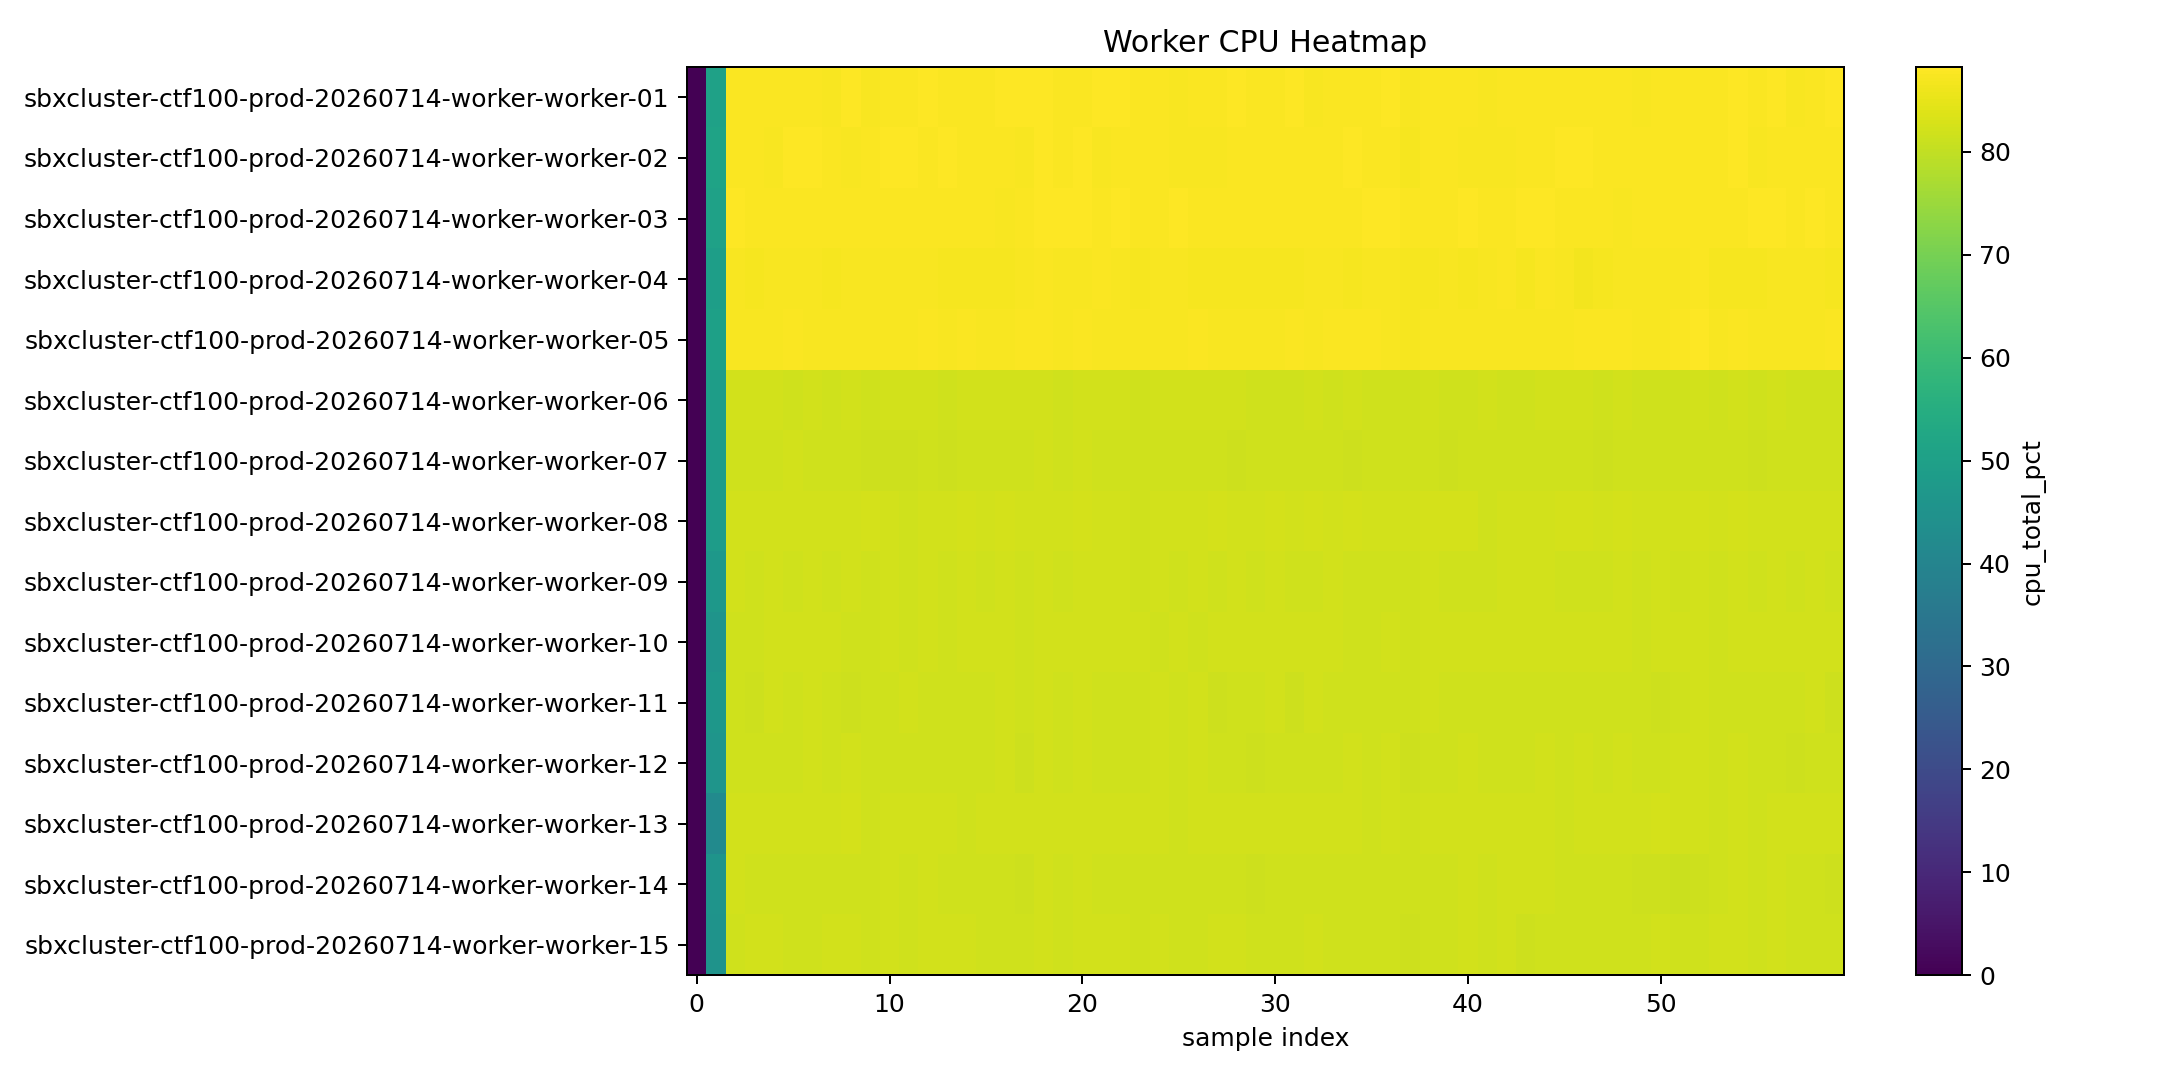
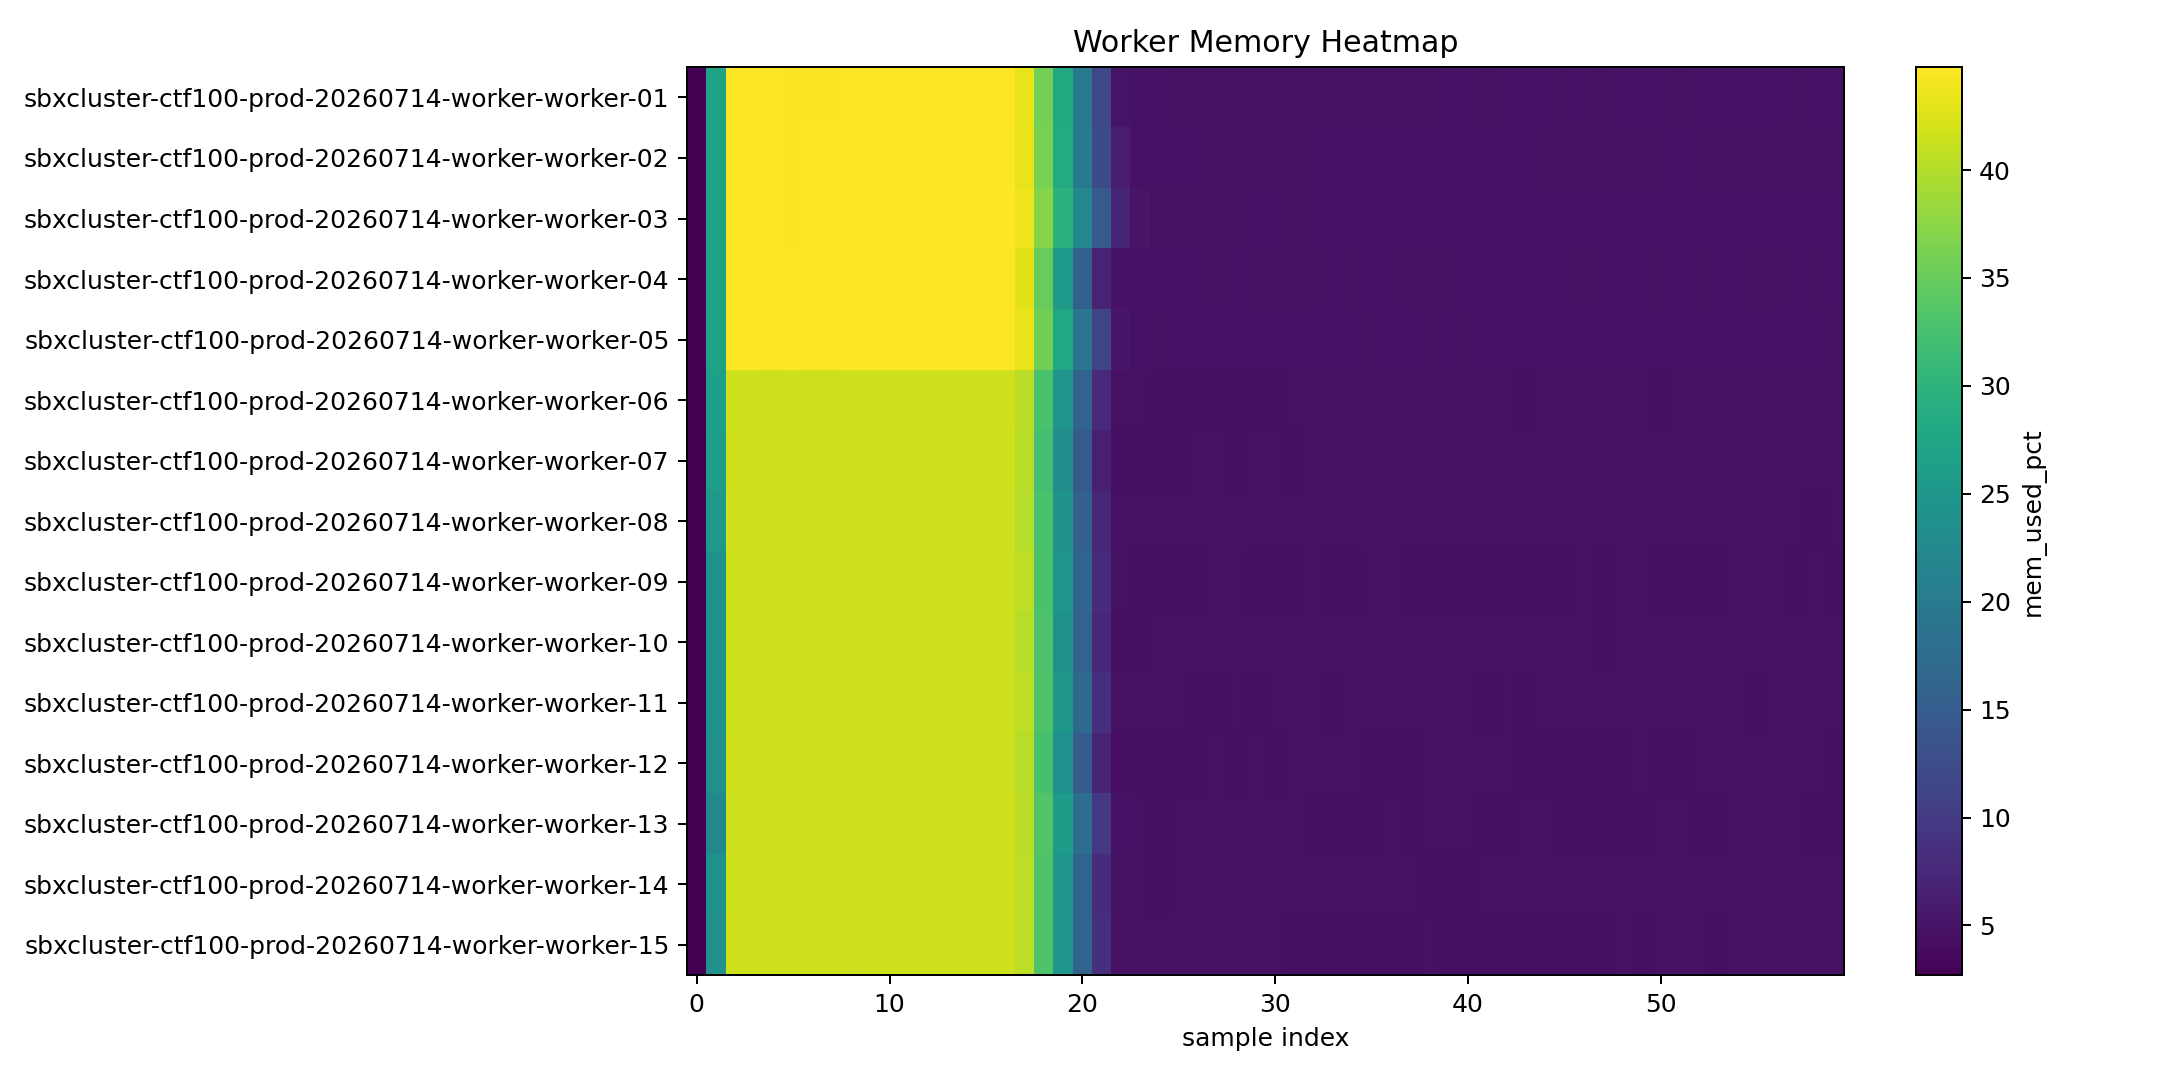
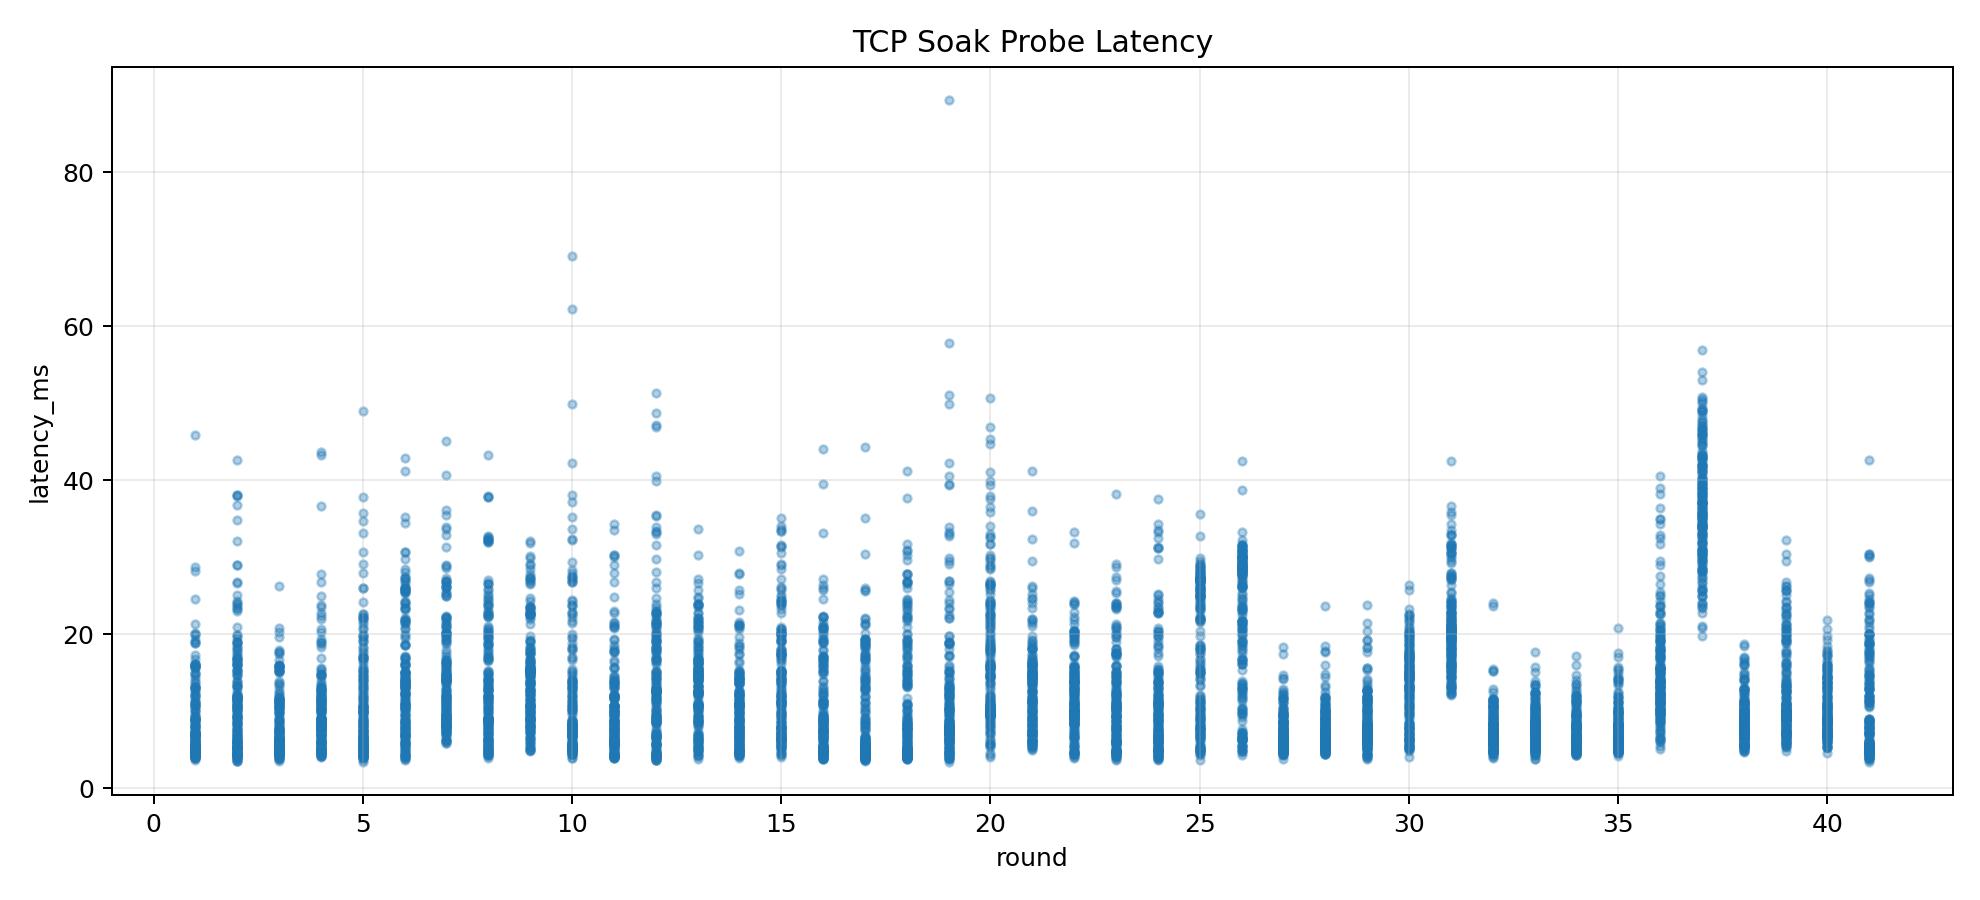
Extended Scale Conclusion
At the 100-team / 200-VM scale, Sandboxd-O still completed both scenarios successfully. Even under quota-constrained worker sizing (15x c7i.4xlarge), the platform sustained full creation success, balanced placement across workers, and stable TCP reachability throughout the final 10-minute soak checks. The stress workload scenario in particular showed that the system remained operational with worker CPU utilization in the low-to-mid 80% range while keeping all 200 Sandboxes available.
Appendix B. Infrastructure Cost Comparison (vs K8s)
In this section, we use one real-world use case to compare infrastructure costs between replacing container-provisioner-k8s with Sandboxd-O in SMCTF and its associated infrastructure.
SMCTF is a CTF platform where container-provisioner-k8s was originally used to provision VM (Stack) containers on top of a Kubernetes cluster.
However, this introduced unnecessary Kubernetes complexity, operational overhead, and overengineering. In practice, Kubernetes-level functionality was not actually required, and its networking model did not align well with the intended sandbox architecture. (Sandboxes neither needed to communicate with one another nor should have been allowed to.)
For this reason, Sandboxd-O was developed and adopted as a replacement for container-provisioner-k8s, and the SMCTF infrastructure was redesigned accordingly.
More details can be found in the repositories below:
- smctf
- smctf-infra-v2 (and the previous smctf-infra based on container-provisioner-k8s)
The example below demonstrates how infrastructure costs changed after the migration (that is, comparing smctf-infra and smctf-infra-v2).
[!NOTE]
The example assumes:
- MAU: 10,000 users
- AWS region: Seoul (
ap-northeast-2)- Costs are approximate and may not be exact.
Shared infrastructure costs excluded from both environments:
- RDS
- ElastiCache
- S3
- ECR
- CloudWatch
- Data transfer / Internet egress charges
The following hourly prices are rough estimates for comparison purposes and may differ depending on discounts (SP, RI, EDP), taxes, and actual usage.
- EKS control plane:
$0.10 / hour - NAT Gateway hourly:
$0.045 / hour - ALB hourly (base):
$0.0225 / hour - ALB LCU:
$0.008 / LCU-hour(example assumption) - EC2
t3a.medium(ap-northeast-2):$0.0468 / hour - Fargate (Linux/x86): since exact Seoul pricing should be taken from the console or calculator, this report uses conservative estimates
vCPU-hour ~= $0.050GB-hour ~= $0.0055
Traffic and capacity assumptions:
- Low average load with peak increases during certain periods
- Average backend demand equivalent to 1–2 running tasks
- Peaks reaching 3–4 running tasks
v1 (K8s / EKS)
- Backend nodes:
t3a.medium ×2(always running) - Stack nodes:
t3a.medium ×2(minimum reserved headroom) - Total: 4 EC2 instances + EKS control plane
v2 (Sandboxd-O)
- Sandbox workers:
t3a.medium ×2(always running) - Sandbox control plane:
t3a.medium ×1(always running) - Backend: Fargate tasks (
1 vCPU / 2GB) with autoscaling
Cost calculation formulas:
- Monthly Cost:
- Task Hourly Cost:
Using this report’s assumptions (1 vCPU, 2GB):
Based on these assumptions:
v1 (K8s / EKS)
- EC2 (4 instances):
- EKS control plane:
- ALB (hourly + 1 LCU):
- NAT Gateway (hourly):
Total: 264.78 USD/month (~ 397,170 KRW/month)
v2 (Sandboxd-O)
- EC2 (3 instances):
- Fargate backend (average 1.2 tasks):
- ALB (hourly + 1 LCU):
- NAT Gateway (hourly):
Total: 211.06 USD/month (~ 316,590 KRW/month)
This results in an absolute reduction of 53.72 USD/month, corresponding to approximately 20.3% cost savings, showing that v2 reduces infrastructure cost compared to v1.
In particular, one major factor is that v1 incurred unnecessary fixed costs for the Kubernetes control plane, whereas in v2 the backend moved to the serverless Fargate platform with autoscaling, enabling cost optimization based on actual usage.
That said, this comparison is not exact and includes many variables such as real traffic patterns, reliability requirements, and different operational goals. Therefore, decisions should not be made based solely on cost, but should also consider overall system design, operational complexity, and whether the architecture satisfies actual requirements.
Appendix C. Reference
- swualabs/gvisor-shim-patched : This is a patched version of the gVisor shim modified to resolve issues related to cgroup resource limit enforcement. for more details, refer to commit
041e28din the corresponding fork repository or swualabs/sandboxd-o PR #11.
Appendix D. API Documentation
REST API documentation can be found in docs/orchestrator.md or docs/sandboxd.md, and Swagger documentation is available at the following endpoints:
- sbxorch API Swagger Documentation:
http://<sbxorch-address>/swagger/index.html - sbxlet API Swagger Documentation:
http://<sbxlet-address>/swagger/index.html
Appendix E. FAQ, Troubleshooting and Best Practices
Appendix F. Contribution and Contributors
| Name | GitHub | Role |
|---|---|---|
| Kim Jun Young | @yulmwu | Author, Maintainer |
| BYTE256 | @byte16384 | Vulnerability Reporter/Researcher (#16) |
| Kang Hee chan (Yeonba0918) | @Yeonba0918 | Vulnerability Reporter/Researcher (#21, #22, #23) |
Appendix G. MIT License
Copyright (c) 2026 The Swua Labs Authors, Kim Jun Young as @yulmwu

Permission is hereby granted, free of charge, to any person obtaining a copy of this software and associated documentation files (the “Software”), to deal in the Software without restriction, including without limitation the rights to use, copy, modify, merge, publish, distribute, sublicense, and/or sell copies of the Software, and to permit persons to whom the Software is furnished to do so, subject to the following conditions:

The above copyright notice and this permission notice shall be included in all copies or substantial portions of the Software.

THE SOFTWARE IS PROVIDED “AS IS”, WITHOUT WARRANTY OF ANY KIND, EXPRESS OR IMPLIED, INCLUDING BUT NOT LIMITED TO THE WARRANTIES OF MERCHANTABILITY, FITNESS FOR A PARTICULAR PURPOSE AND NONINFRINGEMENT. IN NO EVENT SHALL THE AUTHORS OR COPYRIGHT HOLDERS BE LIABLE FOR ANY CLAIM, DAMAGES OR OTHER LIABILITY, WHETHER IN AN ACTION OF CONTRACT, TORT OR OTHERWISE, ARISING FROM, OUT OF OR IN CONNECTION WITH THE SOFTWARE OR THE USE OR OTHER DEALINGS IN THE SOFTWARE.